Last updated on January 18th, 2021
This tutorial contains step by step instructions on how to Map SharePoint as a Network drive in Windows Explorer. SharePoint Online is a cloud-based service offered by Microsoft, that helps companies and organizations to Sync, Store and Share files in the cloud. Assigning a SharePoint document library to a drive letter in File Explorer in Windows, will make it easier for users to access and work with shared documents on SharePoint.
How to MAP a SharePoint Site as a Network Drive in File Explorer in Windows 10.
1. Launch Internet Explorer *
* Note: You will not be able to map as a network drive the SharePoint site, by using another web browser (e.g. Chrome, Firefox or Edge).
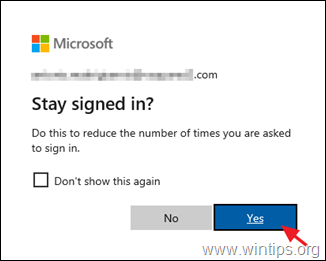
2. Login to the SharePoint site that you want to map as a network drive in File Explorer and at the last step when asked to Stay signed in?, click Yes (this is important)
3. From the Tools  menu, click Internet Options.

3. At the Security tab, highlight the Trusted sites and click Sites.
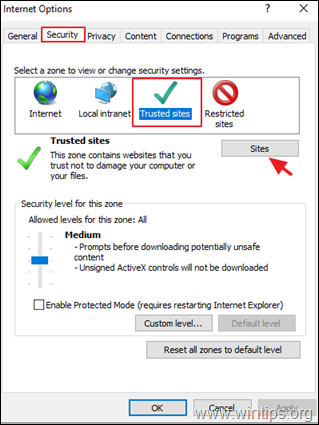
4. Click Add to add the SharePoint site to trusted sites and then click Close & OK to close the Internet options.

5. Restart Internet Explorer and navigate again to the SharePoint Site. *
* Important: If you try to map a SharePoint Library (Documents) from a Windows Server 2012 0r Server 2016, proceed and install the WebClient service on the server before you continue below.
6. Select Documents on the left pane and from the All Documents menu select View on File Explorer.
![SharePoint > View in File Explorer” src=”https://techprotips.com/wp-content/uploads/2021/01/echo/image_thumb-72.png” alt=”SharePoint Documents > View in File Explorer” width=”614″ height=”316″ border=”0″></a></p>
<div>
<div>
Advertisements
</div>
<div>
<center></p>
<p><!-- RESPONSIVE-NEW_WinTips_Post_Bottom --><br />
<ins class=]()
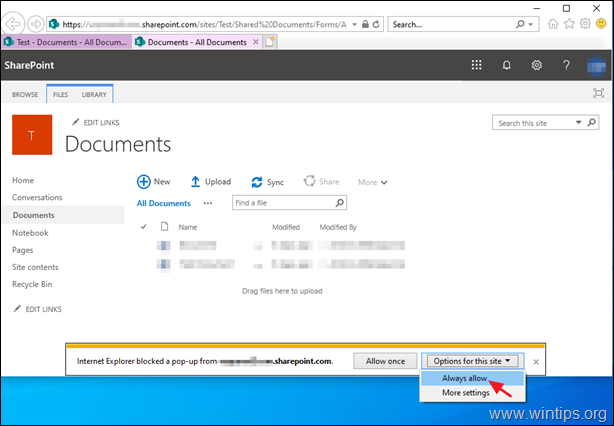
7. In the new Internet Explorer window select Options for this site -> Always allow at the security notification that says “Internet Explorer blocked a pop-up from…%your SharePoint site%”
8. After that, a new File Explorer window will open with the Share Point’s path displayed on the address bar.
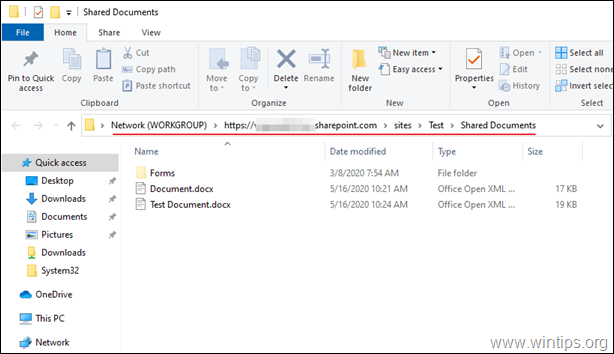
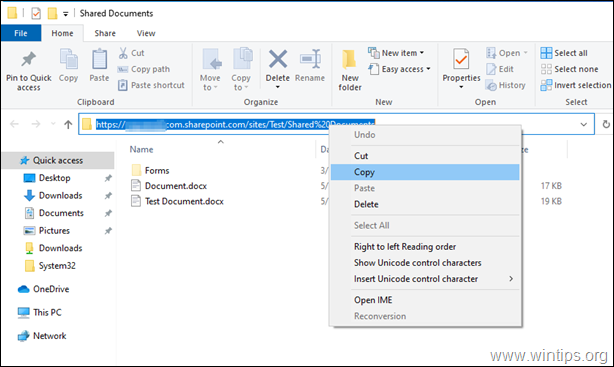
9. Highlight the displayed address and right-click -> Copy the displayed address.
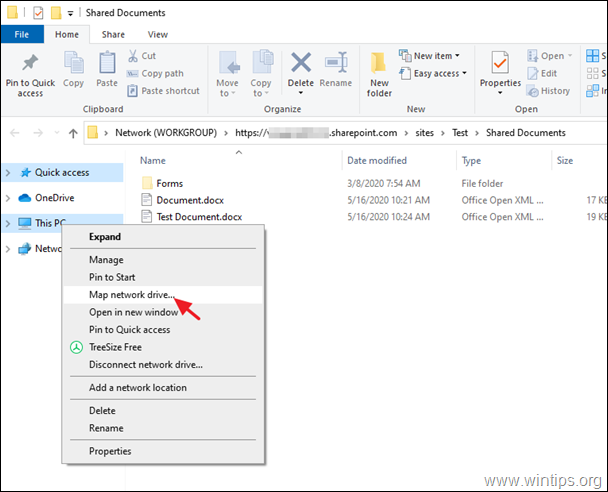
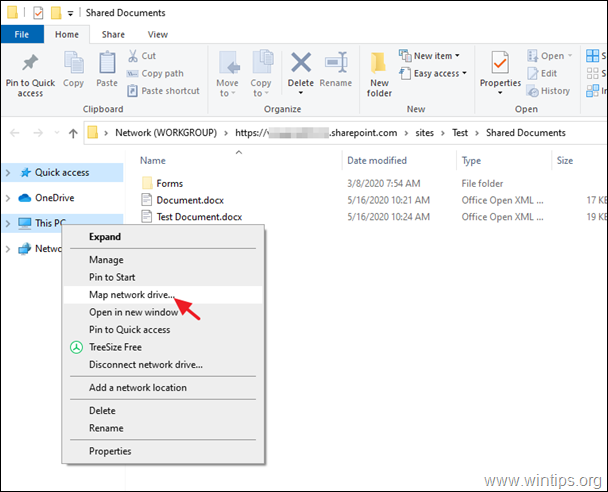
10. Then right-click on ‘This PC’ icon and choose Map network drive.
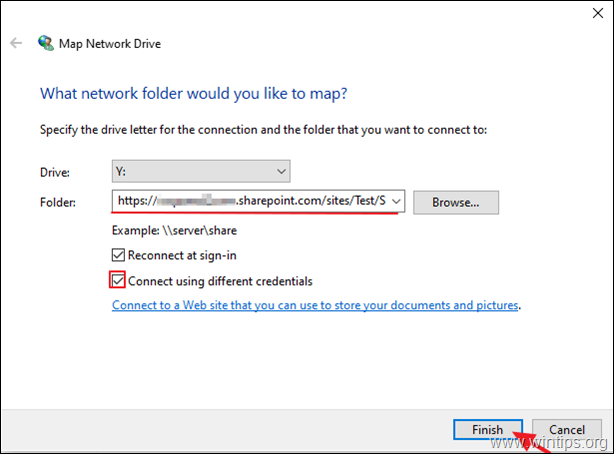
11. At the ‘Map Network Drive’ options window:
a. Choose a Drive letter for the mapped SharePoint site.
b. At folder path: right-click and Paste the copied address.
c. Check the Connect using different credentials checkbox.
d. Click Finish.
12. Finally, type your credentials to the SharePoint site, check the Remember my credentials checkbox and click OK.

13. If everything goes smoothly you should see the SharePoint site as a network drive in Windows Explorer. *

* Troubleshooting Steps:
Proceed and apply the steps mentioned below, if you cannot map the SharePoint Documents library with one of the following errors:
-
- Path is not accessible. You might not have permission to use this network resource. Contact the administrator of this server to find out if you have access permissions.
- The mapped network drive could not be created because the following error has occurred: Access Denied. Before opening files in this location, you must first add the web site to your trusted site list, browse to the web site, and select the option to login automatically.

Step 1. Navigate to Windows Services and set the ‘Startup type’ of the WebClient service to Manual or Automatic. When done, restart your PC and ensure that the ‘WebClient’ service is Running. *
* Note: By default, in Server 2012 & 2016, the WebClient service is missing and you have to install the service.
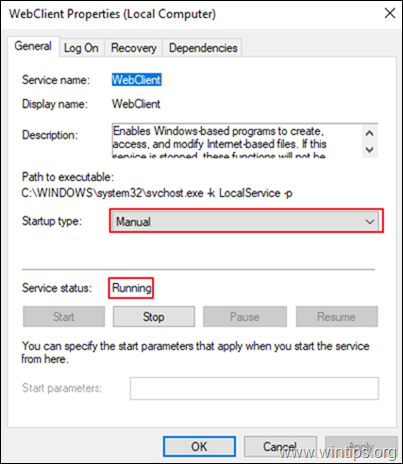
Step 2. Add the following sites in Trusted Sites (in Internet Explorer).
- https://*.sharepoint.com
- https://login.microsoft.com
- https://portal.office.com
Step 3. If you have enabled the Azure Active Directory Connect, then navigate to Azure active directory -> Azure AD Connect and at USER SIGN-IN options, Disable the Seamless single sign-on option.
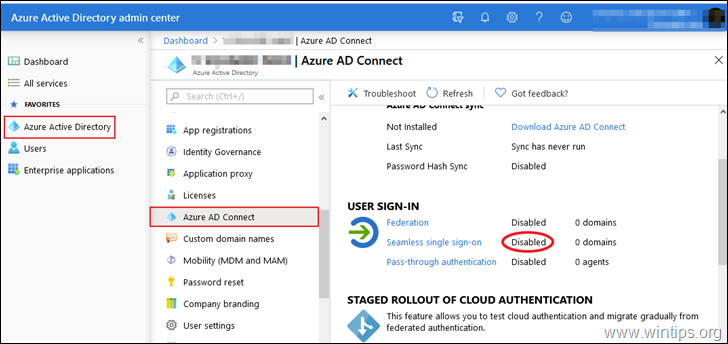
Step 4. In SharePoint, in the bottom left corner click the Return to classic SharePoint option and then follow the instructions from the beginning to map the SharePoint documents library.

Step 5. Restart your PC and follow the instructions again (to the letter).
* Related Article: FIX: Error 0x800700DF: The file size exceeds the limit allowed and cannot be saved in SharePoint (WebDAV).
That’s it! Let me know if this guide has helped you by leaving your comment about your experience. Please like and share this guide to help others.
If this article was useful for you, please consider supporting us by making a donation.
Even $1 can a make a huge difference for us in our effort to continue to help others while keeping this site free:
If you want to stay
constantly protected from malware threats,
existing and future ones, we recommend that you install
Malwarebytes Anti-Malware PRO by clicking below (we
do earn a commision from sales generated from this link, but at no additional cost to you. We have experience with this software and we recommend it because it is helpful and useful):
![]() menu, click Internet Options.
menu, click Internet Options.


