Last updated on April 11th, 2021
This guide contains detailed instructions on how to setup Synology NAS DiskStation with WebDav, in order to be able to Map (mount) the NAS Shared drive as a Network drive outside of the local network. (Windows 10, 7, 8 or 7 OS).
A few days ago I installed a NAS drive (specifically a Synology NAS DiskStation DS418) for one of my clients. During the installation, my client asked to have the ability to access the NAS shared files over the Internet in an easy way (e.g. as another drive in Windows Explorer) and without using Synology’s Web interface (which is excellent for making basic tasks).
How to Configure and Access Synology NAS with WebDAV over Internet.
Step 1. Set up WebDav on Synology NAS device.
Step 2. Assign a Static IP Address on Synology NAS.
Step 3. Obtain a Free Domain Name using a DDNS Service.
Step 4. Setup Port Forwarding on your Router.
Step 5. Set up DDNS on Synology NAS Device.
Step 6. Map Synology Shared Drive in Windows Explorer.
Step 1. Configure and Enable WebDav Server on Synology NAS.
1. From Synology NAS WEB UI open Package Center.
2. Go to All Packages and then find and install the WebDav Server Package.
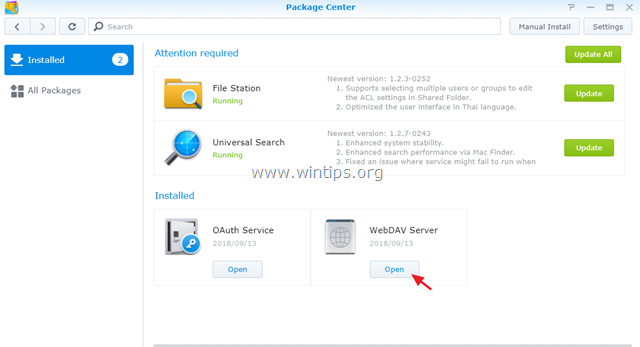
3. When done, go to Installed packages and open WebDav Server.

4. At Settings options, enable the HTTPS protocol only (HTTPS Port:5006), in order to have only securely access to your files over Internet (using HTTPS and SSL) and then click Apply.

Step 2. Assign a Local Static IP Address on Synology NAS Device.
1. From Synology NAS WEB UI open Control Panel.
2. Click Network on the left pane and then select the active LAN (connected) and click Edit.

3. in IPv4 tab:
a. Select the Use manual configuration option.
b. Assign a Static IP Address for your Synology NAS device (e.g. 192.168.1.199) and then fill the rest required fields (Subnet mask, Gateway, DNS Server) according to your Network settings.
c. When done click OK

Step 3. Get a Free Domain Name from a Free DDNS Service Provider.
In order to access your files on Synology NAS server from outside, you need to register a free Domain Name from a free DDNS* service provider.**
* A DDNS (Dynamic Domain Name System) service maps Internet Domain Names to Dynamic IP addresses. A DDNS service lets you to access your devices on your local network from anywhere in the world.
** List of some free Dynamic DNS Service Providers:
Step 4. Setup Port Forwarding on your Router.
To be able to access your NAS shared files from outside of your local network, you need to forward the port “5006” (on your router) to the NAS IP address (e.g. “192.168.1.199”). To do that:
1. Open your router’s administration page.
2. Go NAT settings and select Virtual server. *
3. Then forward the port “5006” to NAS Synology IP address (e.g. “192.168.1.99”).
* Note: See your router’s manual on how to set up port forwarding.

Step 5. Set up DDNS on Synology NAS Device.
After registering a free DDNS Domain Name (e.g. “example.ddns.net”), proceed to enable DDNS support on Synology NAS DiskStation. To do that:
1. From Synology NAS WEB UI go to Control Panel –> External Access.

2. At DDNS tab click Add.

3. At DDNS settings:
a. Select your DDNS provider. (e.g. No-IP.com”)
b. Type the DDNS hostname you have registered. (e.g. example.ddns.net”)
c. Type your Username/Email & Password on DDNS provider.
d. When done, click the Test Connection button.
e. If the connection is successful, click the OK button to save the changes and continue to the next step.

Step 6. Remotely Map Synology Shared Drive as Another Drive in Windows Explorer.
The final step, is to map (mount) the NAS Synology Shared files, from outside. To accomplish this task you will need to download and install the WebDrive* utility on the remote client.
* WebDrive is an excellent drive mapping utility that uses open FTP, FTPS, SFTP, and WebDAV protocols to access remote file servers that supports these protocols (FTP, FTPS, SFTP, WebDAV).
1. Download and install WebDrive.
2. Open WebDrive mapping utility and on the Site Wizard select the Secure WebDav server type and click Next.

3. At the ‘Account Information’ screen:
a. Type the DDNS name (e.g. “example.ddns.net”) and your credentials on the DDNS provider and then click Advanced Settings.

b. At Connection Settings, uncheck the “Use default port” and then type 5006 (WebDav’s HTTPS Port).
c. When done, click OK.

4. Then click Test Connection.

5. See the connection results and then close the “Status” window. *
* Note: If the connection isn’t successful, then make sure that you have entered the correct account and port details at the previous screens.

6. Then click Next to continue…

7. Assign a drive letter (e.g. “M:”) for the Synology NAS drive, click Connect Now and then click Finish to close the “Site Wizard”.

That’s it! Let me know if this guide has helped you by leaving your comment about your experience. Please like and share this guide to help others.

do earn a commision from sales generated from this link, but at no additional cost to you. We have experience with this software and we recommend it because it is helpful and useful):