Last updated on July 17th, 2020
This article contains instructions on how to install and configure TeamViewer in order to remote access and manage a computer from distance. Remote access in computer networking terms is any software technology that gives the ability to access and control another computer from a distance over the network or over the Internet. This means that the user can control and work on the remote computer without being physically present at its location.
Remote access is often used in corporate networks where the IT Administrators need to access servers or assist the workstation users securely and quickly without interrupting the productivity. Today there are many remote access software programs in the market that may also help the home users to access and control their home computer from anywhere in the world. But, in my opinion, one of the easiest applications to securely access a remote computer is TeamViewer.
TeamViewer is one of my favorite applications as I have been using it for several years now in order to provide technical support and assistance both to my friends and customers, because it is easy to be downloaded and installed even by a amateur user.
TeamViewer has more features when compared to other remote access software that exist in the market, plus it is a cross platform application (runs on Windows, Mac, Linux, Mobiles). Some of the useful features that I found in TeamViewer and are given for free for NON-Commercial use, is the ability to use the program for unattended access to your remote computer, to cut and paste using the clipboard, to transfer files, to open multiple sessions, to disable the remote input, to reboot the remote computer in safe mode, etc. TeamViewer is also available as a portable application so you don’t have to setup the program in order to use it. This is useful when the program is used to provide (or receive) assistance without running always in the background.
How to Install and Use TeamViewer to Remotely Manage a Computer.
Before continuing to the rest of this article you have to understand the following terms that are referenced in this article:
- Remote Computer: Is the computer that you want to control from a distance (e.g. your office computer).
- Home Computer: Is the computer that it is used to access the Remote computer.
Step 1. Install TeamViewer on the Remote Computer.*
* Note: Follow the instructions below to install and configure TeamViewer to the computer that you want to manage from a distance (e.g. your office computer).
1. Download TeamViewer. When the download is completed, double-click at the ‘TeamViewer_Setup’ application to install TeamViewer.

2. At the ‘Welcome’ screen choose Custom installation – with unattended access support and click Accept – finish.

3. Wait the installation to complete and at the next screen click Next to setup unattended access.

4. Now type (and memorize it) a strong password in order to connect to this computer remotely and press “Next”.

5. Now, if you’d like, you can create a TeamViewer account * or just select the “I don’t want to create a TeamViewer account now” option and press Next.
* Note: If you using a TeamViewer account, then you can access your customer’s TeamViewer data (e. g. TeamViewer ID, username or connection settings) or computers at any time, anywhere via the TeamViewer Management Console and the TeamViewer full version. More info about TeamViewer account you can find here.

6. Write down the TeamViewer ID in order to connect to this computer from your home.

Step 2. Install TeamViewer on your Home computer.
1. Download TeamViewer. When the download is completed, double-click at the ‘TeamViewer_Setup’ application to install TeamViewer.
2. At the welcome screen choose Default installation and press Accept – finish. *
* Note: If don’t want to install TeamViewer on your PC, select the Run only (one time use) option and skip to Step-4.

3. Wait for the installation to complete.
Step 3. Access your remote computer.
To access and manage the remote computer from Home:
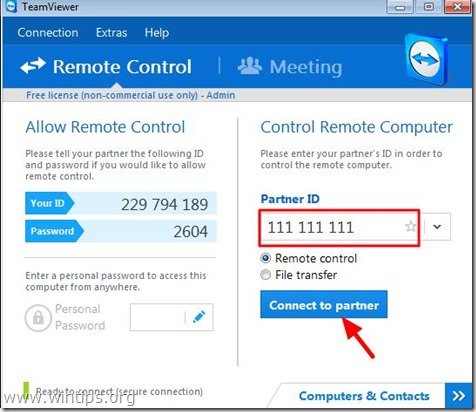
1. Open TeamViewer and type the remote computer’s ID inside “Partner ID” box and press Connect to partner.

2. When asked, type the password you have specified at the remote computer (step 1) and press Log on.

3. You ‘re done! From now on you can access your remote computer and work on it, like you’re sitting in front of it!
Additional Help: If you want to make changes to TeamViewer’s Unattended access options, or if
you have installed TeamViewer without the unattended access:
a. Navigate to Extras > Options

b. At ‘General’ options, perform the corresponding action according your choice:
To Enable the Unattended access in TeamViewer, check the Start TeamViewer with Windows checkbox.
To Disable the Unattended access in TeamViewer, uncheck the Start TeamViewer with Windows checkbox.

c. To change the TeamViewer password for the unattended access, select Security on the left pane, type your new password and click OK.

That’s it! Let me know if this guide has helped you by leaving your comment about your experience. Please like and share this guide to help others.

do earn a commision from sales generated from this link, but at no additional cost to you. We have experience with this software and we recommend it because it is helpful and useful):