Last updated on February 22nd, 2021
If you want to sync your local file shares to SharePoint Online, then continue reading below. By default SharePoint Online, gives you the ability to sync the SharePoint files to your PC by using the OneDrive app. However, while the OneDrive app is a good choice for syncing SharePoint files to your computer, it does not have the ability to sync files between SharePoint Online and a local file server share, or to save and sync the SharePoint files to another location (or disk) on your computer (other than under the local user’s folder).
In this tutorial, you ‘ll learn how to:
- Migrate local files, or files from an on-premise file server, to SharePoint Online.
- Synchronize individual folders (Local files, Local file Server Shares or Network Shares), with the SharePoint, by using the SynToy synchronization tool from Microsoft.
- Schedule SyncToy to run automatically in order to synchronize the Local and the SharePoint files every day. *
* Note: SynToy does not provide a user interface to schedule the synchronization between the selected folders, however you can schedule it to run automatically, by creating a scheduled task in Windows (see step-3 below).
How to Sync SharePoint Online with Local File Shares with SyncToy.
Step 1. MAP SharePoint as a Network Drive in File Explorer.
The first, step to migrate and synchronize your files from your PC or your Network, to SharePoint Online, is to map as a Network Drive, the SharePoint Documents library in File Explorer. For this task, follow the instructions in this tutorial: How to MAP SharePoint as a Network Drive in File Explorer.
Step 2. Copy & Synchronize Local Files to SharePoint by using the SyncToy utility.
After mapping the SharePoint Documents library to a network drive, its time to synchronize all your local files to SharePoint Online, by using the SyncToy utility. *
* Note: If you want, you can use any other utility, or a backup program (e.g. the SyncBackPro), to copy your local files to SharePoint or to synchronize the SharePoint files with your local files.
1. Download and install the SyncToy 2.1 utility from Official Microsoft Download Center, or from here.
2. Run SyncToy and at the first screen choose Create New Folder Pair.

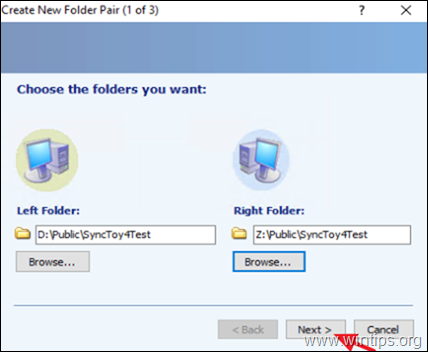
3. At the next screen, click the Browse button and select which folders from your PC (or your local Network),* you want to synchronize with the SharePoint Online Documents Library.
* Note: To synchronize the network shares, first MAP the Shared Folder as a Network drive in File Explorer.

4. Leave the Synchronize option selected and click Next.

5. Now type a recognizable “Folder Pair Name” and click Finish.

6. Finally click the Run button to start synchronize the selected folder to SharePoint Online immediately, or continue to step-3 to schedule synchronization to run in the future.

7. Wait to synchronization to complete, and once this done, you will see a new window that informs you about sync results.

Step 3. Schedule SyncToy to RUN at a Specific Time.
If you want to run the synchronization at a specific time, or if you want SyncToy to run automatically at periodic intervals, follow the steps below:
1. At the search box, type: task scheduler
2. Open Task scheduler

3. From Action menu select Create Basic Task.

4. At Created Basic Task wizard, type a recognizable name for the task (e.g. “SharePoint Sync”), and click Next.

5. At Trigger options, select when do you want the task to run (e.g. ‘Daily’) and click Next.

6. Set the start time and date, and then select when you want the synchronization process to be repeated. When done, click Next.

7. At ‘Action’ options, select Start a program.

8. At the next screen, click Browse, locate and select the SynToyCmd and click Open.

9. in ‘Add arguments’ box type -R to run all the active folder pairs, or, if you want to run only one of the active pairs type: – R “Folder Pair Name”.* When done, click Next.
* e.g. If the folder pair name is ‘PublicPair’, type: -R “PublicPair”

11. Finally, click Finish to save the new scheduled task.

That’s it! Let me know if this guide has helped you by leaving your comment about your experience. Please like and share this guide to help others.

do earn a commision from sales generated from this link, but at no additional cost to you. We have experience with this software and we recommend it because it is helpful and useful):