Last updated on March 16th, 2020
Just as all Operating Systems do, Microsoft Windows 10 also allows its users to take screenshots while working. The Screenshots (also known as “Snapshots”, “Screen captures”, or screen grab), are images that the user captures from all or part of the screen and shows what the computer screen displays at the time of capture.
Although Windows 10 provides several methods to capture and save screenshots, several third-party software are also available to make the capturing process easier and more versatile.
Recording screenshots is a great way for:
- Providing evidence of actions taking place on the screen
- Showcasing an achievement or an interesting moment
- Capturing a comment or message for later reference
- Capturing a technical problem for sending to technical support
- Providing step-by-step images to make it easier to understand a process
On a desktop PC, the keyboard is the primary instrument for capturing screenshots. Various keys are available to aid the process, chief among them being the “Print Screen” , with “Windows Logo” ![]() , “Alt“, “Ctrl“, and “Shift” being the other support keys to be used in various combinations for different effects when capturing screenshots, as explained later. Laptops may require the use of “Fn” key along with the “print” keys.
, “Alt“, “Ctrl“, and “Shift” being the other support keys to be used in various combinations for different effects when capturing screenshots, as explained later. Laptops may require the use of “Fn” key along with the “print” keys.
On a Windows phone or tablet, pressing the “Windows Logo” and “Volume -“ buttons together at the same time helps to capture and save the screenshot. The process captures everything on the entire screen, which the user can later edit and crop to the required area of interest.
In this article, we will examine several ways of taking or capturing screenshots in Windows 10:
- How to take a quick screenshot of the entire screen.
- How to save the captured screenshot
- How to capture a single window in a screenshot
- How to capture any part/area of the screen in a screenshot
- How to take screenshots using the Sniping Tool.
- How to capture of record your screen using the Game Bar.
- Free third-party tools to capture versatile snapshots.
How to Print Screen in Windows 10.
1. How to Take a Screenshot of the Entire Screen
1.1. This step is probably the easiest—simply press the Print Screen (PrtScn) on the keyboard, to capture the entire screen. Although nothing seems to happen, the PC has captured the entire screen to its clipboard, but has not saved it.
2. How to Save a Captured Screenshot
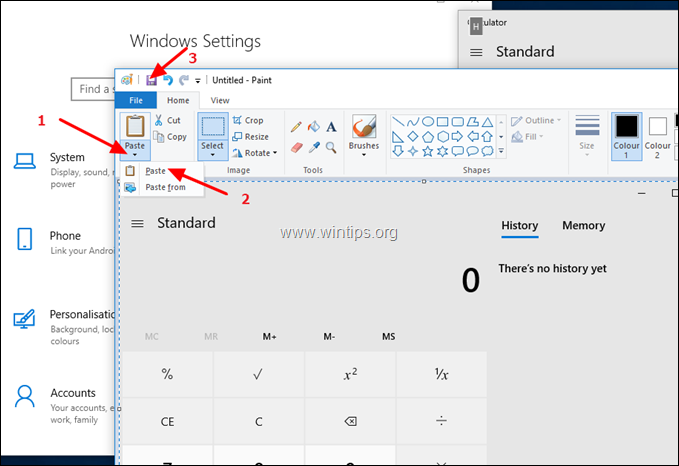
2.1. To save the screenshot just captured, you can use any drawing or document editor program such as the “Paint” or “Word”. For example, to view and save the captured screenshot in Paint application:
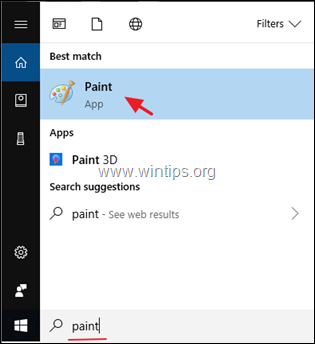
a. In the search bar, type “paint” and the click on the Paint result.
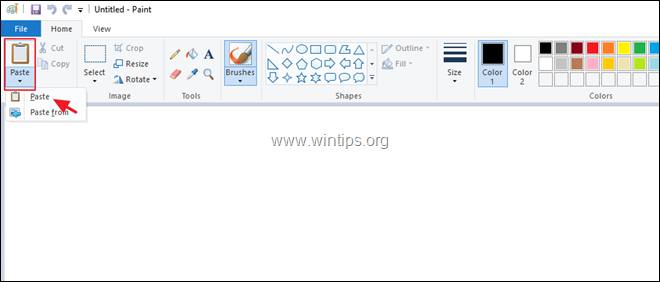
b. When Paint open, click on the Paste icon and then click Paste again, or press the “Ctrl” + “V” buttons on the keyboard together.
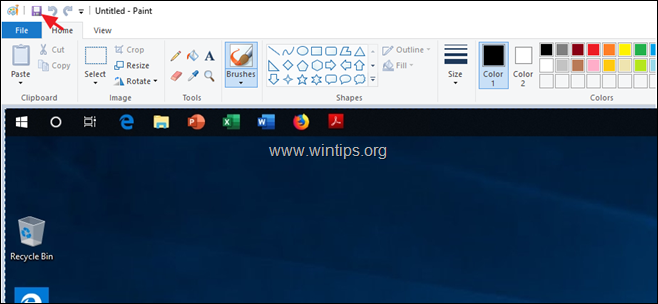
2.2. Paint will show the image recently captured. Click on the Save button, to save the image anywhere with a specific name.
2.3. Instead of the two steps above, it is possible to do it in a single step. To capture and save the screenshot of the entire screen in one step, press the “Windows Logo” and “Print Screen” keys together. Depending on your settings, the screen may dim for a fraction of a second, and return to normal.
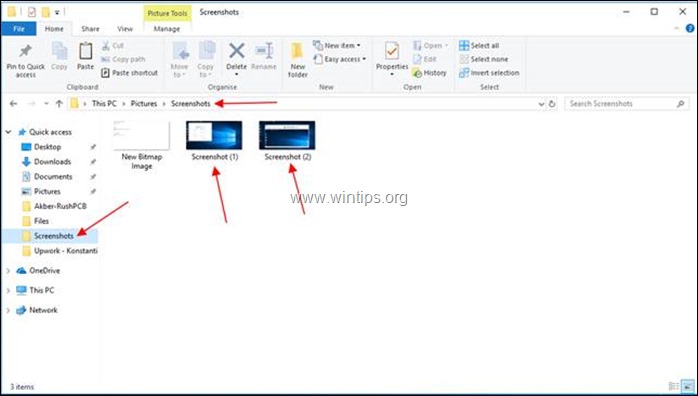
2.4. The PC saves the screenshot image in a folder named “Screenshots” within the “Pictures” folder under “This PC”. The PC also names the images of screenshots it saves with serially increasing numbers.
3. Capturing a Window in a Screenshot
3.1. If instead of the entire screen, it is necessary to capture only a single window, click on the title bar of the required window. This will raise the window above the others (making it active).
3.2. Press the “Alt” + “Print Screen” buttons and the PC will capture the active window screenshot in its clipboard. Open any drawing or document editor program such as Paint.
3.3. Open Paint and click on the “Paste” icon and the next “Paste” icon, or press the “Ctrl” + “V” buttons on the keyboard together. Paint will show the image recently captured.
3.4. Click on the “Save” button on Paint to save the image anywhere with a specific name.
4. How to Capture Any Part of the Screen in a Screenshot
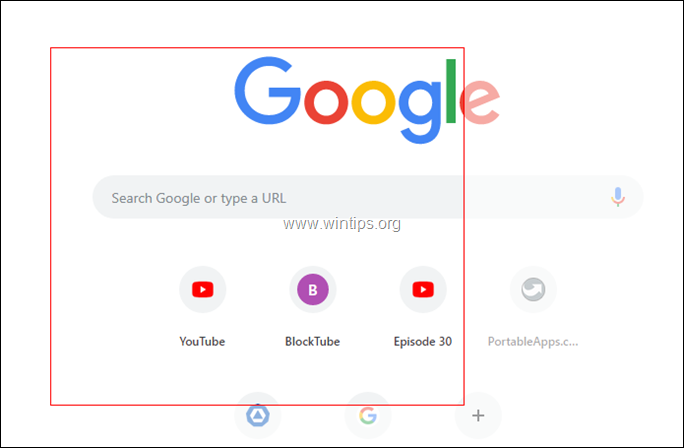
4.1. For capturing any part of the screen in a screenshot, press the Windows logo ![]() + Shift + S keys together. The entire screen will dim and the cursor will change to a cross.
+ Shift + S keys together. The entire screen will dim and the cursor will change to a cross.
4.2. Place the cursor at one corner of the area you want to capture and while pressing the left mouse button, drag the cursor to the opposite corner diagonally, and then release the mouse button. The PC will capture the screenshot of the area on the clipboard.
4.3. Save the image using your favorite drawing or document editor as in the earlier step.
5. How to capture screenshots using the Snipping Tool.
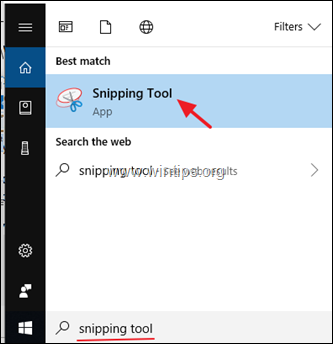
The Snipping Tool is a nifty little program in Windows 10 that helps in capturing screenshots. To capture a screenshot using the snipping tool:
5.1. Open the Snipping tool. (In the search bar, type “snipping” and the click on the Snipping tool result.
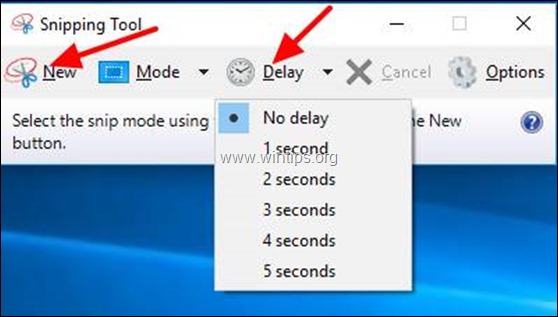
5.2. Click the “Mode” button to select the area you want to snip/capture—free-form, rectangular, window, or full-screen.
5.3. Click the “Delay” button to add a delay of 0 to 5 seconds before the capture, which helps you to set up your screenshot.
5.4. Once you have set up both to your liking, click the “New” button to start the capture.
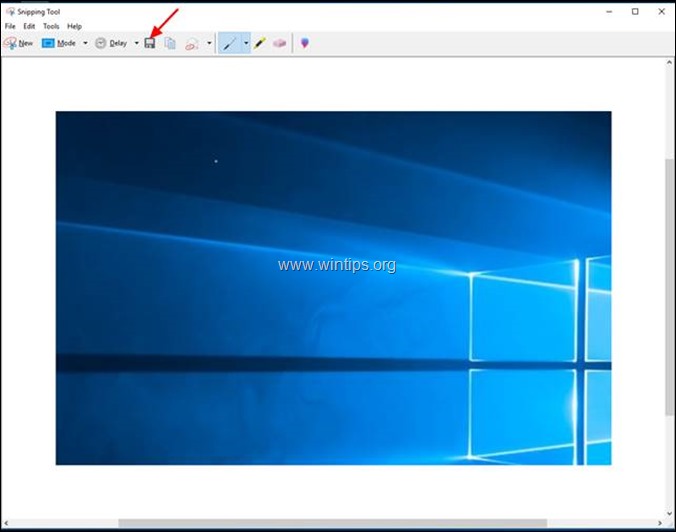
5.5. The Sniping Tool opens a new window to show the area it has captured. Click on the “Save Snip” button and give the file a name and select a place to save it.
6. How to take screenshots using the Game Bar.
Windows 10 offers a very useful feature for taking screenshots when playing games. To use this feature, you need to turn On the “Take Screenshots using Game DVR” feature in Settings. *
* Note: Your PC must meet the hardware requirement for Game DVR before you can use this feature fully.
To capture your screen using Game DVR:
6.1. Open Windows 10 Settings
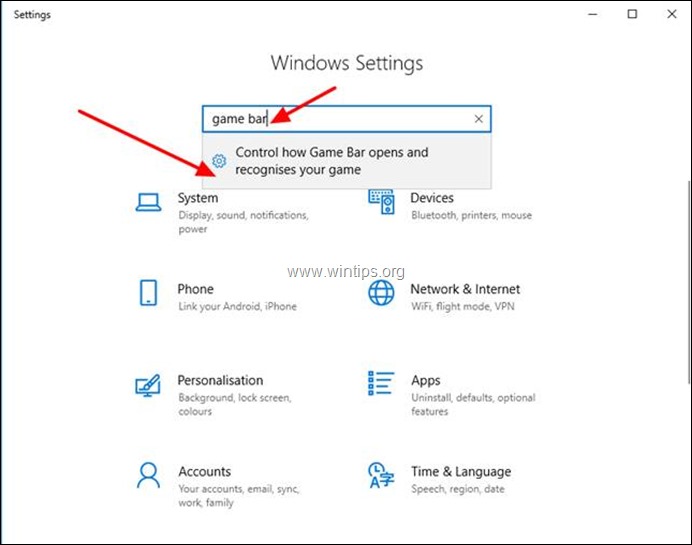
6.2 Type “Game Bar” in the search window, and then click on the message “Control how Game Bar Opens and recognizes your game”.
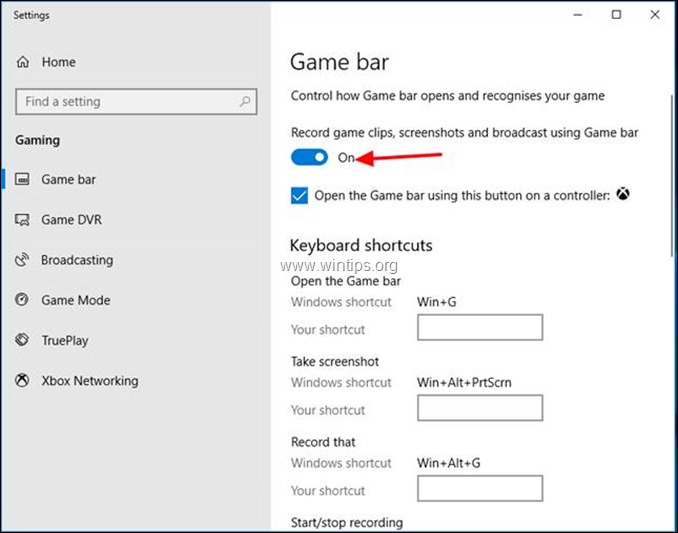
6.3. This will bring you to the next screen. Make sure the switch is ON for “Record game clips, screenshots and broadcast using Game bar”.
6.4. Notice the keyboard shortcuts that Windows 10 offers for using the Game Bar:
-
- Windows key + G: Open Game bar
- Windows key + Alt + Print Screen: Take a screenshot
- Windows key + Alt + G: Record the last 30 seconds (you can change the amount of time recorded in Game bar > Settings)
- Windows key + Alt + R: Start/stop recording
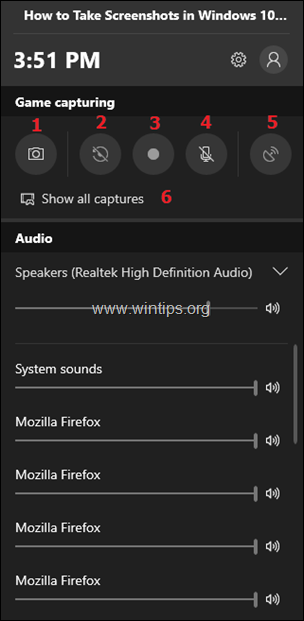
6.5. Now bring up the Game Bar, by pressing the “Windows Logo” ![]() + “G” on the keyboard, press the corresponding button, according the action you need to perform:
+ “G” on the keyboard, press the corresponding button, according the action you need to perform:
1. Click the Camera button to take a single snapshot of the entire screen.
2. Click the Record button to start recording a video.
3. Click the Stop Record to stop the recording.
4. Click the Microphone button to switch the microphone on/off during the video recording.
5. Click the Start broadcasting button to broadcast whatever you are recording.
6. Click the Show all captures button, to see what you have captured. *
* Note: Game Bar stores its snapshots in the “Captures” folder under the “Videos” folder. (e.g. in “C:UsersUserNameMy DocumentsMy VideosCaptures”)
7. Using Third-Party Tools for Capturing Snapshots
Although the built-in methods in Windows 10 are useful, they have their own limitations. Professionals working with snapshots require more flexibility and versatility, which they can get by using third-party tools.
While several professional commercial tools are also available, you could start with PicPick, as there is also a free version for home users. Installing PicPick in Windows has many other advantages. For example you can easy crop a captured image or to add marking arrows, effects, annotations on the image.
To capture a screenshot with PicPick:
7.1. Download and install PicPick.
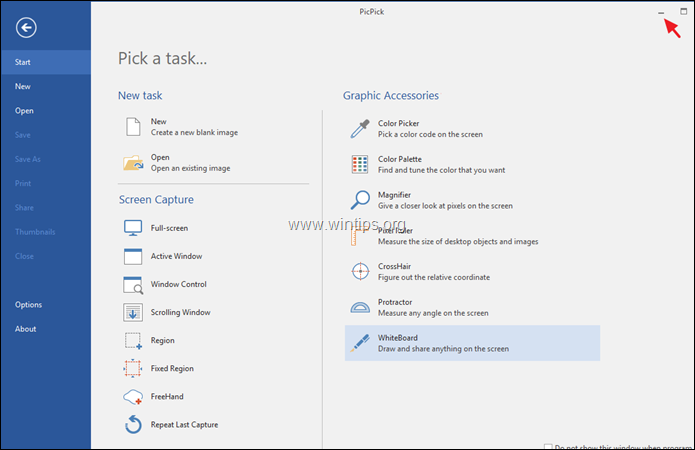
7.2. Open the PicPick app and then minimize the window. *
* Note: The first time you run PicPicK, it opens up a “Pick a task” window, which allows you to choose the action or the type of capture that you want to perform (e.g. Full screen, Active window, etc.). At this point, you can experiment with the available choices, or to minimize that window and to start capturing, by using the instructions below.
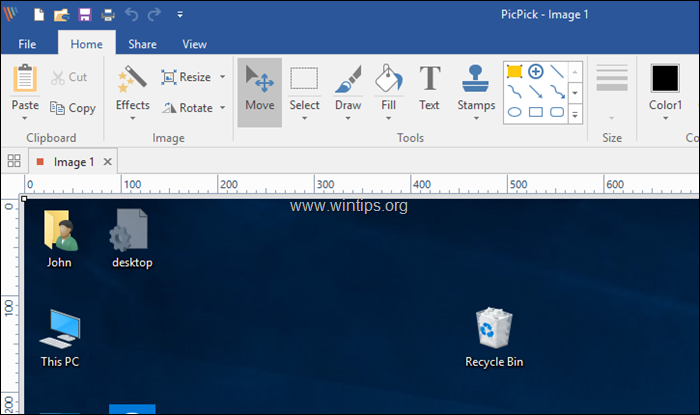
7.3. For capturing the entire screen, just press the “Print Screen” button on the keyboard, and PicPick opens with the image of the screen.
7.4. Similarly, for capturing only a single window, click on the Title bar of the required window. (This will make the window active and raise it above the others). Finally press the “Alt” + “Print Screen” buttons on the keyboard, and PicPick will capture the active window screenshot and open it up for further processing. *
* Tip: If you want to customize (change) the “Hot Keys” for the image capturing, open the File menu and go to Options > Hot Keys.
That’s it!
Let me know if this guide has helped you by leaving your comment about your experience. Please like and share this guide to help others.
do earn a commision from sales generated from this link, but at no additional cost to you. We have experience with this software and we recommend it because it is helpful and useful):
Full household PC Protection – Protect up to 3 PCs with NEW Malwarebytes Anti-Malware Premium!

