In Windows 10 and Windows 11, Microsoft added the Miracast feature that lets you use your laptop screen as a second monitor on another computer. Miracast technology, allows you to wirelessly transmit or receive content between devices that support it.
Performing multiple tasks on a single computer screen can be counterproductive and less efficient. Imagine that as a data analyst, you are expected to gather data using Excel spreadsheet, query the data with SQL to find consistency, and use Tableau to visualize your findings. Performing all of these tasks on a single screen will lead to delay and burnout.
Setting up your laptop as a secondary monitor of another computer is a convenient and useful solution that will give you many advantages. For example, it will give you more working space and allow you to run several programs at the same time by moving the mouse from one screen to another.
If you’re interest to learn how to use your laptop as a second monitor on your main computer, continue reading below. (The instructions can be applied to both Windows 10/11 OS)
How to Use Laptop’s screen as a Second monitor on another computer.
* Important: To use your laptop screen as a secondary display on another computer, both computers must be wirelessly connected to the same network, be running Windows 10 or 11, and support Miracast. **
** Note: To find out if your devices support Miracast:
1. Press Windows + K keys to open the Connect options.
2. If you see the option “Connect to a wireless display” at the bottom, this means your device supports Miracast.
Step 1. Setup your laptop as a second monitor.
To be able to use your laptop’s monitor as a second monitor on another PC you have to enable the “projecting to this pc” feature on your laptop. To do that:
1. From Start menu ![]() click Settings
click Settings ![]() and select System.
and select System.
2. At the right pane, scroll down and click Projecting to this PC.

3. At ‘Projecting to this PC’ options:
a. Select Available Everywhere on secure networks under Some Windows and Android devices can project to this PC when you say it’s OK. This will ensure that only secured networks from your home will be able to project to the laptop.
b. At Ask to project to this PC options: select Every time a connection is requested, or choose First time only if don’t want to get a prompt each time you use the laptop as a monitor.
c. Require PIN for pairing: Set a PIN to prevent other devices from projecting on your laptop screen. (This is recommended if you’re connected to a public network, otherwise leave it to “Never”).
d. This PC can be discovered for projection only when it’s plugged in: Set it to ON if you want to save battery power.*
* Note: After you have configured all of the above, note the name of the computer (PC name) at the bottom, because you will need it when you choose which device to connect to on the other computer.

4. When done with the above settings, type Connect at the search bar and click Open. This will get the laptop ready to connect to it from the other PC.

Step 2. Connect to your laptop’s monitor from other PC.
On the other PC that you want to project to your laptop’s monitor:
1. Press the Windows + P keys to open the Project widget and select Duplicate or Extend.
- Duplicate: The PC and the external monitor will display the same thing.
- Extend: This option allows you to extend the desktop to the connected monitor. Extending the screen allows you to have more screen space and different open windows on each of the screens.

2. Finally, select the laptop with the “shared monitor” from the devices available and connect to it. *
* Notes
1. An additional way to connect to the laptop’s monitor, is to press the Windows + K keys and then to select your laptop to connect to it.
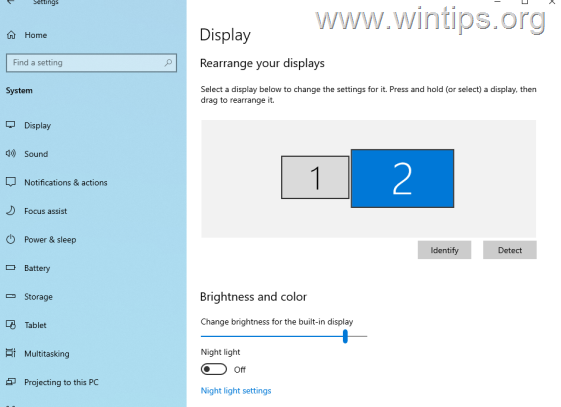
2. If you have selected the “Extend” option, then after connecting to laptop’s monitor, you can “rearrange” the monitors to meet your needs, or to set the laptop’s monitor as your main display, from the Display settings. To do that:
a. Go to Start menu > Settings and select Display on the left.
b. Locate and click the Identify button. This will display the number on each display to help you identify them.
c. Drag and drop displays to rearrange them if you want (and select Apply), or select the laptop’s monitor and check the box “Make this my main display” at the end of this page, to set the laptop’s monitor as your primary monitor.

That’s it! Let me know if this guide has helped you by leaving your comment about your experience. Please like and share this guide to help others.

do earn a commision from sales generated from this link, but at no additional cost to you. We have experience with this software and we recommend it because it is helpful and useful):