,
Are you concerned about your privacy while using Windows 11? You’re not alone. Many users are concerned about the data their operating system collects, and in this guide you will find instructions to prevent Microsoft from spying on you if you are using Windows 11.
Microsoft collects data for a variety of reasons, including improving the operating system, personalizing user experiences, and providing diagnostic information. However, while some of the data collected is necessary for functionality, you have the right to limit them.
How to Prevent Microsoft from Spying on you in Windows 11.
Here’s a practical guide to reducing tracking and improving privacy in Windows 11 with detailed instructions.
Part 1. Prevent Microsoft from spying you during Windows 11 Installation.
Choose a Local Account Over Microsoft Account
When setting up a new computer coming with Windows 11 (Out of Box Experience/OOBE) or when performing a clean installation of Windows 11, choose a local account instead of signing in with a Microsoft account. This limits data sending to Microsoft. To do this, follow the instructions on this guide: How to Setup Windows 11 With a local account
Additionally, during setup, decline sending data on the “Choose privacy settings” screen by selecting “No” or “Required“.

Part 2. Prevent Microsoft from spying you after Windows 11 Installation.
If you are already using Windows 11 with a Microsoft account or a Local Account*, then you can do the following to prevent your system from sending data to Microsoft about your activity.
* Note: If you’re using a Microsoft Account and you want to switch to a Local Account, do the following:
-
- Press Win + R keys, type “control userpasswords2” and hit Enter.
- In the ‘User Accounts’ window, click Add and then choose Sign in without a Microsoft Account (not recommended) > Local Account
- Type a name and a password (optional) for the local account and click Next > Finish.
- Finally, in the ‘User Accounts’ window), select the new user and select Properties.
- Go at Group Membership tab, select Administrator and click OK. Then click OK again to close the ‘User Accounts’ window.
- Restart the computer or right-click at Start button and go to Shut down or sign out > Sign Out.
- Choose the new account in the login screen and then continue to setup the new account by choosing “No” or “Required” at privacy options.
- After entering in Windows 11 transfer your files and settings from the Microsoft account to the new account.
1. Disable Connected User Experience and Telemetry service.
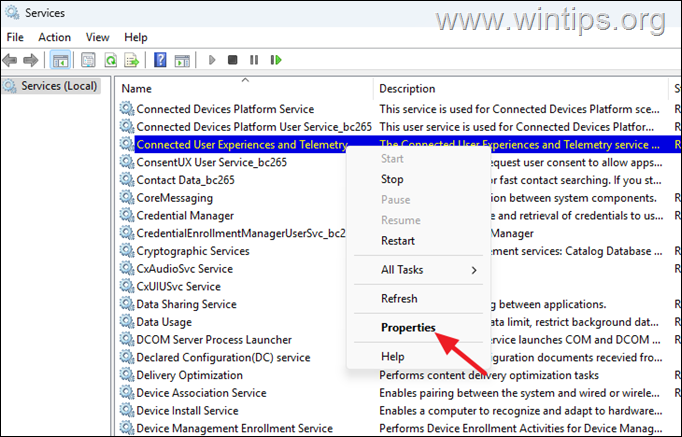
The Connected User Experience and Telemetry (DiagTrack) service collects and sends diagnostic and usage data to Microsoft. To prevent this from happening, proceed to disable this service.
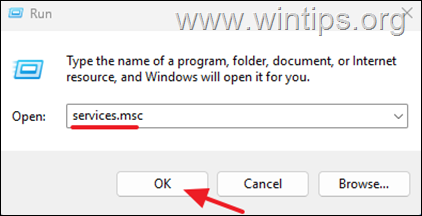
1a. Press the Windows + R keys to open the Run command box.
1b. In run command box, type the below command and press Enter, to open the Windows Services control panel:
- services.msc

2a. Right-click on each on Connected User Experience and Telemetry service and select Properties.

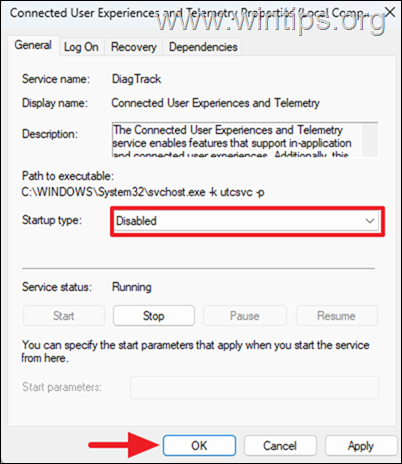
2b. Change the Startup type to Disabled and click Apply > OK.
3. Restart your PC to apply the change.

2. Turn Off Personalized Ads & Tracking.
Go to Settings > Privacy & Security > General and toggle to Off all the tracking actions and the personalized Ads.

3. Turn Off Diagnostics & Feedback Data
Go to Settings > Privacy & Security > Diagnostics & Feedback & do the following to send only the required data to MIcrosoft:
- Set ‘Send optional diagnostic data’ to Off
- Turn off ‘Improve inking and typing’
- Disable ‘Tailored experiences’ to stop personalized tips and ads based on your usage.
- Turn off ‘Send optional diagnostic data’ if visible.
- Turn off ‘View diagnostic data’
- Press Delete to delete the diagnostic data Microsoft collected about your device.
- Set the ‘Feedback frequency’ to Never.

4. Disable Activity History.
Go to Settings > Privacy & Security > Activity History and do these actions:
- Turn Off ‘Store my activity history on this device’.
- Click Clear history to delete your activity history stored on the device.

5. Disable Speech Recognition.
Go to Settings > Privacy & Security > Speech.
- Turn off “Online speech recognition” to stop voice data from being sent to Microsoft.

6. Turn Off Typing tracking
Go to Settings > Privacy & Security > Inking & Typing Personalization
1. Disable ‘Custom inking and typing dictionary to prevent keystroke and handwriting data collection to be saved to your Microsoft Account.

7. Control and Restrict Device and App permissions.
Go to Settings > Privacy & Security and under the App permissions section, open each item (e.g. Location, Camera, Microphone, etc.) and check which apps has permission to it. In particular, pay attention to the following elements:
- Location: Review which apps or device can access your location or completely turn off the location services.

- Camera and Microphone: Review which apps have access to your camera and microphone. Disable access for apps that don’t require it. Be particularly cautious with unknown or rarely used applications.

- Account Info, Contacts, Calendar, Email, Tasks, Messaging, Documents, Pictures: Carefully review each of these sections and disable access for apps that don’t need the specific information or functionality.
8. Disable or Uninstall Microsoft Copilot.
Microsoft Copilot is an AI-powered assistant built into Windows 11, developed by Microsoft to improve productivity and user experience. In the latest versions of Windows 11/10, Copilot starts automatically with Windows and runs in the background, sending diagnostic data to Microsoft.
To prevent this from happening, either remove Copilot completely from your system or prevent it from running in the background.
1. Go to Settings > Apps > Installed apps.
2. Next to Microsoft 365 Copilot, click the three-dot menu and click Uninstall, if you want to remove it from your system, or click Advanced options if you don’t want to remove it but don’t want it running in the background, and…

….Set the options ‘Let this app run in background’ to Never and ‘Runs at log-in’ to Off.

9. Prevent Advertising and Tracking in EDGE browser.
If using Microsoft Edge, prevent tracking and advertising by doing the below actions:
1a. Go to Settings > Privacy, Search, and Services > Tracking prevention.
1b. Set the Tracking prevention to On and select Strict below.

2. Then, go to Settings > Privacy, Search, and Services > Privacy and set to Off the following:
- Send Do Not Track requests
- Optional diagnostic data
- Search and service improvement
- Personalization & advertising

3. Finally, go to Settings > Privacy, Search, and Services > Search and connected experiences and turn off at least the following:
- Save time and money with Shopping in Microsoft Edge
- Get notifications of related things you can explore with Discover
- Save screenshots of sites for history

10. Customize Microsoft Account Privacy Settings.
If you’re using a Microsoft Account on Windows 11, or signed to Microsoft products and services using a Microsoft account, you can manage your data and settings on the following pages of the privacy dashboard:
11. Browser Privacy Protection measures.
- Choose a privacy-focused browser, such as Mozilla Firefox or Brave, which prioritizes user privacy.
- Configure privacy settings to block the trackers and limit location sharing.
- Install privacy-enhancing extensions, such as Privacy Badger or uBlock Origin, to block trackers, ads, and ensure secure connections.
By following these steps, you can significantly protect your privacy, prevent Windows spying, and enjoy a more secure and private computing experience. Remember to check your settings regularly (especially after installing Windows updates) and always be careful about what kind of personal information you give out online.
That’s it! Let me know if this guide has helped you by leaving your comment about your experience. Please like and share this guide to help others.

