Last updated on December 14th, 2020
Office 365 Business with Exchange Online, gives you the ability (such as Exchange 2016 & 2019), to set up a corporate email signature, which applies to any email sent by any user or device of the company. A company-wide email signature is configured on the server side, and therefore ensures that all of your company’s outgoing e-mail messages will have the same signature format and details for your organization, and eliminates the ability to add other details to the signature that you didn’t want.
Although adding a organization-wide email signature has many benefits, on the other hand it has some limitations, as mentioned below.*
* Note: To bypass these limitations, you can use a third-party app from CodeTwo or Exclaimer.
Limitations of a company-wide signature on Office 365 or Exchange:
- The signature is not visible to the users when composing an email.
- The signature is always added, at the bottom of the email conversation.
- You cannot embed an image directly in the signature. If you want to use an image, you’ll need to use a public URL for that image.
- The users don’t have the ability to choose a different signature, if they want to.
- An HTML-formatted e-mail signature is not displayed correctly when sent by devices that do not use Outlook as an e-mail client.
In this article you ‘ll find step by step instructions, on how to create and customize an email signature for your company on the server-side by using Exchange transport rules (Exchange 2019 & 2016).
How to Create a Organization-Wide Email Signature in Exchange Online (Office 365 Business).
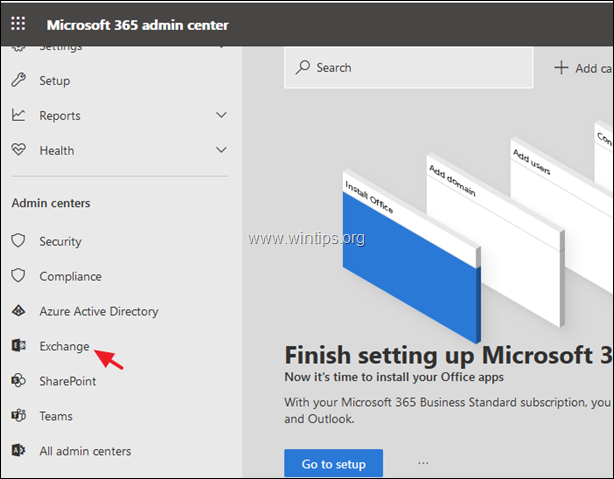
1. Login to Office 365 Admin portal and click Exchange.

2. In Exchange admin center, select Mail flow from the left pane.
3. At the rules tab click the plus + sign and select Apply disclaimers.

4. On the New rule page, type a name for the rule (e.g. “Company Signature”).
5a. From the Apply this rule if drop-down list, select The sender is located…

5b. Select Inside the organization and click OK.

6. In the Do the following drop-down list, select Append the disclaimer…(After that, you will see the Enter text & Select one options at the right.)
6a. Click the Enter text link to customize your signature.

6a1. At specify disclaimer text box, you can either input your company details in either plain text or HTML format, and you can use some special attributes to automatically acquire information for each user from the predefined list of Active Directory attributes. (Display Name, Tittle, Phone Number, Company Name, etc.).
For example, if you want to create a simple signature in HTML format, like the below…

..copy and paste the following HTML code (without the quotes) in the specify disclaimer text box and then modify the sentences with the red letters according your own information. When done, click OK: *
“
Best Regards,
%%DisplayName%%
%%title%%
%%Company%%
Type your Company’s Address here
Phone: %%PhoneNumber%%
Fax: 203 202 2011
email: %%Email%%

| * Notes – Additional help:
1. If you don’t know HTML, you can use a free online “Word to HTML editor” to design your signature in HTML. City 6b1. After customizing your signature, click the Select one link, and select what to do if the disclaimer can’t be inserted (failback action).
6b1.Specify one of the available failback actions and click OK:
7. When done, scroll down choose Enforce and Save the new rule. * * Note: If you want to activate or deactivate the rule at a specific time, or to add additional actions & exceptions to the signature rule, click More Options and make your changes.
8. Finally, select Yes to apply the rule to all the future messages. * Notes: That’s it! Let me know if this guide has helped you by leaving your comment about your experience. Please like and share this guide to help others. |


do earn a commision from sales generated from this link, but at no additional cost to you. We have experience with this software and we recommend it because it is helpful and useful):
Full household PC Protection – Protect up to 3 PCs with NEW Malwarebytes Anti-Malware Premium!