Last updated on February 9th, 2021
The VirtualBox error “Call to WHvSetupPartition failed: ERROR_SUCCESS (Last=0xc000000d/87) (VER_MEM_VM_CREATE_FAILED)”, commonly appears because the HYPER-V is installed, or loaded at Windows 10 startup. The issue commonly in Windows 10 PRO, as well in Home editions.
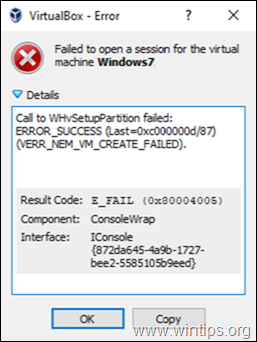
Problem Description: After a Windows 10 Update, the VirtualBox Machine failed to start with error:
Call to WHvSetupPartition failed: ERROR_SUCCESS (Last=0xc000000d/87) (VERR_NEM_VM_CREATE_FAILED).
Result Code: E_FAIL (0x80004005)
Component: ConsoleWrap
Interface: IConsole {872da645-4a9b-1727-bee2-5585105b9eed}

This tutorial contains instructions to solve the “Call to WHvSetupPartition failed: ERROR_SUCCESS (Last=0xc000000d/87) (VER_MEM_VM_CREATE_FAILED)” in VirtualBox.
FIX VirtualBox Error: Call to WHvSetupPartition failed: ERROR_SUCCESS in Windows 10.
1. Navigate to Control Panel > Programs and Features > Turn Windows features on or off

2. Uncheck the following features:
- Containers *
- Hyper-V *
- Virtual Machine Platform
- Windows Hypervisor Platform
- Windows Sandbox
* Note: The ‘Containers’ and the ‘Hyper-V’ features exists only in Windows 10 PRO.

3. Restart the Computer after uninstall.
4. Open Command Prompt as Administrator.
5. Type the following command and press Enter:
- bcdedit /set hypervisorlaunchtype off

6. Reboot your PC.
7. After reboot, start the VM.
That’s it! Let me know if this guide has helped you by leaving your comment about your experience. Please like and share this guide to help others.

do earn a commision from sales generated from this link, but at no additional cost to you. We have experience with this software and we recommend it because it is helpful and useful):