Sometimes Microsoft Word may not work properly due to user modifications or changes made by other programs. In these cases, the easiest way to restore Word functionality is to reset it to the factory default settings.
In this tutorial, you will find detailed instructions on how to reset Word to its factory default settings.
How to Reset Word to Default Settings.
Step 1. Delete the “Normal” Template.
1. Close Microsoft Word.
2. Press Windows ![]() + R keys to open the run command box.
+ R keys to open the run command box.
3. Type %appdata%MicrosoftTemplates and press Enter.

4. Find and delete the Normal.dotm file.

Step 2. Delete Current Word settings in Registry.
1. Press Windows ![]() + R keys to open the run command box.
+ R keys to open the run command box.
2. Type regedit and press Enter.

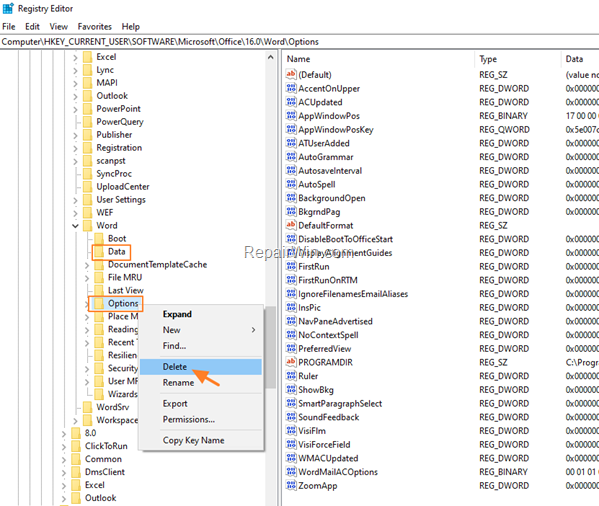
3. In Registry Editor navigate to the following key, according your Office version:
- Word 2007: HKEY_CURRENT_USER/Software/Microsoft/Office/12.0/Word
- Word 2010: HKEY_CURRENT_USER/Software/Microsoft/Office/14.0/Word
- Word 2013: HKEY_CURRENT_USER/Software/Microsoft/Office/15.0/Word
- Word 2016, 2019 & Office 365: HKEY_CURRENT_USER/Software/Microsoft/Office/16.0/Word
4. Finally, expand the Word key and select and delete these subkeys:
- Data
- Options
* Note: When prompted click Yes to confirm your decision.

6. Close the Registry Editor.
7. Open Word and you’re done.
That’s all folks! Did it work for you?
Please leave a comment in the comment section below or even better: like and share this blog post in the social networks to help spread the word about this problem.
