,
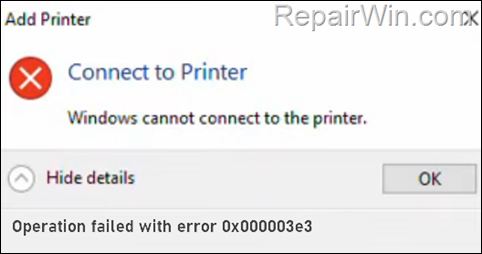
If you cannot print to a network or a shared printer, or if you cannot install or connect to a shared printer with error “Operation failed with error 0x000003e3”, or if your receive the error 0x000003e3 when trying to print to a network printer on Windows 10/11, continue reading below to fix the problem.

How to FIX: “Windows Cannot Connect to Printer: Operation Failed with error 0x000003e3” on Windows 10/11 OS.
Printer error 0x000003e3 usually occurs because of a problem in the print queue or because of incorrect Windows or printer settings. To fix the problem follow the instructions below.
Method 1. Restart the Print Spooler service & Clear Print jobs.
![]() + R keys to open the run command box.
+ R keys to open the run command box.
2. In the Search box, type: services.msc & click OK.

3. In Services panel, right-click on Print Spooler service and click Stop.
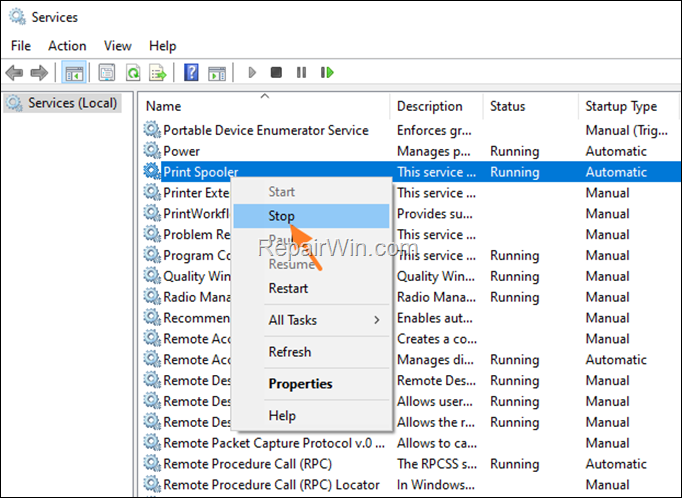
4a. Without closing the Services window, open File Explorer, copy & paste the following address in the address bar and press Enter.
- C:Windowssystem32spoolprinters

4b. Press CTRL + A to select all files under the “printers” folder and then press Delete to remove all of them.
5. When done, go to Services panel, right-click on Print Spooler service and click Start.
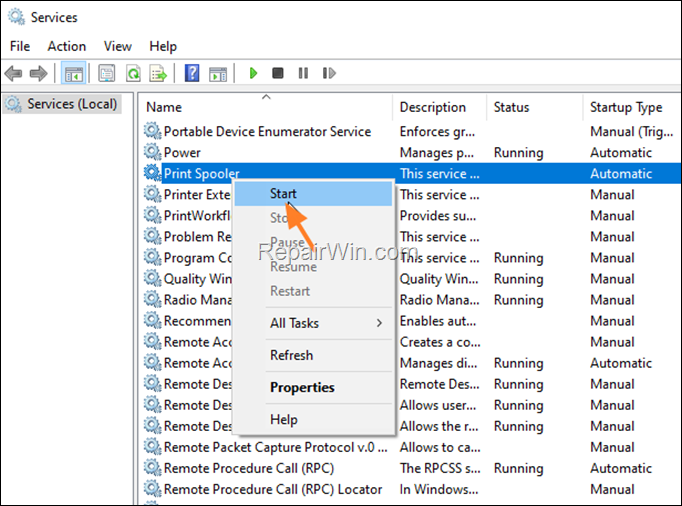
6. Now, try to print a test page (if the printer is already installed), or try again to install the network printer (if it’s not installed).
Method 2. Add the Network / Shared Printer as Local.
The second way to bypass the error 0x000003e3 when installing a network or a shared printer on Windows 10/11, is to manually add the printer by specifying the Printer Port (Local or TCP/IP).
1. Navigate to Control Panel > Devices and Printers.
2. Click Add a printer. *
* Note: If the printer is already installed and the error 0x000003e3 appears when trying to print, I would recommend that you try removing and reinstalling the printer the classic way before continuing with the instructions below.

3. At the next screen, click The printer that I want isn’t listed.
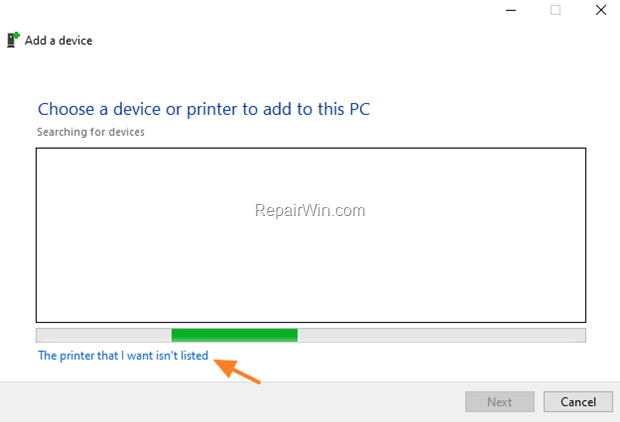
4. Select Add a local printer or network printer with manual settings and click Next.
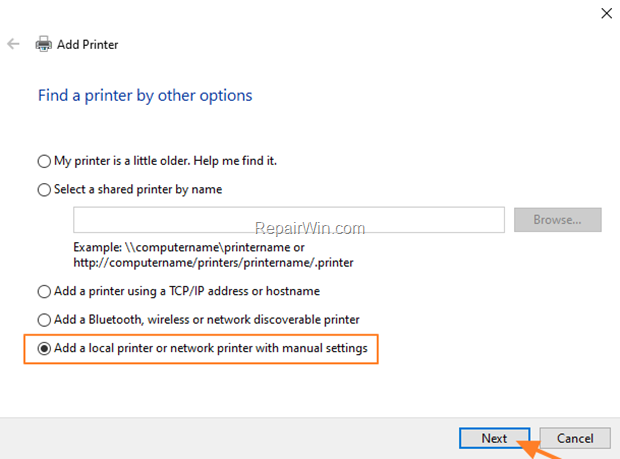
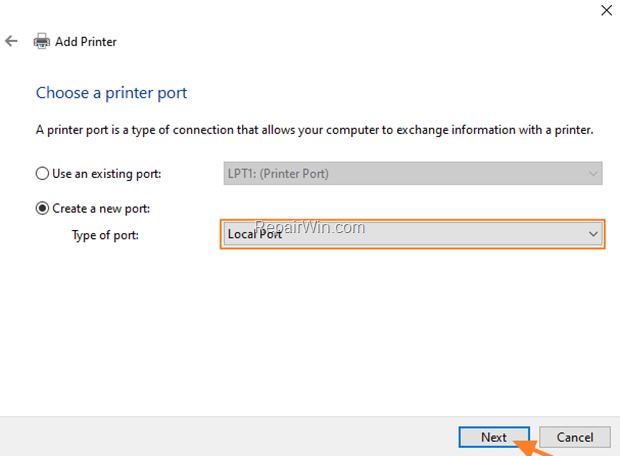
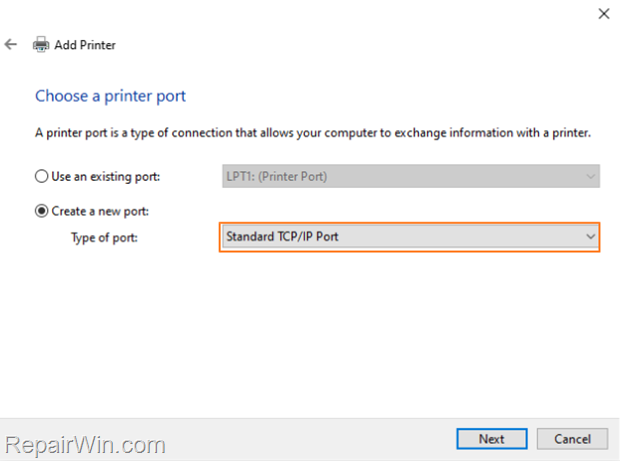
5. At the ‘Choose a printer port’ options, check Create a new port and then select one of the following options, according your case:
Case A. Select Local Port from the drop-down menu if the printer is shared on another computer on the network. Then, click Next and continue to step 6.
Case B. Select Standard TCP/IP Port if the printer is a Network Printer and has an IP address. Then, click Next and continue reading below.
6. At the next screen, do the following according your case:
Case A. If it’s a SHARED Printer:
If the printer is shared on another computer on your network:
1. Type the port name in one of the following formats and click OK:*
- \ComputerNameSharedPrinterName
- \ComputerIPAdressSharedPrinterName
* Examples:
a. If the computer name of the computer that shares the network printer is “Computer01” and the printer’s share name is “HP1100” then the port name is “\Computer01HP1100”
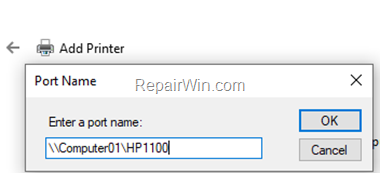
b. If the IP Address of the computer that shares the network printer is “192.168.1.20” and the printer’s share name is “HP1100” then the port name is \192.168.1.20HP1100
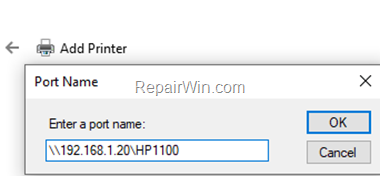
2. At the next screen select the network printer model and click Next. *
* Note: If you cannot find the printer’s model here, then download the printer driver from the manufacturer and then install the printer locally on your PC (LPT1). After installation, perform again the steps on this method to manually install the printer by using the “Local Port” option.
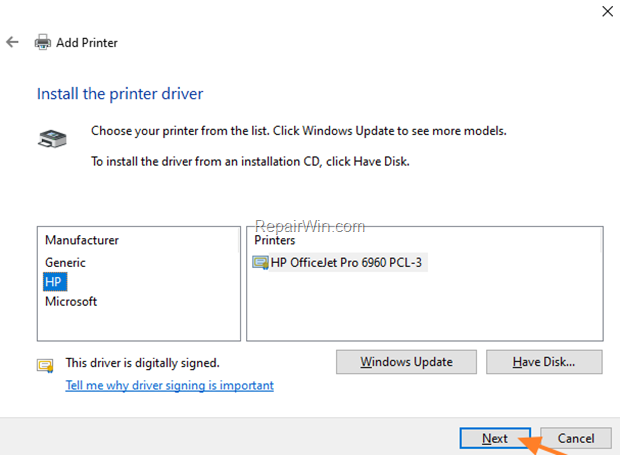
3. When the printer installation is completed print a test page to test the printer and you’re done.
Case B. If its a NETWORK Printer (IP Address).
If the network printer that you want to connect to, has an IP address:
1. Type the Printer’s IP address in Hostname or IP address field* and click Next.
* Note: The IP address will be filled in automatically and in the field “Port name”.
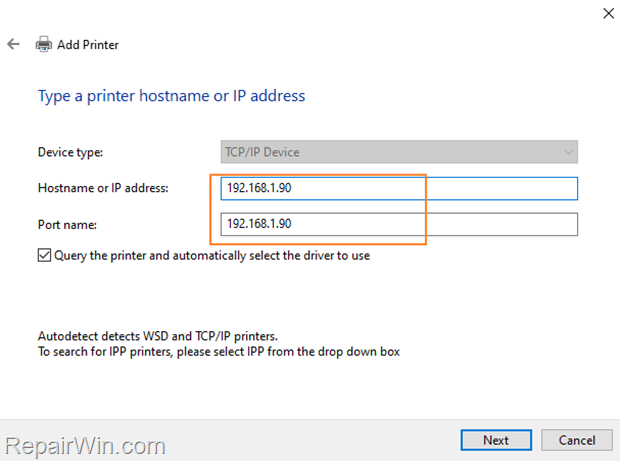
2. Let Windows to communicate with the network printer and install the necessary drivers for it. When this done, you should be able to print to it without any problems.
* Note: If Windows could not find the drivers for the printer, then download the printer driver from the manufacturer and then install the printer locally on your PC (LPT1). After installation, perform again the steps on this method to manually install the printer by using the “Local Port” option if its a shared printer, or by using the “Standard TCP/IP Port” option to install the printer using its IP Address.
Method 3. Disable Client Side Rendering (CSR) on Print Server.
When printing through a print server, the print jobs are rendered/processed in the client computer and not on the server. This can sometimes cause the 0x000003E3 error when trying to print, or it hangs print jobs in the client’s print queue. To fix this problem, proceed as follows:
1. On the Print server (the computer on which the printer is shared), open the Printer’s Properties.
2. Select the Sharing tab and uncheck the option Render print jobs on client computers and click OK.
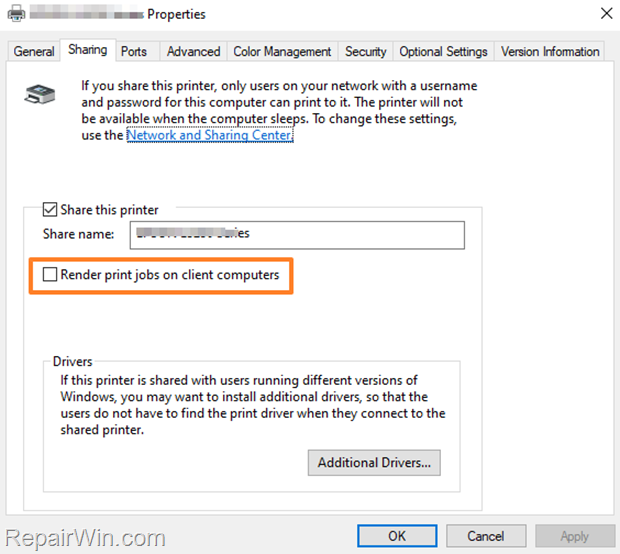
3. Now, restart the client computer and try to print again.
Method 4. Disable Client Side Rendering (CSR) in Group Policy (Client).
On the client machine receiving the print error 0x000003e3, do the following modification in Group Policy tin order to always render the print jobs on the Print Server and not in client.*
* Note: This method applies only to Windows 10/11 Pro versions. If you face the printing error 0x000003e3 on Windows 10/11 Home, skip to Method-5 below.
![]() + R keys to open the run command box.
+ R keys to open the run command box.
2. In the Search box, type: gpedit.msc & click OK.
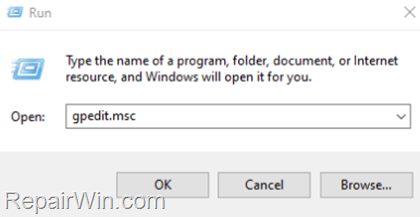
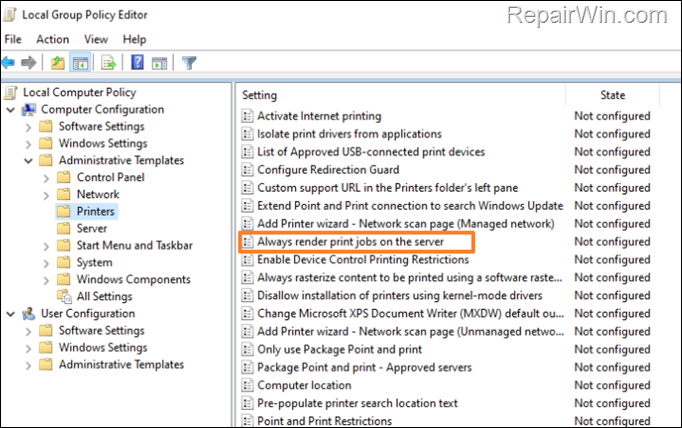
3. In Group Policy Editor navigate to the following location:
- Computer ConfigurationAdministrative TemplatesPrinters
4. At the right pane open the Always render print jobs on the server policy.
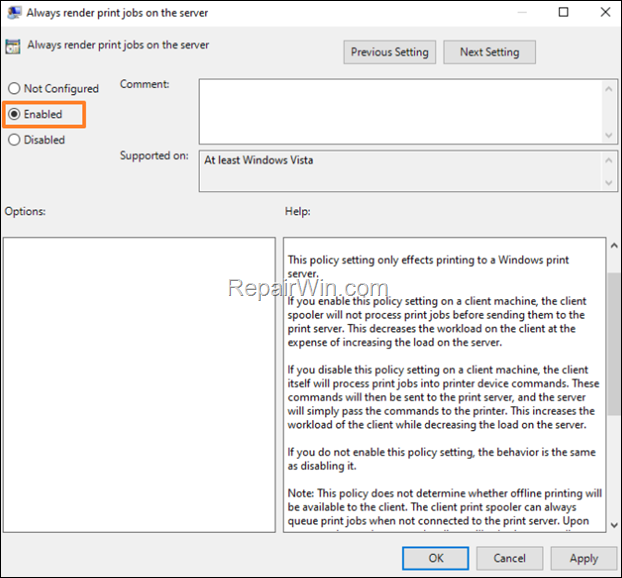
5. Set the policy to Enabled and click Apply > OK.
5. Close the Group Policy editor, restart the computer and try to print again.
Method 5. Disable Client Side Rendering (CSR) through Command Prompt (Client).
To disable the Client Side Rendering on Windows 10/11 home computer(s):
1. Then, open Command Prompt As Administrator.
2 Give the following command to get a list of all printers installed on the computer, and press Enter:
- wmic printer list brief
3. Notice in the list the name of the Network Pinter that gives you the error “0x000003e3”.
4. Then give the following command to disable the Client Side Rendering for the shared printer, and press Enter:
- printui /Xs /n “Printer-Name” ClientSideRender disabled
* Note: Replace the “Printer-Name” in the above command, with the name of the printer.
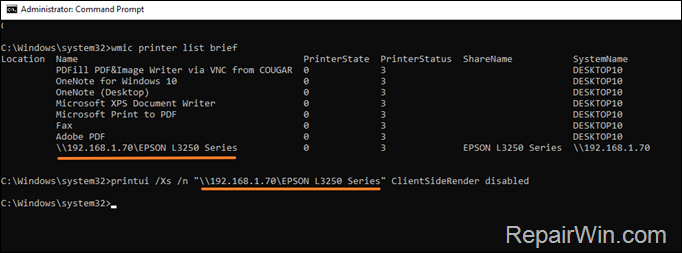
5. Finally, try to print again. *
* Note: If the problem persists, restore the “Client Side Rendering” to its default value (enabled), by giving the following command in Command Prompt (Admin) and continue to next method:
- printui /Xs /n “Printer-Name” ClientSideRender enabled
Method 6. Fix Printer error 0x000003e3 in Registry. (Client).
The final method to fix the error 0x000003e3, is to delete the Print Providers registry key which stores info for the “Client Side Rendering Print Provider”.
1. Open Windows Services (services.msc), and Stop the Print Spooler.

![]() + R keys to open the run command box.
+ R keys to open the run command box.
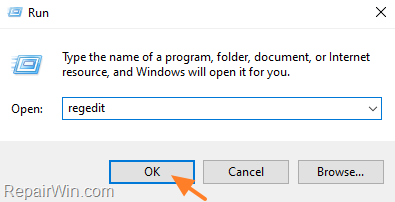
3. Type regedit and press Enter.
4. In Registry Editor navigate to the following location:
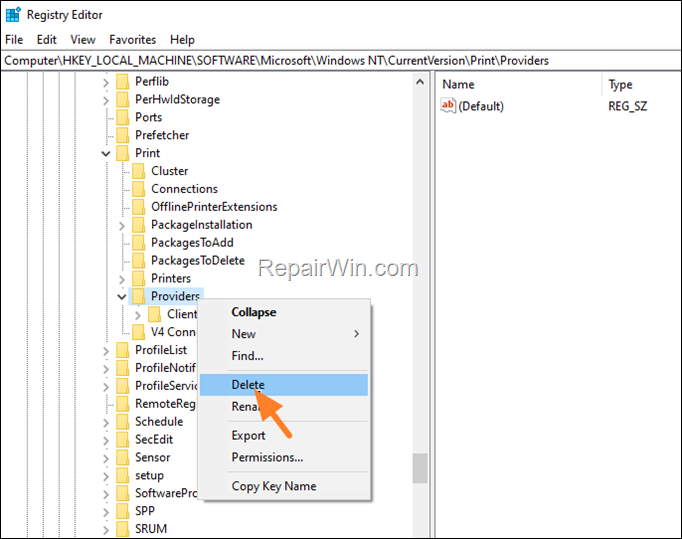
- HKEY_LOCAL_MACHINESOFTWAREMicrosoftWindows NTCurrentVersionPrintProviders
5. Then, right-click on the Providers key and select Delete.
6. When done, close the Registry Editor.
7. Go to again to Services panel, right-click on Print Spooler service and click Start.

8. Try to print now.
That’s all folks! Did it work for you? If so, by what method?
Please leave a comment in the comment section below or even better: like and share this blog post in the social networks to help spread the word about this problem.
