,
The error message “This sign-in option is disabled because of failed sign-in attempts or repeated shutdowns. Use a different sign-in option, or keep your device powered on for at least 2 hours and then try again” is a common issue faced by users when trying to log in to their Windows 10 or Windows 11 PC.
This error usually occurs after several failed login attempts but it could also be caused by repeated shutdowns, Windows updates, problems with the Windows authentication system, or corrupted system files.
In this guide, we have put together a list of solutions that will definitely help you fix this error.
How to FIX: This Sign-in option disabled. Keep your device on for 2 hours and try again on Windows 10/11.
- Sign-in using a different method.
- Try to sign-in again after 2 hours.
- Reset PIN or Password.
- Unlock Locked Account (Windows 10/11 Pro).
- Change Account Lockout Policy. (Windows 10/11 Pro).
- Modify Account Lockout settings in Registry. (Windows 10/11 Home).
Method 1: Use a Different Sign-in option/method.
In case the PIN sign-in method does not work, you can try using another sign-in option if available. For example, you can try using your password or fingerprint to sign in to Windows.*
* Tip: Having multiple sign-in options (e.g. PIN, Password or Fingerprint), provides flexibility and allows you to access your account even if one method fails.
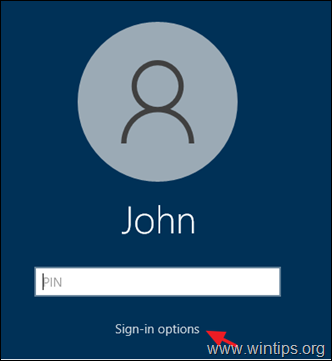
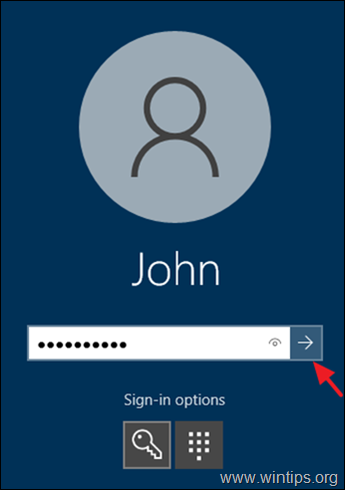
1. In the login screen, click Sign-in options.
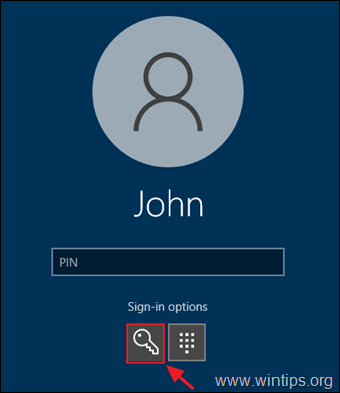
2. Now click the Key icon.
3. Type your password and press Enter to login to Windows. *
* Notes:
1. If you’re using a Microsoft Account to login to Windows and you have forgotten the password, proceed and Reset your Microsoft Account password.
2. If you’re using a Local account to login to Windows and you have forgotten the password, skip to method-4.
4. After entering to Windows got Settings -> Accounts -> Sign in options and reset your PIN.
Method 2: Keep your System On for 2 hours.
If you or someone in your home tried to log in to your computer with the wrong password or PIN several times, Windows thinks it’s a security risk and blocks access. You’ll then see an error message saying “This sign-in option is disabled because of failed sign-in attempts“.
In such a case and if you’re in no hurry to use your computer, just keep it turned on for a couple of hours and then try logging in again. If it’s a laptop, make sure it’s plugged into power.
But if you really need to use your computer right away or if the error happened for a different reason, follow the methods below to fix the issue.
Method 3: Reset your Microsoft’s Account PIN or Password.*
If you cannot login to Windows with your MS account’s Password or PIN, you can try resetting the PIN or password of your MS account.
* Note: This method only works if you sign in to Windows with a Microsoft account. If you sign-in with a local account, skip to next method.
- To reset your Microsoft Account Password: follow the instructions on this Microsoft page: Reset your Microsoft Account password.
- To reset the Microsoft Account PIN, follow the instructions below:
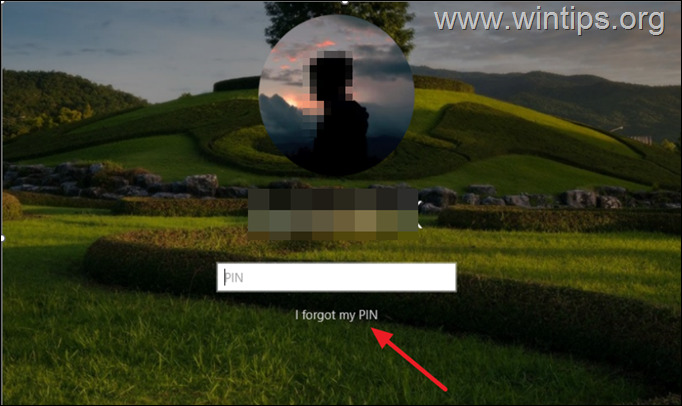
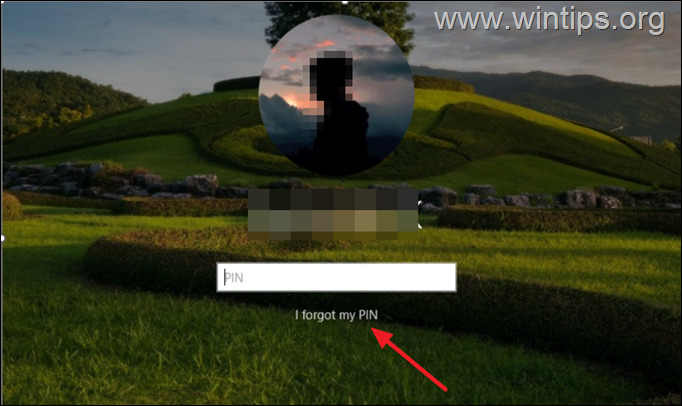
1. Make sure your device is connected to the Internet and click on the I forgot my PIN option on the login screen.
2. When the Microsoft accounts dialog box will appear on the screen, enter your Microsoft account password and click Sign in.

3. Next, verify your identity by selecting Text to receive a code on your phone*, or Email to get a verification email on your email account, or if you have security codes, click I have a code and enter it.
* Note: If you chose to receive a code on your phone, enter the last four digits of your mobile number when prompted.
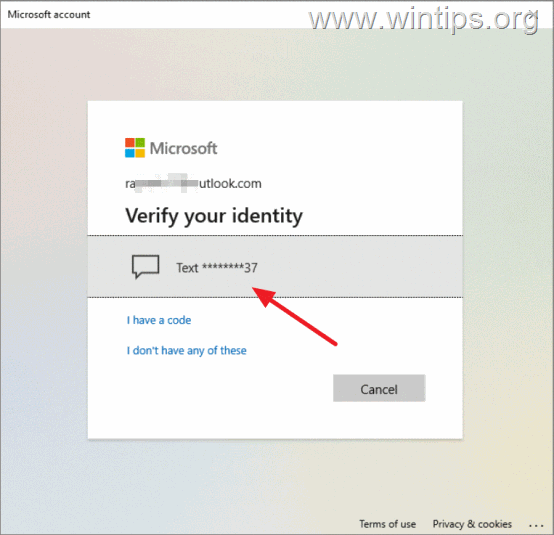
4. Now enter the code received on your phone or email and click on Verify.

5. Once your identity is verified, you will be asked to confirm whether you want to proceed with the reset of your computer PIN. Click Continue to reset your PIN.

6. Now type a new PIN (twice to confirm it), and click OK.
7. Now you should login to Windows with the new PIN.
Method 4. Unlock Locked Account in Windows 10/11 Pro.
If you can login to Windows using another account* and you own a Windows 11/10 Pro, Education or Enterprise edition**, try to unlock/enable your account using the “Local Users and Groups” console.
Notes:
1. This method, can be applied only if you can login to the PC using another account with administrative privileges. If you haven’t another admin account on your PC, then follow the instructions in this article to enable the hidden Administrator account by modifying the Windows Registry offline. After enabling the Administrator account, restart the PC, login the “Administrator” account and apply the instructions below:
2. If you’re using Windows 10/11 Home version, skip to method 6 below.
1. Sign-in to Windows using another user account with administrative privileges.
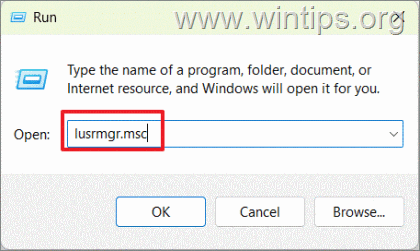
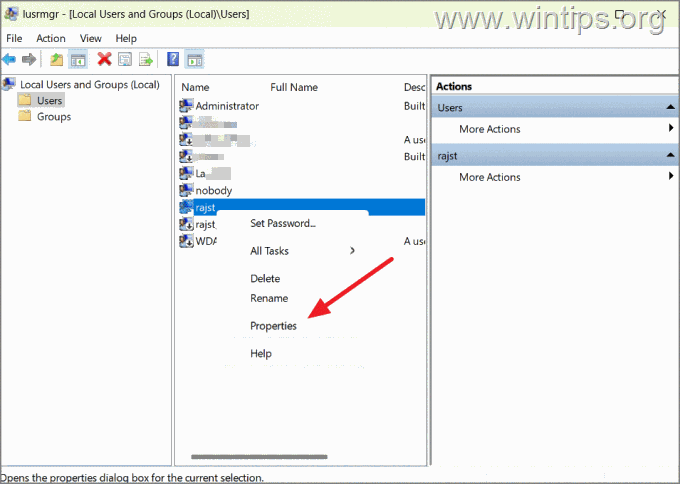
2. Press Windows + R, type lusrmgr.msc in the Run command box and press Enter.
3. Under the Local User and Groups section, select the Users folder.
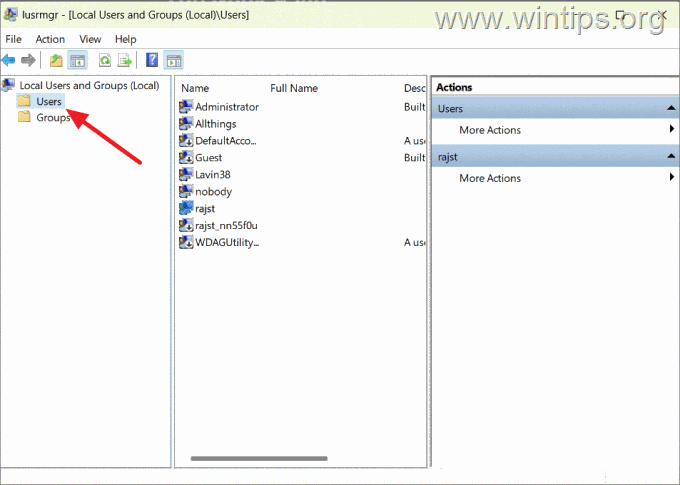
4. Now, right-click on the locked user account and select Properties.
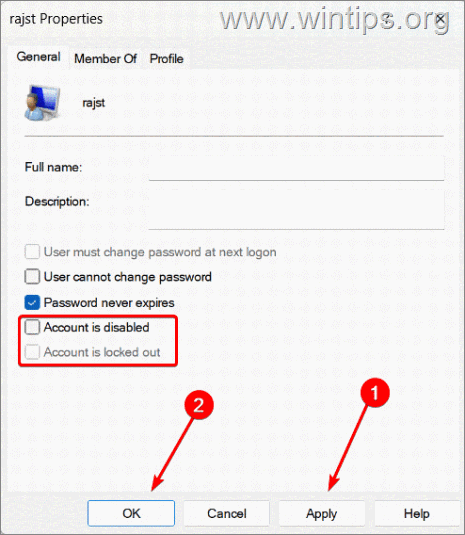
5. Now, uncheck the following options and click Apply > OK:
- Account is disabled
- Account is locked out
6. After that, restart your PC and try to sing-in to the locked account.
Method 5: Edit the Account Lockout Policy in Windows 10/11 Pro.
The lockout policy in the Windows settings defines the maximum number of login attempts a user can make before their account gets locked, the duration of the lockout, and the duration to reset the failed attempt counter.
So, if you can sign-in to Windows using another account with administrative privileges and you’re running a Windows 11/10 Pro, Education or an Enterprise edition, proceed to change the Account lockout threshold policy setting as described below.
Notes:
1. This method, can be applied only if you can login to the PC using another account with administrative privileges. If you haven’t another admin account on your PC, then follow the instructions in this article to enable the hidden Administrator account by modifying the Windows Registry offline. After enabling the Administrator account, restart the PC, login the “Administrator” account and apply the instructions below:
2. If you’re using Windows 10/11 Home version, skip to method 6 below.
1. Sign-in to Windows using another user account with administrative privileges.
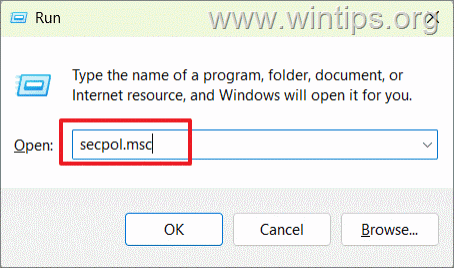
2. Press Windows + R to open the Run dialog, type secpol.msc and press Enter.
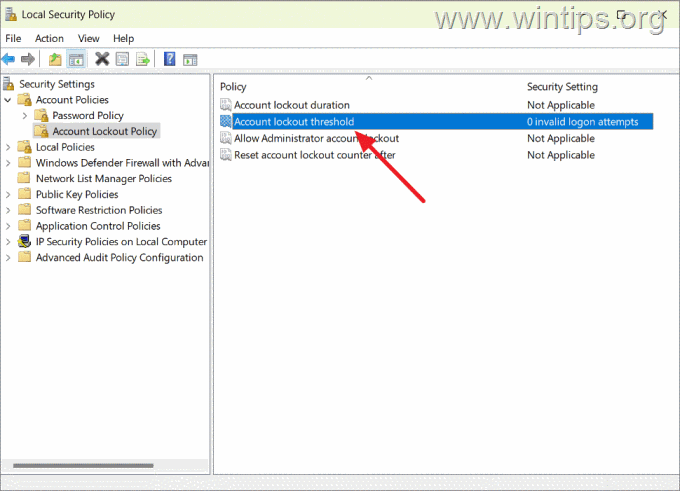
3. Under Security Settings, expand Account Policies and then select Account Lockout Policy.
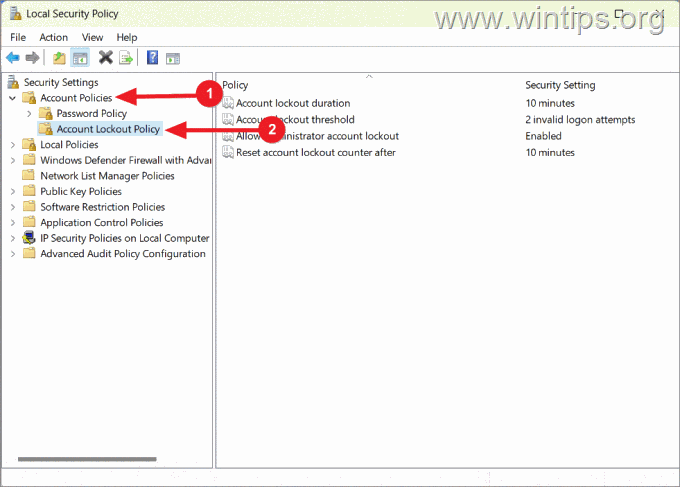
4. Now, double-click on the Account lockout threshold policy on the right-side pane to edit it.
5. Under the Local Security Setting tab, set the value to 0, and click Apply to save the changes. Then, click OK.
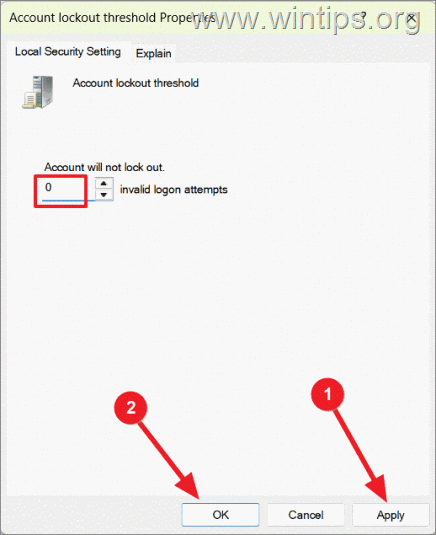
6. Restart the PC and try to login to the locked account.
Method 6: Change Account Lockout Settings in the Registry Editor
In Windows 10/11 Home edition, the Registry Editor can be used to modify the Account lockout policy settings and fix the problem.
1. Sign-in to Windows using another user account with administrative privileges.
2. Search for Registry Editor in the Windows search and select it from the result.
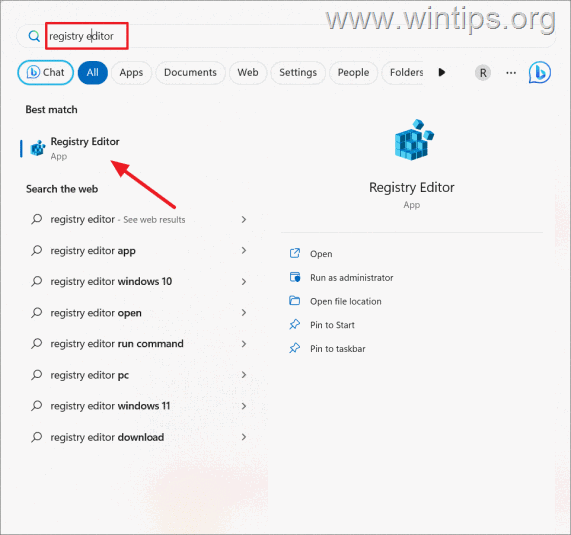
3. Once the Registry Editor opens, navigate to the following location using the left navigation panel, or copy-paste the path below into the address bar and hit Enter:
- HKEY_LOCAL_MACHINESYSTEMCurrentControlSetServicesRemoteAccessParametersAccountLockout
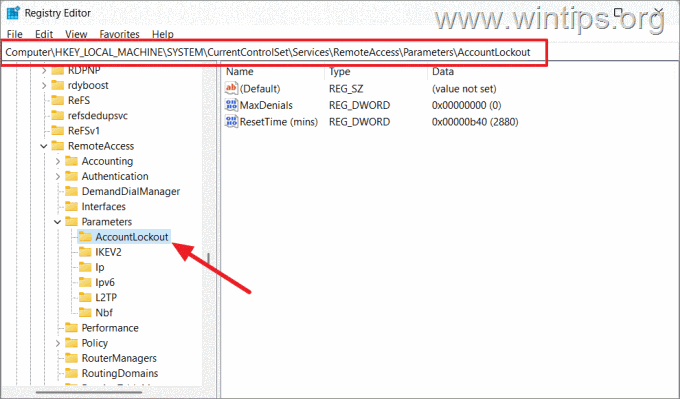
4. At the right pane, double-click to open the MaxDenials DWORD and change its value to 0. When done, click OK and close the Registry Editor.
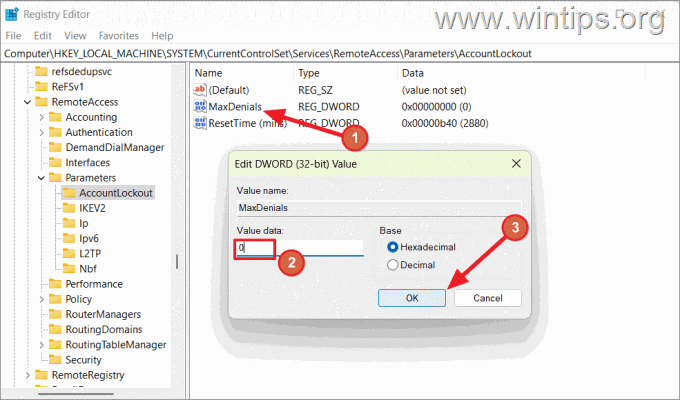
5. Restart the computer to apply the change and try to login to your account.
That’s it! Which method worked for you?
Let me know if this guide has helped you by leaving your comment about your experience. Please like and share this guide to help others.
