In this guide, we’ll show you how to back up your notes from Sticky Notes app on Windows 10/11 and how to restore them to the same or another computer if needed.
Windows Sticky Notes is a built-in application that has been around since Windows 7 and allows users to create virtual sticky notes on the Windows desktop. Sticky notes is a convenient and easy way to keep your notes or important information such as passwords, tracking numbers and anniversary dates.
Because backing up your Sticky Notes is important, here you’ll find instructions on how to backup your notes locally (for example, on an external USB drive), or synchronize your Sticky notes with your online Microsoft account so you can access them through Outlook Web and Outlook for Desktop.
How to Back up and Restore Sticky Notes on Windows 10/11.
There are the following three (3) methods to backup your Sticky Notes on Windows 11/10:*
* Note: The first method also works on Windows 8, 8.1 and 7 OS.
- Backup – Restore Sticky Notes manually.
- Sync Sticky Notes with Microsoft Account.
- Backup – Restore Sticky Notes with File History.
Method 1: Manually Backup & Restore Sticky Notes via File Explorer
Sticky Notes app stores its contents locally in a single SQLite database file named “plum.sqlite“. To back up your sticky notes just copy this database file to your backup location.
![]() + R keys to open the Run command box.
+ R keys to open the Run command box.
2. Copy and paste the following path and press Enter:
- %UserProfile%AppDataLocalPackagesMicrosoft.MicrosoftStickyNotes_8wekyb3d8bbweLocalState
* Note: In case you are using Windows 10 version 1511 or Windows 8, 8.1, or 7, copy-paste the following path instead:
- %UserProfile%AppDataRoamingMicrosoftSticky Notes
![clip_image002[4] clip_image002[4]](https://techprotips.com/wp-content/uploads/2023/08/localimages/clip_image0024_thumb.png)
2. Locate the file named “plum.sqlite“, right-click on it, and select Copy. *
* Note: In case you are using Windows 10 version 1511 or Windows 8, 8.1, or 7, copy-paste the “StickyNotes.snt” file to your backup location.
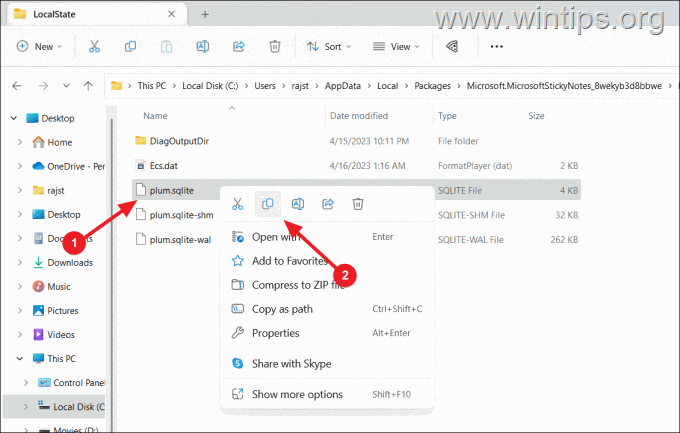
3. After copying the file, paste it at your backup location (e.g. to a USB drive) and use it to restore your Sticky Notes if needed, by using the instructions below. *
* Note: To keep a recent backup of your Sticky Notes, don’t forget to perform the above steps frequently or to include the “plum.sqlite” file in your regular backup routine.
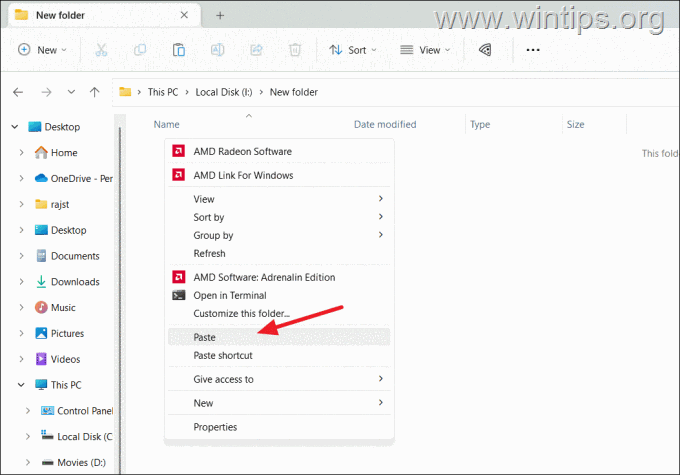
How to Manually Restore Sticky Notes.
Once you have a backup of the sticky notes database file “plum.sqlite”, you can either restore your notes on the same computer or to transfer them to another one. To restore the Sticky Notes, follow these steps:
1. Right-click on any space on the taskbar and select Task Manager from the overflow menu, or press CTRL + SHIFT + ESC.

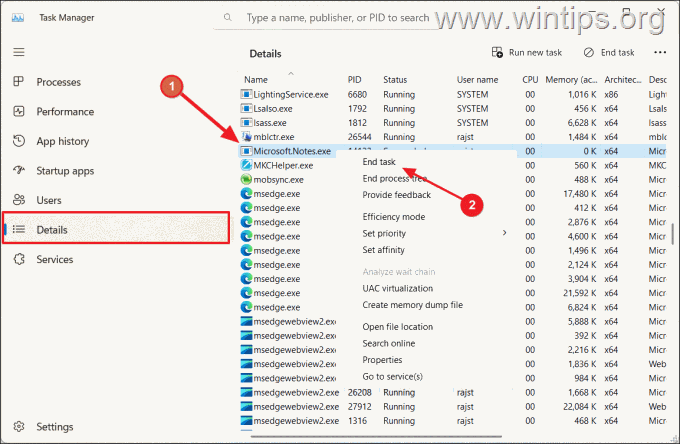
2a. In the Task Manager window, select the Details tab.
2b. Right-click on the Microsoft.Notes.exe and choose the End task option.
2c. Then, click End process at the confirmation box to kill the service.
![]() + I to open the Windows settings and click Apps. If you own Windows 11, go to Apps > Installed apps.
+ I to open the Windows settings and click Apps. If you own Windows 11, go to Apps > Installed apps.
![clip_image012[4] clip_image012[4]](https://techprotips.com/wp-content/uploads/2023/08/localimages/clip_image0124_thumb.png)
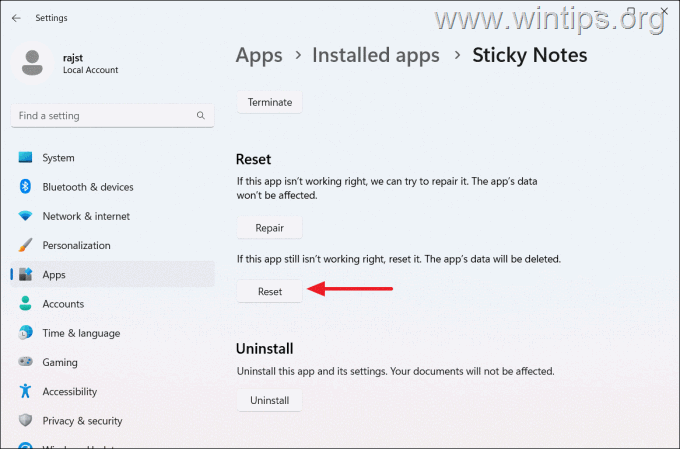
4. From the list of apps, find and click on the Sticky Notes app and select Advanced options. (If you own Windows 11, click the three dots button on the Sticky Notes and select Advanced options).
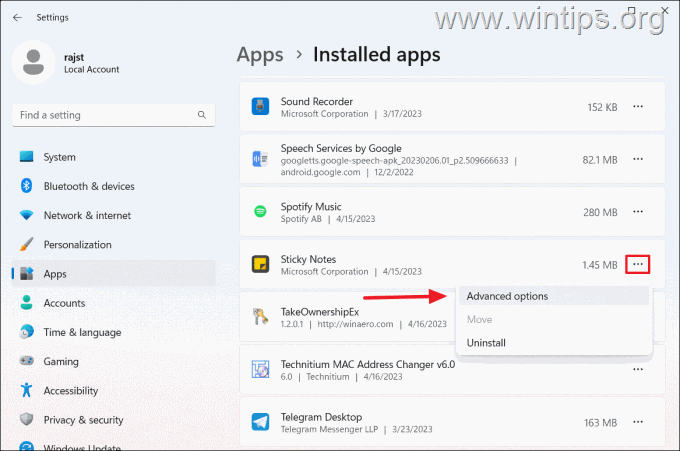
5. On the app’s settings page, click the Reset button and then click Reset again to confirm your decision.
![]() + R keys to open the Run command box.
+ R keys to open the Run command box.
6b. Copy and paste the following path and press Enter:
- %UserProfile%AppDataLocalPackagesMicrosoft.MicrosoftStickyNotes_8wekyb3d8bbweLocalState
* Note: In case you are using Windows 10 version 1511 or Windows 8, 8.1, or 7, copy-paste the following path instead:
- %UserProfile%AppDataRoamingMicrosoftSticky Notes

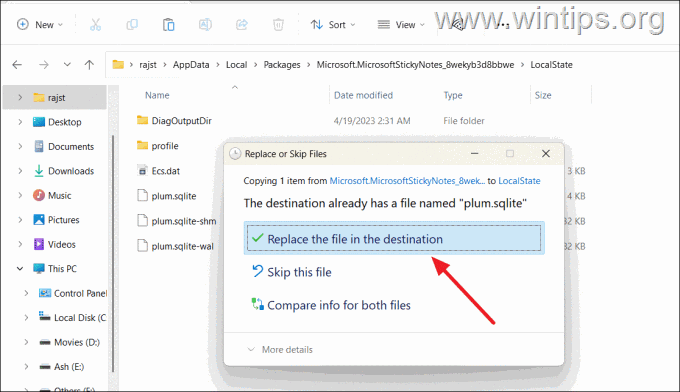
7a. Finally copy the Sticky Notes “plum.SQLite” file from your backup location and paste it on the “Local State” folder. *
* Note: In case you are using Windows 10 version 1511 or Windows 8, 8.1, or 7, copy the “StickyNotes.snt” file from your backup location to the “Sticky Notes” folder.
7b. On the prompt box, click Replace the file in the destination.*
* Note: This action will delete any existing notes on the device and replace them with your Sticky notes from the backup.
Method 2: Sync Sticky Notes to Microsoft Account.
Another easy way to backup your Sticky Notes, is to Sync them with your Microsoft account on the cloud. The advantages of this method are that your Sticky Notes will be available to any device you using your Microsoft Account and in Outlook for desktop & Outlook for web apps.
However, the Online Sync feature is only available on Windows 10 version 1809 (October 2018 Update) and later, including Windows 11. Here’s how to sync your Sticky Notes with your MS Account.
1. Launch the Sticky Notes app and click the Settings icon.

2. Then, click the Sign in button. (If you already synced with your MS account, skip to step-4)
![clip_image024[4] clip_image024[4]](https://techprotips.com/wp-content/uploads/2023/08/localimages/clip_image0244_thumb.png)
3. Enter your Microsoft login credentials to sign-in in Sticky notes app.
![clip_image026[4] clip_image026[4]](https://techprotips.com/wp-content/uploads/2023/08/localimages/clip_image0264_thumb.png)
4. Once you signed in, click the Sync now button in the app’s settings to sync your notes to your Microsoft account on the cloud.
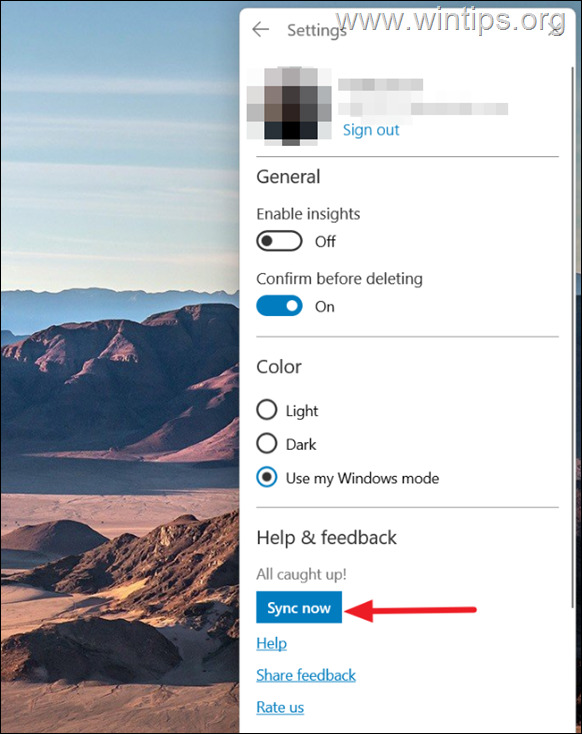
5. That’s it! From now on, all your Sticky Notes will be accessible on any device you sign in to with the same Microsoft account.
How to Access your Sticky Notes from Outlook.
As I mentioned above one of the advantages of synchronizing your sticky notes with your Microsoft account is that they can easily be accessed from anywhere via Outlook on the web or in Outlook for desktop app.
To view your Sticky Notes in Outlook for web:
1. Go to Outlook.com and log in with your Microsoft account.
2. From the left-side navigation panel, click Notes under the Folders section.
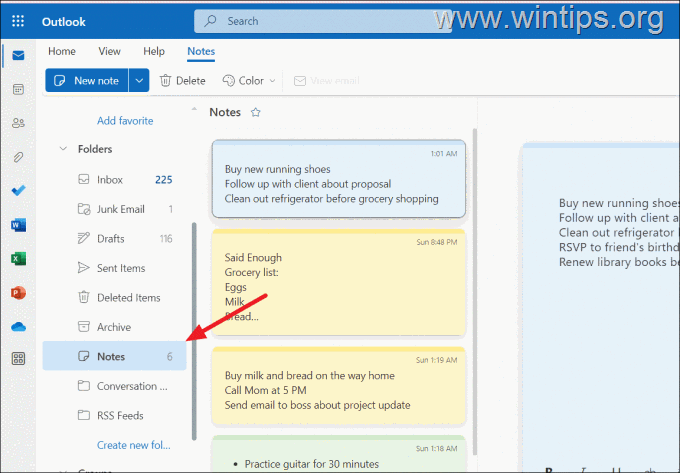
3. Here, you can access all your synced notes. By right-clicking on the sticky note, you can easily copy its contents and paste them somewhere else if required.
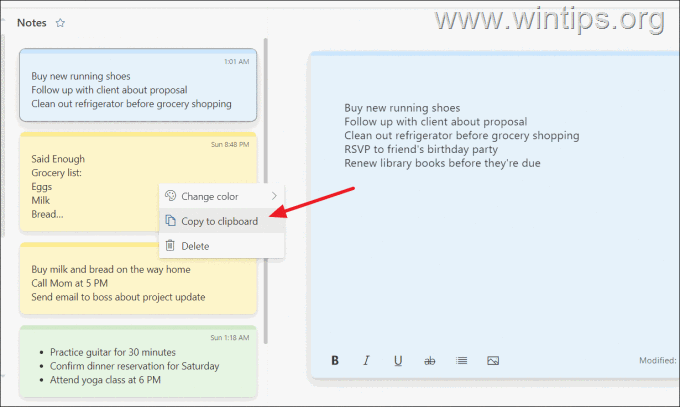
Tip: If you accidentally deleted one of your sticky notes, you can also easily restore them from Outlook. Just go to the Deleted Items folder, select the deleted note and click the Restore button on the Toolbar.
![clip_image034[4] clip_image034[4]](https://techprotips.com/wp-content/uploads/2023/08/localimages/clip_image0344_thumb.png)
To view your Sticky Notes in Outlook desktop app:
1. Open Outlook and, if you haven’t already done so, add your Microsoft account to Outlook. (From File menu, click Add Account and then follow the onscreen instructions to add your MS Account).
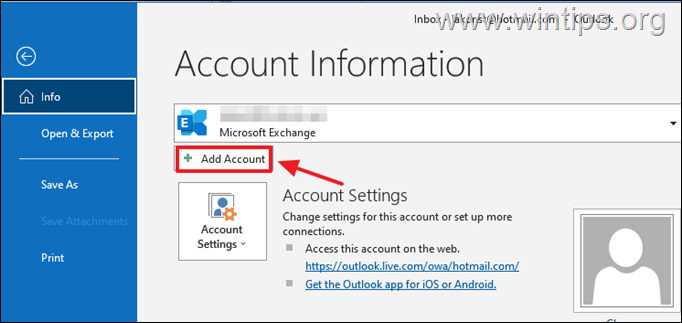 2. .
2. .
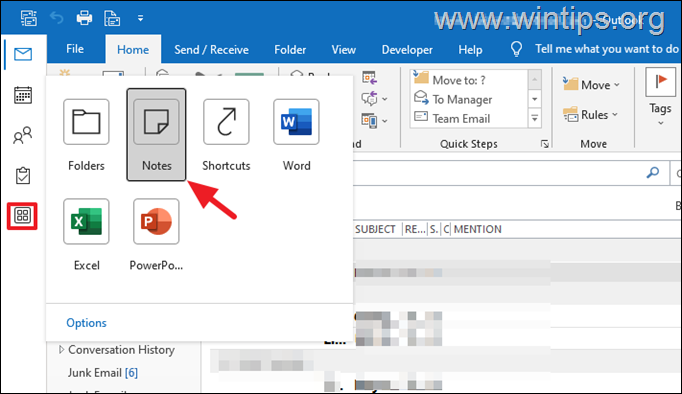
2. After adding your MS account, click on More apps icon![]()
![]() on the sidebar and click Notes, to view your Sticky Notes in Outlook.
on the sidebar and click Notes, to view your Sticky Notes in Outlook.
Method 3: Backup – Restore Sticky Notes using File History in Windows 10/11.
While the Microsoft sync feature is a convenient way to back up your Sticky Notes, it does require an internet connection and a Microsoft account. If you prefer to back up your notes periodically either offline, the “File History” feature is a good alternative.
With File History, you can easily back up your personal files and Sticky notes automatically to an external hard drive and ensure you always have a recently updated copy of them.
To backup Sticky Notes with File History.
1. First, connect a USB drive to the computer where you want to back up your sticky notes.
2. Type “file history” in the Windows Search and then select File History from the search result.
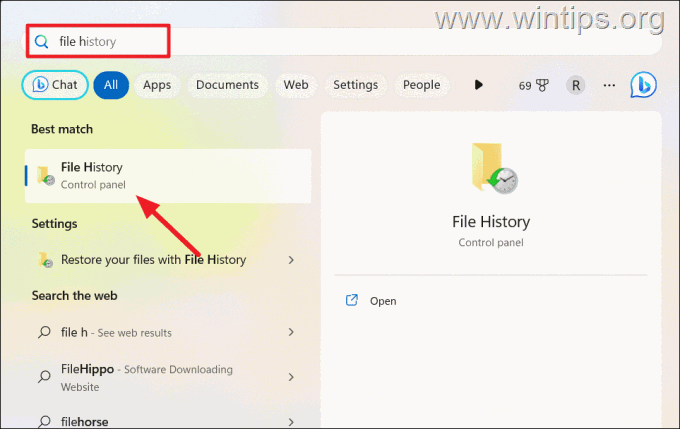
3. In the File History page of the Control Panel, click on the Select drive option from the left sidebar to choose the backup location.

4. Select the USB drive to save the backup and click OK.
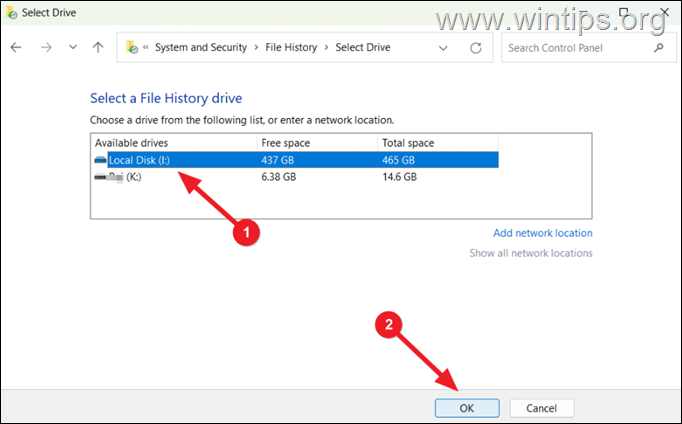
5. Now click the Turn on button

6. File History will start saving the first copy of your files on the Desktop, Documents, Music, Pictures and Videos folders to the external USB drive. Wait until this process is completed and do not Stop it.

7. When you see the message “Files were last copied on…” with the “Run now” option below, it means that the backup process is complete. When this is done, proceed to the next step.

8. To back up your Sticky Notes files using File History, you would need to add the Sticky Notes “LocalState” folder to the list of “Libraries” folders, as instructed below.
![]() + R keys to open the Run command box.
+ R keys to open the Run command box.
9b. Copy and paste the following path and press Enter:
- %UserProfile%AppDataLocalPackagesMicrosoft.MicrosoftStickyNotes_8wekyb3d8bbwe
![clip_image052[4] clip_image052[4]](https://techprotips.com/wp-content/uploads/2023/08/localimages/clip_image0524_thumb.png)
10. Right-click on the “Local State“* folder and select Include in library -> Create new library.
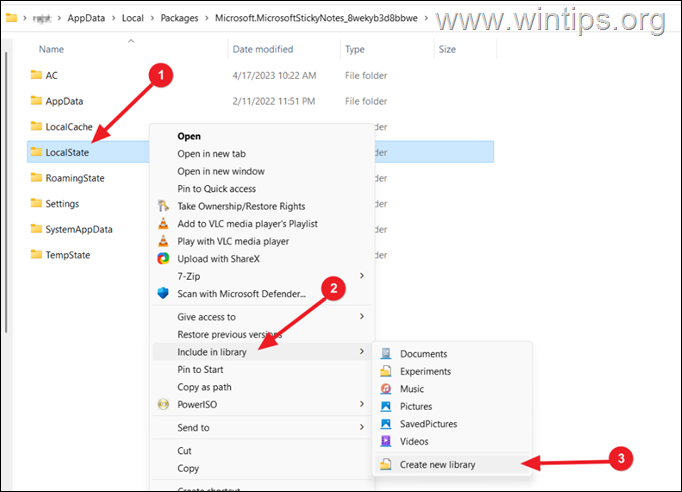
11. After doing the above, the “LocalState” folder will now appear under Libraries in the navigation pane of File Explorer.
![clip_image056[4] clip_image056[4]](https://techprotips.com/wp-content/uploads/2023/08/localimages/clip_image0564_thumb.png)
12. Now, go back to the “File History” page and click on Advanced settings from the left-hand side panel.

12. Click the drop-down menu next to Save copies of files and choose how often you want to back up your files and your Sticky Notes. (e.g. “Every hour”)

13. Leave the default setting “Forever”, on the Keep saved versions option and click Save changes to save the settings.
![clip_image050[4] clip_image050[4]](https://techprotips.com/wp-content/uploads/2023/08/localimages/clip_image0504_thumb.png)
14. Finally, click the Run now button to include the “Sticky Notes” in the File History backup.
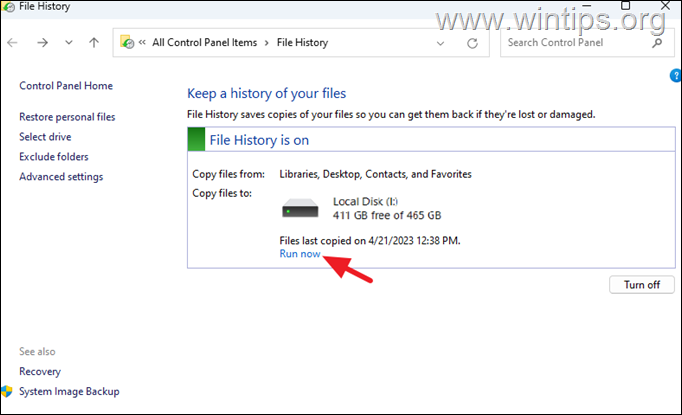
15. That’s it. From now on, File History will save copies of your Sticky Notes and your files automatically according to the backup frequency you’ve specified.
How to Restore Sticky Notes from File History.
To restore your Sticky Notes in Windows 10/11 using File History, follow these steps:
1. Open File History and click on Restore personal files from the left sidebar.
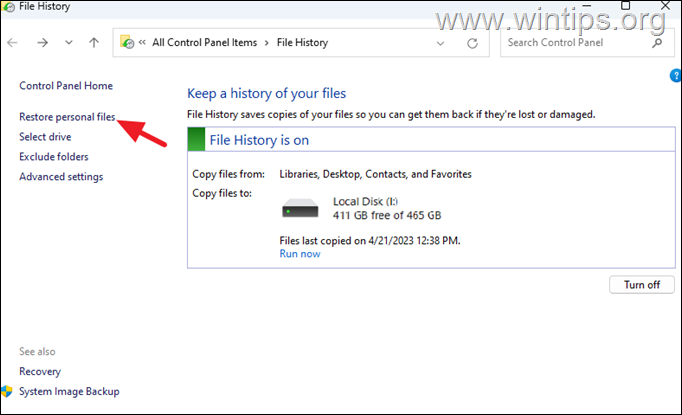
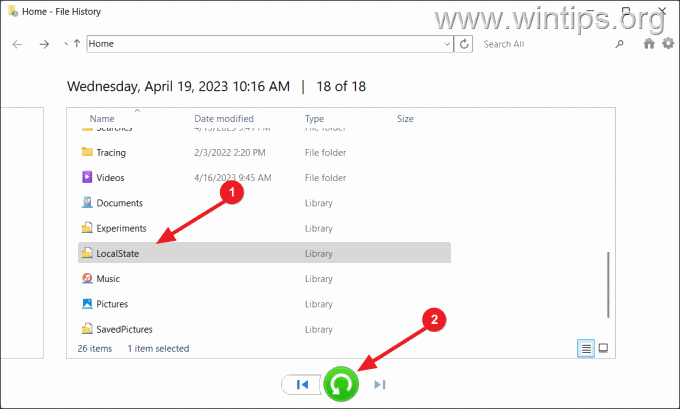
2a. The Files History app will show you a list of files and folders that it has backed up. Find in the list the Sticky Notes “LocalState” folder and click to select it.
2b. Then, click on the green restore button ![]()
![]() to restore the folder.
to restore the folder.
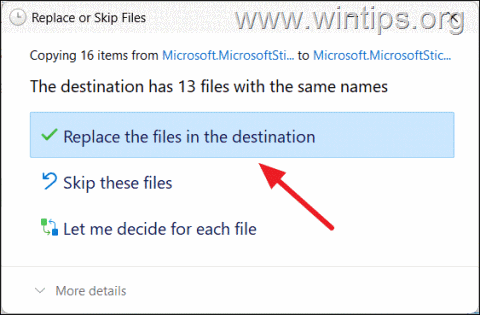
3. Select Replace the files in the destination when prompted to restore your Sticky notes.
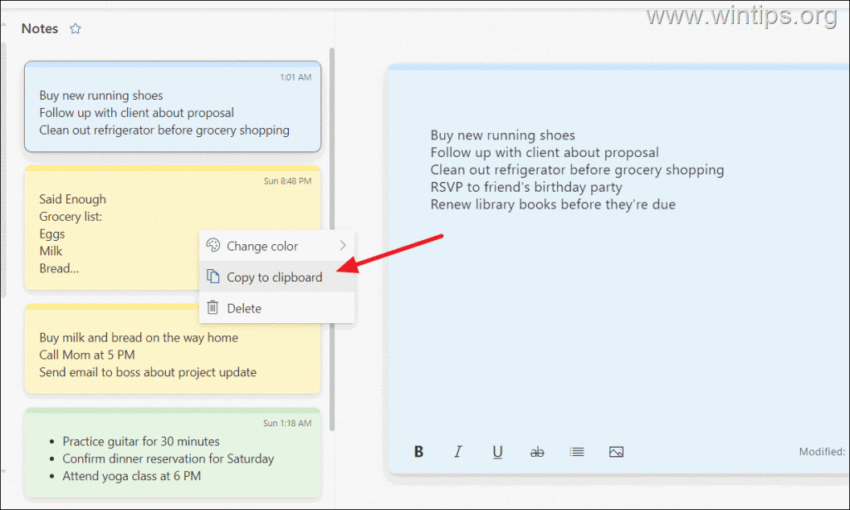
4. Once the process is finished, you should have your Sticky Notes back.
That’s it! Which method worked for you?
Let me know if this guide has helped you by leaving your comment about your experience. Please like and share this guide to help others.
![clip_image002[4] clip_image002[4]](https://techprotips.com/wp-content/uploads/2023/08/localimages/clip_image0024_thumb.png.webp)


![clip_image012[4] clip_image012[4]](https://techprotips.com/wp-content/uploads/2023/08/localimages/clip_image0124_thumb.png.webp)


![clip_image024[4] clip_image024[4]](https://techprotips.com/wp-content/uploads/2023/08/localimages/clip_image0244_thumb.png.webp)
![clip_image026[4] clip_image026[4]](https://techprotips.com/wp-content/uploads/2023/08/localimages/clip_image0264_thumb.png.webp)


![clip_image034[4] clip_image034[4]](https://techprotips.com/wp-content/uploads/2023/08/localimages/clip_image0344_thumb.png.webp)


![clip_image052[4] clip_image052[4]](https://techprotips.com/wp-content/uploads/2023/08/localimages/clip_image0524_thumb.png.webp)

![clip_image056[4] clip_image056[4]](https://techprotips.com/wp-content/uploads/2023/08/localimages/clip_image0564_thumb.png.webp)


![clip_image050[4] clip_image050[4]](https://techprotips.com/wp-content/uploads/2023/08/localimages/clip_image0504_thumb.png.webp)


