,
This guide shows how to back up a Synology NAS device to an external USB drive using Hyper Backup & USB Copy programs.
Network Attached Storage (NAS) devices have become extremely popular these days because they provide the ability to store large amounts of data securely at a relatively low cost.
However, even with the redundancy provided by NAS systems, it is still important to have an additional backup copy of the NAS data on another storage device. (e.g. on an external USB drive, another NAS device, Cloud, etc.)
Synology, offers two programs to manually backup or schedule backups of your Synology NAS files to USB. The first one, is the Hyper Backup and the second is the USB Copy. Both programs has the feature to manually or automatically backup files and folders from Synology NAS to USB storage devices, but they have important dereferences:
- Hyper Backup: It can backup all Synology NAS information (files, apps, settings), into a single compressed file, which can be only opened either on the NAS, or by using the Synology Hyper Backup Explorer app on a desktop computer.
- USB Copy: It can backup only the Synology NAS files, but the backup can be viewed on any computer without installing any other application, if the backup data are uncompressed.
In this article, you will learn how to back up your Synology NAS data to a USB disk by using both the below programs.
Part 1. How to use Hyper Backup to Back Up Synology to USB Drive.
Synology’s Hyper Backup program allows you to back up your Synology NAS files, applications and configuration, manually or by schedule, to multiple destinations, including public cloud services, local shared folders, remote Synology NAS, external storage devices attached to Synology NAS, etc.
With Hyper Backup, each backup task can retain multiple backup versions, and automatic rotation will be performed by deleting the oldest backup version or by following the Smart Recycle or customized retention policy, depending on your configuration. (To view all Hyper Backup specs, refer to this article.)
To manually or automatically back up your Synology NAS with Hyper Backup:
Step 1. Install Hyper Backup Package.
1. Attach the external USB drive, that you want to use to backup your Synology NAS.
2. Open the Package Center.
3. Search for “hyper backup” and press Enter.
4. Then click Install Hyper Backup.


Step 2. Backup Synology NAS files, apps and settings to USB Disk.
1. Open Hyper Backup
2. At Backup Destination, choose Local folder & USB and click Next.


3. At Backup Destination settings, do the following and click Next:
- At Shared folder, choose the connected USB External Disk.
- At Directory, type a name for the backup folder (on the USB disk).


4. At Data Backup options, choose to backup all the folders, (or just the folders you want to include in the backup), and click Next.


5. In the application backup options, select all the applications installed on the Synology NAS and click Next.


6. At Backup Settings options, specify the options suitable to you and click Next:*
- Task: Type a name for the Backup task (e.g. “DailyBackup2USB” if you want to backup your Synology NAS files and apps to USB every Day).
- Enable task notification: By checking this option, you will be notified of the task status via email, SMS, or push service. (If this option is selected, you should configure the email, SMS, or push services in Control Panel > Notification center)
- Compress backup data: By enabling this option, you will reduce the amount of storage space that the backup will take up. (More backup time is required when this option is enabled).
- Enable backup schedule: Enable this option to automatically repeat the backup task at a specific time/day.*
* Example: If you want to automatically run a daily backup of your Synology NAS, select Enable Schedule, then select Daily and specify at what time of day you want the backup to run.
- Enable integrity check: Schedule an automatic integrity check, which examines stored data and detects corruption, to run at a specific time to ensure data reliability.
- Enable client-side encryption: Protect your backup data from unwanted access at the destination by using a password. The password used for encryption here will be required for restoring the data backed up in this task. Thus, losing this password will result in permanent data loss.


7. At Rotation settings, if you want Enable backup rotation and then specify how many versions you want the backup to keep. *
* Example: If you set up a daily backup and set 30 versions, then after 30 days, (i.e. the 31st), the system will erase the oldest version (i.e.the 1st), so that there will always be 30 backup versions.


8. You will then be asked if you want to do the first Back up now. Click Yes to run the backup and ensure that everything is correct.


Part 2. How to use USB Copy to Back Up Synology NAS files to a USB Disk.
Synology USB Copy helps you copy files from your Synology NAS to an external USB storage device once or at scheduled times and supports various copy modes, such as Incremental, Mirroring and Multi-versioned. (To find out all USB Copy specs, refer to this article.)
To manually back up or schedule backups of Synology NAS Data with USB Copy.
Step 1. Install USB Copy Package.
1. Attach the external USB drive, that you want to use to backup your Synology NAS.
2. Open the Package Center.
3. Search for “USB Copy” and press Enter.
4. Then click Install USB Backup.


Step 2. Back up Synology NAS Data to USB Drive.
1. Open USB Copy and click the plus (+) to create a new task.


2. At Welcome screen, click Data Export.


3. At Task Settings, specify the backup source folder and backup destination folder, then “Copy mode” type, and click Next:
a. Type a name for the Task (e.g. “DailyBackup”).
b. At Source: browse and select the NAS folder you want to back up.


c. At Destination: Browse and select the attached USB drive and optionally create a folder to store the backup.


d. At Copy Mode: Select the backup type/method from the three available options and click Next: *
* Note: In this article we select the Multi-versioned copy mode.
- Multi-versioned: Each time the task runs, a folder will be created and named with the run time. All source files will be fully copied to the destination.
- Mirroring: Each time the task runs, all changes made in the source folder will be copied to the destination, making the destination folder a complete mirror copy of the source.
- Newly added source files will be copied to the destination
- Modified source files will overwrite older copies in the destination.
- Files deleted from the source folder will be deleted from the destination.
- Incremental: Each time the task runs, newly added and modified source files will be copied to the destination.
- Modified source files will overwrite older copies in the destination.
- File deleted from the source folder will not be deleted from the destination.


4. At Rotation Settings, enable if you want the backup rotation and then specify how many backup versions you want to keep. *
* Example: If you schedule (in the next step) to backup daily, then after 30 days you will have 30 different versions of your files. At the next backup, the 31st, Hyper Backup will automatically delete the oldest/earliest version, to always have 30 backup versions.


5. At Trigger Time settings, choose if you want to copy data whenever the USB/SD disk is plugged in and to eject the USB disk when copy complete.
Then, Enable Schedule if you want to automatically back up your Synology NAS data to USB, at a specific date and time and click Next.


6. In File Filter settings, choose to copy all file types and click Done.


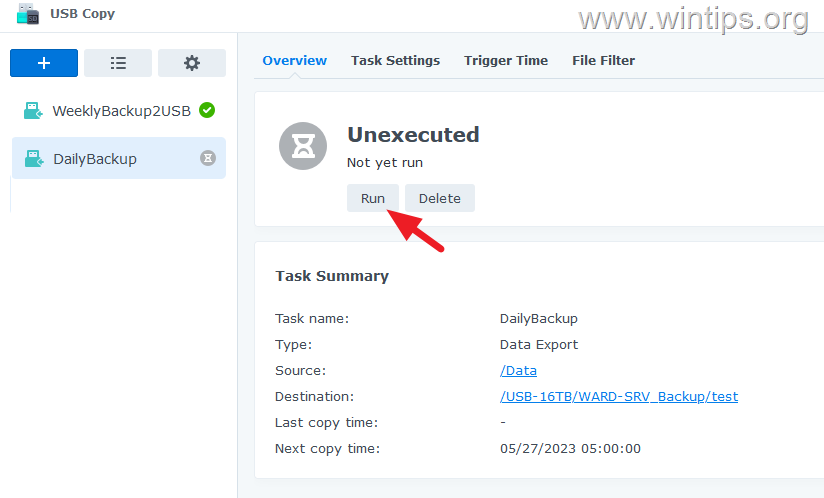
7. When the back up task is created, click Run to take the first backup of Synology NAS Data to USB.


That’s it! Which method worked for you?
Let me know if this guide has helped you by leaving your comment about your experience. Please like and share this guide to help others.
