Last updated on November 9th, 2020
As you may know, in previous versions of Outlook (Outlook 2007 or Outlook 2010), if you used an IMAP account, there was the ability to specify in which folder the Sent mail messages will be stored. But, in newer versions of Outlook (Outlook 2013, 2016 or 2016), you can’t change where the sent items are stored. To bypass this problem, continue reading below.
Info:
To change where Mail Messages are stored in previous versions of Outlook, when using an
IMAP Account
Outlook 2007:
-
From the
Tools
menu, click
Account Settings
. -
Select the IMAP email account and then click
Change
. -
Click
More Settings
. -
In the ‘Internet E-mail Settings’ window, click the
Folders
tab. -
Then select the
“Choose an existing folder or create a new folder to save your sent items for this account in”
option. -
Select the folder you want from the listed folder (usually the ‘
Sent Items
” folder), or press
New Folder
to specify a custom folder for saving the Sent emails.
Outlook 2010:
-
From the
File
menu, click
Account Settings
->
Account Settings
. -
Select the IMAP email account and then click
Change
. -
Click
More Settings
. -
In the ‘Internet email Settings’ window’
,
click the
Sent Items
tab. -
Now select the ”
Save sent items in the following folder on the server
” option, expand the folder list, and then select the folder you want to save the Sent items, or press
New Folder
to specify a custom folder for saving the Sent emails.
How to Specify where Sent Messages will be stored for an IMAP account in Outlook 2013, 2016 & 2019.
Since Outlook newer versions doesn’t allow to change where sent items are stored, the only option you have to bypass this limitation, is to create a new rule and to specify manually the destination folder for the emails you sent. So, to change the Sent items folder for your IMAP account in newer versions of Outlook:
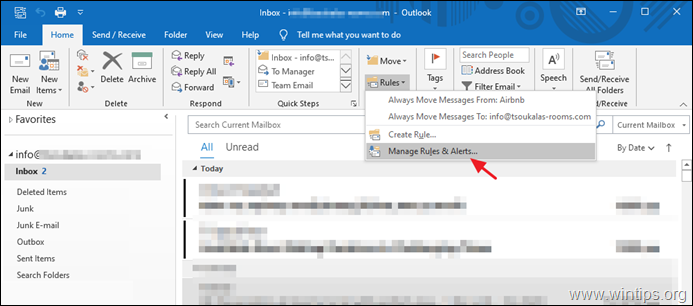
1.
At ‘Home’ Tab, click
Rules
->
Manage Rules & Alerts

2.
Click
New Rule

3.
Select
Apply rule on messages I send
and click
Next.

4.
Select
through the specified account,
click
specified
and select your email account.

5.
When done click
Next.

6.
At the next screen select
move a copy to the specified folder
and then click
specified
to select the destination folder for the messages you send.

7.
Now choose the folder you want (e.g. the “Sent items” folder) and click
OK
.

8.
Click
Next
to continue.

9.
At the next screen, click
Next
again.

10.
Finally type a name for the new created rule (optionally), and click
Finish
.

11.
You re done! From now on every email you send, will be stored to the selected mail folder.
Additional help:
If you having problems when you sending messages with an IMAP account, (e.g. the ‘Sending’ process is freezing). then proceed and turn off the saving of sent messages. To do that, navigate to ‘Account Settings”, select the IMAP account and click
Change
. Then tick the
Don’t save copies of sent items
and click
Next
to apply the change. *
* Note:
This action will disable the default “save” action of the Outlook program but it doesn’t affect the created rule you created with the above instructions.

That’s it! Let me know if this guide has helped you by leaving your comment about your experience. Please like and share this guide to help others..
Even $1 can a make a huge difference for us
in our effort to continue to help others while keeping this site free:

constantly protected
from malware threats,
existing and future ones
, we recommend that you install
Malwarebytes Anti-Malware PRO
by clicking below (we
do earn a commision from sales generated from this link, but at no additional cost to you. We have experience with this software and we recommend it because it is helpful and useful):