,
Have you ever come across C:$GetCurrent folder while trying to free up space and wondered what it is and why it’s taking up so much room? In this article, we will explain what the $GetCurrent folder is and provide steps on how to safely delete it in Windows 10 or 11.
What is $GetCurrent folder in Windows 10/11?
$GetCurrent folder is created by the operating system during the Windows upgrade process. The $GetCurrent folder usually keeps log files from your recent Windows 10/11 upgrade. Normally, these leftover files are quite small in size. But sometimes, the $GetCurrent folder may also have the installation files for a feature update and may take up a lot of space.
Actually, the size of the $GetCurrent folder varies depending on the size of the update and the data generated during installation. If it contains leftover Windows Update installation files, it can take up about 3.38 GB of space. Otherwise, it can have a minimum size of about 192-200 KB.
Is it safe to delete the $GetCurrent folder?
Yes, you can safely delete the $GetCurrent folder once you have confirmed that your system is running smoothly after an upgrade. For example, if you find that the last modification date of the $GetCurrent folder is a month ago, then you can safely delete the folder.
Windows usually automatically removes the $GetCurrent folder after 30 days of upgrading, but you can also do it manually as explained below.
How to Safely Delete the C:$GetCurrent folder on Windows 10/11.
* Notes:
1. Before deleting $GetCurrent folder, make sure there are no pending updates to install by going to Start > Settings > Windows Update.
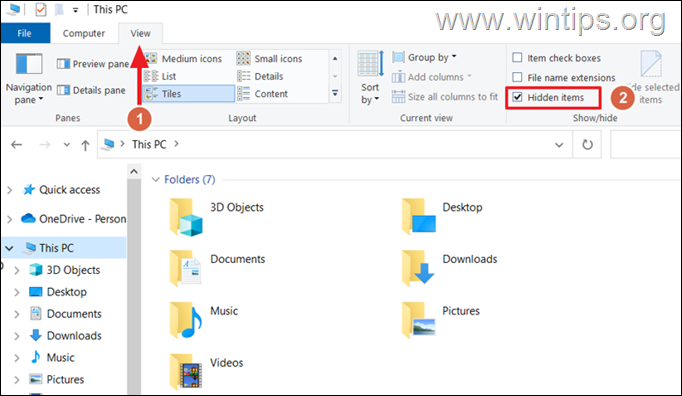
2. The $GetCurrent folder is a hidden folder and before you can delete it you must first enable the “Hidden files” view to make the folder visible. To do this, simply open File Explorer and from the View tab in the ribbon menu, check the Hidden items checkbox. Once it’s visible, you can delete $GetCurrent folder using one of the methods below.

Method 1. Delete $GetCurrent folder using Windows File Explorer
To delete the C:$GetCurrent folder using Windows File Explorer, follow these steps:
1. Open File Explorer.
2. In the File Explorer window, select the (C:) drive from the left panel.
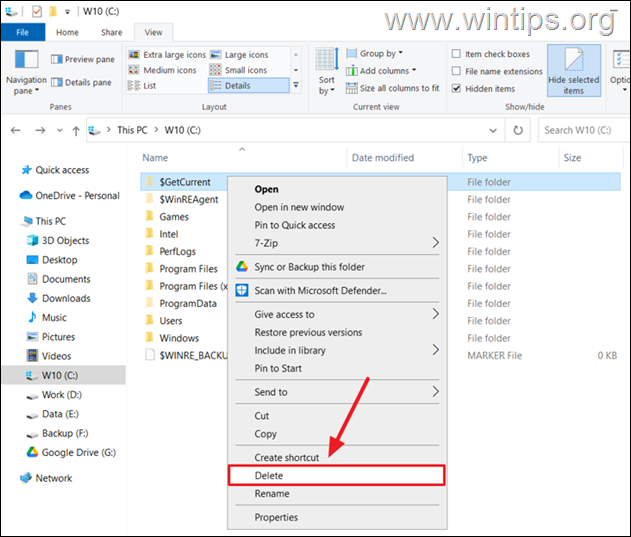
3. Then, at the right pane, right-click on the $GetCurrent folder and click Delete. If you receive a UAC prompt, select Yes to proceed.

4. After deleting the folder, right-click on Recycle bin and empty it.
Method 2. Delete $GetCurrent folder using Command Prompt
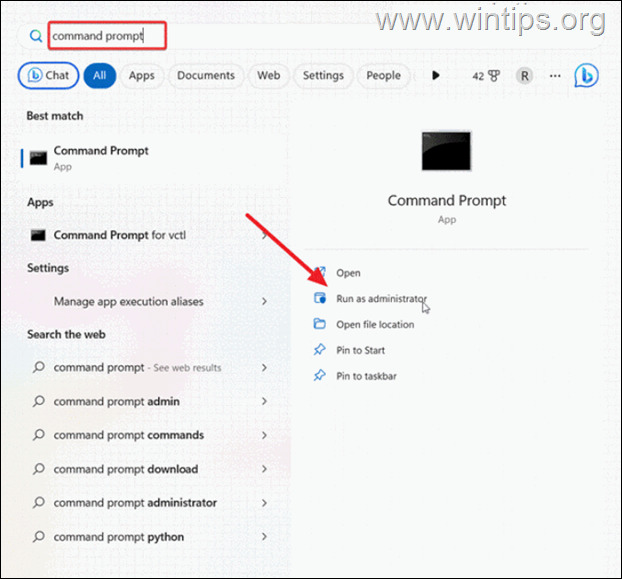
1. Click the Start button, type “command prompt” in the search box, and select Run as Administrator. *
* Note: Click Yes on the User Account Control (UAC) prompt.

2. Now, copy and paste the command below into the elevated command prompt, and then press Enter to delete the “$GetCurrent” .
- RD /S /Q “C:$GetCurrent”

3. Once the command executed, close command prompt and you’re done!
What to Do If You Cannot Delete $Getcurrent Folder?
If you are having difficulty deleting the $GetCurrent folder, it may be due to pending updates that need to be installed on your Windows computer. In this case, finish installing the updates first and then remove the $GetCurrent folder.
That’s it! Which method worked for you?
Let me know if this guide has helped you by leaving your comment about your experience. Please like and share this guide to help others.

