,
If for any reason you want to disable Windows 11 device encryption (aka “BitLocker Encryption”), this guide will teach you how to do it.
Device encryption is a security feature that helps protect the data on your device by encrypting them with a unique code to prevent unauthorized access.
In Windows 10/11, device encryption is done through BitLocker, a Microsoft encryption program used to encrypt the entire operating system drive and its files. BitLocker encrypts device data with an encryption key stored in the Trusted Platform Module (TPM), a hardware chip found in modern laptops and desktop computers.
This encryption key is attached to the device and is used to unlock and decrypt data when you sign-in to Windows 10/11 with your PIN, Password or Fingerprint, ensuring that only authorized users with the correct credentials have access to the data.
Today, newer laptops with Windows 11 preinstalled by the manufacturer usually already have device encryption enabled, and users may not need to take any additional steps.
Although this is a good practice for your security, device encryption can cause problems in some cases, (eg during a Windows Update or when trying to reset or repair Windows, when updating BIOS, etc.), and needs to be disabled.
Related article: How to Encrypt Drive C: with BitLocker in Windows 10/11 Pro & Enterprise.
How to Disable Windows 11 Device Encryption or BitLocker Drive Encryption in Windows 10/11 Pro.
To disable BitLocker device and data encryption in Windows 11, follow one of the following methods, depending on your edition of Windows:
1. Turn Off Device Encryption in Windows 11 Home.
2. Turn Off BitLocker Encryption in Windows 10/11 Pro.
3. Check Drive Encryption Status.
How to Disable Device Encryption in Windows 11 Home.
To turn off the encryption on Windows 11 Home, and to decrypt your data do the following:
1. Go to Go to Start menu > Settings > Privacy & security.
2. At the right pane, slide the Device Encryption switch to Off.


3. Then click Turn off again to remove the device encryption.
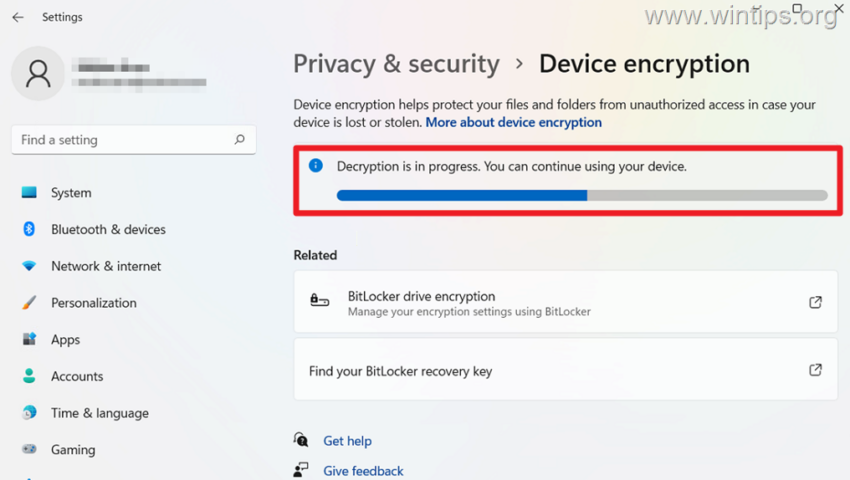
4. Then wait for the decryption to complete and you’re done!*
* Note: To enable again the Device Encryption in the future, just set this switch to On.


How to Disable BitLocker Encryption in Windows 11/10 Pro.
To turn off the encryption on Windows 10/11 Professional and Enterprise editions:
1. Type “control panel” in search and then click Manage BitLocker.


2. Click Turn off BitLocker to remove the BitLocker encryption on drive C:


3. Then click Turn off BitLocker again to decrypt the drive C:


4. Now click in the BitLocker icon to see the decryption progress and wait until it completes.


5. When the Decryption is complete, click Close.


6. That’s it! *
* Note: If you want to re-enable BitLocker protection in the future, click Turn on BitLocker next to drive C: and then follow the instructions on the step-3 of this article: How to Encrypt Drive C: with BitLocker in Windows 10/11 Pro & Enterprise.


How to Check BitLocker Encryption Status in Windows 10/11.
If your want to verify that the system drive C: is fully unencrypted, do the following:
1. Type cmd or command prompt in search and open Command Prompt as administrator.


2. Next give the following command to see the BitLocker Drive Encryption (BDE) status:
- manage-bde -status
3. Now see the “Protection status” and according the result:
- If the “Protection Status” is Protection Disabled, it means that BitLocker encryption on your device is disabled and the data on the operating system disk is unencrypted.
- If the “Protection Status” is Protection Enabled, it means that BitLocker encryption on your device is enabled and the data on the operating system disk is encrypted.


That’s it! Let me know if this guide has helped you by leaving your comment about your experience. Please like and share this guide to help others.
