If you’re looking for ways to disable or enable the microphone on Windows 10, continue reading below. The majority of today’s headsets have a built-in microphone which gives the user the advantage of using only one device to listen and talk. However, some headsets do not have a switch or button that can turn off the microphone when we don’t want to use it.
In the other hand, in video conferencing applications, if a user does not wish to utilize the microphone, he can mute it by pressing the “mute/unmute mic” button within the individual application. But, because simply muting microphone is not enough in cases where a hacker takes the control of your PC, is better to disable it from Windows 10 to maintain your privacy.
In this article, we have listed six different ways to Enable or Disable the Microphone in Windows 10.
How to: Disable/Enable Mic in Windows 10.
Method 1: Disable Microphone using Microphone Settings.
The first method to disable or enable the microphone is through Windows 10 Microphone settings: Start -> Settings -> System -> Sound -> Microphone. To easy navigate there:
1. Open the Run command box by holding the Win ![]() and R keys at the same time.
and R keys at the same time.
2. Type the following and hit Enter:
|

3. In the appearing window, scroll down to the Input section.
4. Check if the right input (microphone) device is selected at Choose your input device drop-down menu and click Device properties.

5. In the Device Properties window, tick Disable to disable your mic.

6. To re-enable your mic, just untick the Disable checkbox.

Method 2: Disable Microphone in Sound Devices settings.
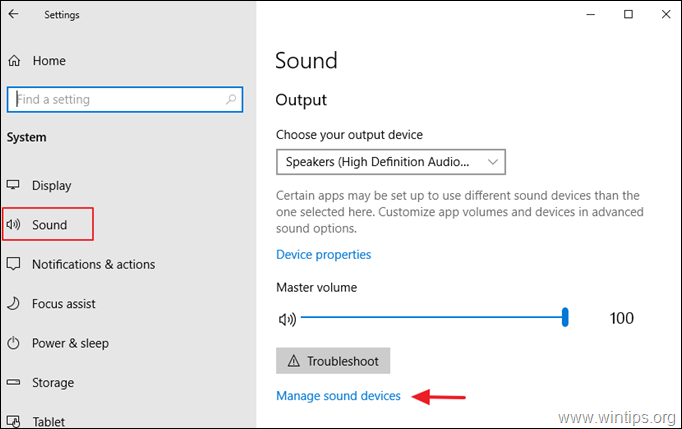
1. Go to Start -> Settings -> System -> Sound, or…
1. Open the Run command box by holding the Win
and R keys at the same time.
2. Type the following and hit Enter:
- ms-settings:sound

2. Click Manage Sound Devices.

3a. Under the Input Devices click on Microphone.
3b. To disable Microphone, click on the Disable button as shown below.

3c. To Enable the Microphone, click on the Enable button.

Method 3: Turn Off/On Microphone in Privacy Settings.
Privacy settings in Windows 10 allows you to enable or disable the microphone in all apps or in a single app.
1. Navigate to Start -> Settings -> Privacy -> Microphone, or…
1. Open the Run command box by holding the Win
2. Type the following and hit Enter:
- ms-settings:privacy-microphone

2a. To disable Microphone in all apps set the “Allow apps to access your microphone switch” to Off. *
* Note: Please note that some desktop applications (such as “Skype for Desktop”) may still use the microphone even when the microphone is turned off here.

2b. If you want to turn off the microphone for a specific application, scroll down in this page and set the corresponding switch to Off.

Method 4: Disable/Enable Microphone from Sound Settings in Control Panel.
1. From Windows Control Panel open the Sound settings and choose the Recording tab, or navigate straight there by doing the following:
1. Open the Run command box by holding the Win
2. Type the following and hit Enter:
- control mmsys.cpl,,1

2. In Recording tab:
2a. Right-click on Microphone device and choose Disable if you want to disable your mic.

2b. To enable the Microphone, right-click on it and choose Enable.

Method 5: Disable or Enable Microphone in Device Manager.
1. Navigate to Device Manager. To do that:
-
- Press Windows
 + R keys to load the Run dialog box.
 - Type devmgmt.msc and press Enter to open the device manager.
- Press Windows
![image_thumb[22]](https://techprotips.com/wp-content/uploads/2021/12/echo/image_thumb22.png61c27a0b28d5e.jpg "image_thumb[22]")
2. In the Device Manager double click at Audio inputs and outputs.
3a. To disable the Microphone, right-click on your microphone device and choose Disable device. (In the confirmation dialog that appears, click Yes)

3b. To Enable the Microphone, right-click on your microphone device and choose Enable device.

Method 6: Disable Microphone via Registry Editor.
Step 1. Find out the Microphone Device Instance Path in Device Manager.
1. Navigate to Device Manager and expand the Audio inputs and outputs devices.
2. Right-click on the Microphone device and choose Properties.

3a. At Details tab, choose Device instance path from Property drop-down menu.
3b. Now notice the path inside the anchors, leave this window open and continue to step-2.

Step 2. Disable Microphone Device in Registry.
1. Open the Registry Editor. To do that:
-
- Open the Run command box by holding the Win
 and R keys at the same time.
 - Type regedit and hit Enter: *
- Open the Run command box by holding the Win
* Note: If you see a User Access Control (UAC) warning window asking for permission, click on Yes.

4. Navigate to (or copy/paste on the search bar), the following location:
|
5a. Expand the Capture folder to list its subfolders.

5b. Now look which subfolder has the same name as the path you noticed inside the anchors in step-1 above and select it. *
* e.g. At this example the subfolder is the “22839265-9023-4D2A-95A3-E72AAD6EF449”
6. At the right, double-click at DeviceState REG_DWORD value.

6a. Type in Value data 10000001 and click OK to disable the Microphone.

6b. To enable the Mic, set the value data to 1 and click OK.

That’s it! Which method worked for you?
Let me know if this guide has helped you by leaving your comment about your experience. Please like and share this guide to help others.

do earn a commision from sales generated from this link, but at no additional cost to you. We have experience with this software and we recommend it because it is helpful and useful):