,
If you cannot boot to Windows and want to disable or remove BitLocker protection from Windows RE (Recovery Environment), read the instructions on this article.
Today, many new laptops that come with Windows 11 pre-installed already have BitLocker encryption enabled. Although this is a good practice to protect the device’s data from unauthorized access, there are some cases where you may need to disable the device encryption (BitLocker) in Windows and especially from within the Windows Recovery Environment (WinRE).
Here are some common reasons why you might need to remove BitLocker drive encryption from WinRE:
- Troubleshooting Boot Issues: When you encounter Windows startup problems, it is useful and convenient to disable BitLocker to more easily fix the problem from within Windows RE.
- BIOS/UEFI Changes: When you make BIOS/UEFI changes (eg after updating BIOS or after clearing TPM keys), BitLocker in WinRE may need to be disabled for Windows to boot.
- Recovery and Repair Operations: When you try to repair your computer from WinRE, BitLocker may interfere with some repair operations. Disabling BitLocker provides a clean environment to repair Windows.
- Reinstallation of Windows: If you are reinstalling Windows 10/11 using the “Reset this PC” feature from WinRE or performing a clean install, you may need to disable BitLocker to avoid problems during the installation process.
- Change system configuration: When you make major changes to your system configuration, such as changing your computer’s motherboard, you may need to temporarily disable BitLocker encryption.
How to Disable or Remove BitLocker Protection from the Windows Recovery Environment (WinRE) with or without the recovery key (Windows 10/11).
This guide is divided in two parts and shows how to disable BitLocker encryption if you know your BitLocker Recovery Key (part-1)* and how to remove BitLocker encryption if you don’t know the Recovery Key (part-2).**
Important Notes:
1. Disabling BitLocker using the recovery key will decrypt the data on the drive and allow you to repair your system from Windows RE without losing any files.
2. Removing BitLocker without the recovery key will erase all data on the drive and allow you to do a clean install of Windows.
Part 1. How to Disable BitLocker in WinRE with a Recovery Key.
Part 2. How to Remove BitLocker in WinRE without a Recovery key.
Part-1. How to Disable BitLocker Encryption from WinRE using the Recovery key.
If you want to turn-off the BitLocker protection on your system without losing any data, follow the steps below.*
* Note: There’s no way to decrypt a BitLocker-protected drive while keeping its data if you don’t know the BitLocker recovery key or password.
REQUIREMENTS:
1. The BitLocker Recovery key.
2. A Windows 10/11 USB installation media (Optionally).
Step 1. Find the BitLocker Recovery key.
To disable the BitLocker protection and decrypt the data on system drive C:, you need to know the BitLocker Recovery key which is a 48-digit number.
Where to find the Recovery key for BitLocker?
If you don’t know the recovery key, do the following to find it depending on your situation:
A. If you use a Microsoft account on the device, (eg to sign in to Windows, download Apps from the Microsoft Store, get your emails or activate Microsoft Office), then use another device with Internet access (eg your smartphone) and…
- Go to the Microsoft BitLocker recovery keys webpage and sign in using the Microsoft account you use on the device to find out the recovery key.
- Go to your Azure Account if you sign in to the device with an Azure Active Directory (Office 365) account.
B. If you haven’t used a Microsoft account on the device and you have enabled BitLocker manually, look at these locations:
- On a Printout that you may have saved while enabling BitLocker.
- On the USB drive where you may saved the Recovery key.
Step 2. Launch Command Prompt in WinRE.
Once you know your BitLocker recovery key, open Command Prompt in the Windows Recovery Environment (WinRE) using one of the following methods depending on your situation:
Method-1: Automatic Repair mode.
1. If you see the below screen on your PC, click Advanced Options, and then click Troubleshoot -> Command Prompt.

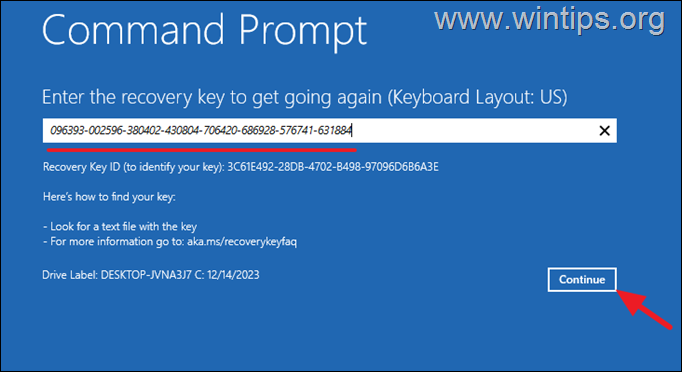
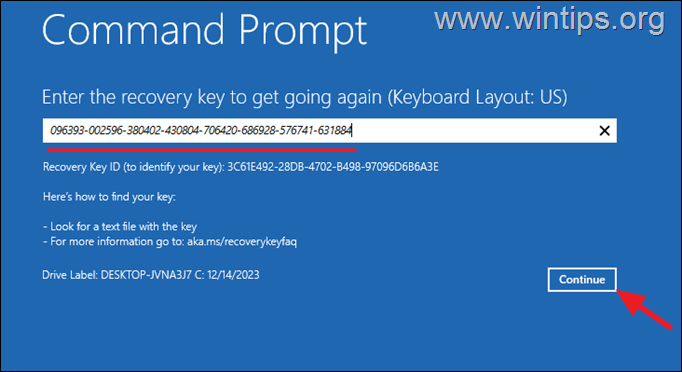
2. In the next screen type the 48-digit number Recovery key and click Continue.
3. After launching command prompt, continue to next step.
Method-2: Force Windows to boot into Automatic Repair Mode.
1. Turn on your computer and when the manufacturer’s logo appears, hold down the power button for 5 seconds to turn it Off.
2. Once it shuts down, turn it on again.
3. Repeat the above process at least 2 more times and then wait for the “Automatic Repair” screen to appear (see above).
4. When this done, click Advanced Options > Troubleshoot -> Command Prompt.
5. Type the recovery key, click Continue and continue to next step.
Method 3. Boot to WinRE Options Using a Windows Installation media.
If you cannot enter to WinRE with one of the above ways, then you have to start your PC using a USB Windows 10/11 installation media. If you don’t own a Windows installation media:
- From another PC, create a Windows 10 installation media on an empty USB drive (at least 8GB).
- Power on the affected computer and boot from the USB Windows Installation media.
- Click Next at the first screen and then click Repair your Computer > Troubleshoot > Advanced Options > Command Prompt.
- After launching command prompt, continue to next step below to unlock the drive.
Step 3. Unlock BitLocker Encrypted Drive.
Once in WinRE command prompt, follow these steps to unlock the encrypted drive:
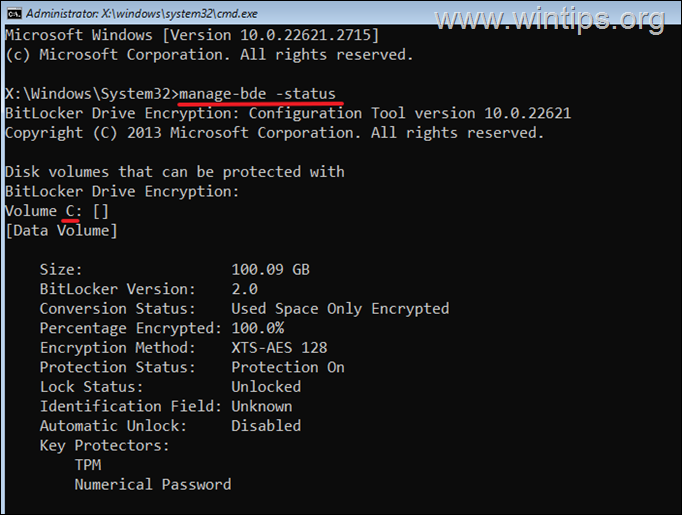
1. Give the following command to find out the drive letter of the encrypted drive.*
- manage-bde -status
* In this example the drive letter of the encrypted drive is “C:”
2. Then unlock the encrypted drive by using the recovery key with this command:*
* Note: Skip to Step-4 if you have already entered the recovery key to launch the command prompt.
- manage-bde –unlock drive-letter: -rp 48-digit-numerical-recovery-key
e.g. To unlock the drive “C:” in this example, by using the recovery key “096393-002596-380402-430804-706420-686928-576741-631994“, the command is:
- manage-bde –unlock C: -rp 096393-002596-380402-430804-706420-686928-576741-631994

3. Once the drive is unlocked proceed to next step.
Step 4. Disable BitLocker and Decrypt Drive.
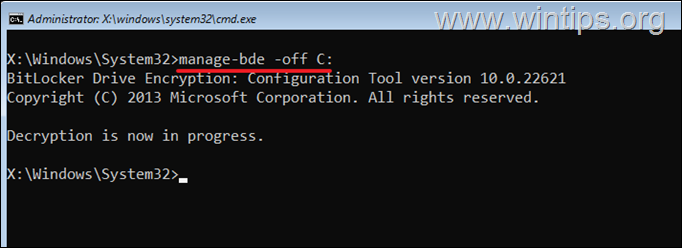
1. After unlocking the drive, give the following command to disable BitLocker and to decrypt the contents of the drive:*
- manage-bde -off drive letter:
eg. To decrypt the contents of “C:” drive in this example, the command is:
- manage-bde -off C:
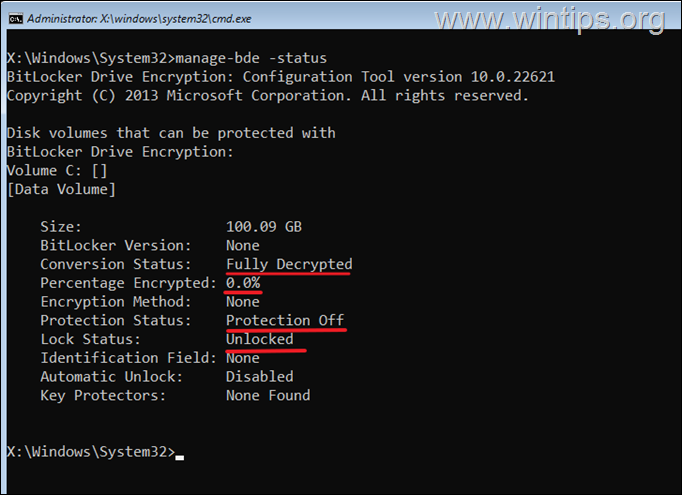
2. Now give again the following command to see the status of the decryption progress:
- manage-bde -status
3. When the ‘Percentage Encryption’ reaches at 0%, the decryption is complete and the drive will be fully decrypted (Unlocked).
Part 2. How to Remove BitLocker Protection from WinRE without the Recovery key.
If you don’t own the BitLocker Recovery key to unlock the drive, then your only option to remove the BitLocker protection is to completely erase the encrypted drive and lose all its data.
This procedure is only useful when you want to clean install Windows on a BitLocker encrypted drive and don’t care about losing all of its contents.***
*** CAUTION: CONTINUE BELOW ONLY IF IT IS YOUR LAST CHOICE. THE FOLLOWING PROCEDURE WILL DELETE ALL YOUR PERSONAL FILES & DATA ON THE ENCRYPTED DISK. ***
To remove the BitLocker protection on drive C: and reinstall Windows:
1. Boot your computer from a USB Windows installation media.
2. Click Next at the first screen and then click Repair your Computer > Troubleshoot > Advanced Options > Command Prompt.*
* If asked to enter the Recovery key, click Skip this Drive.
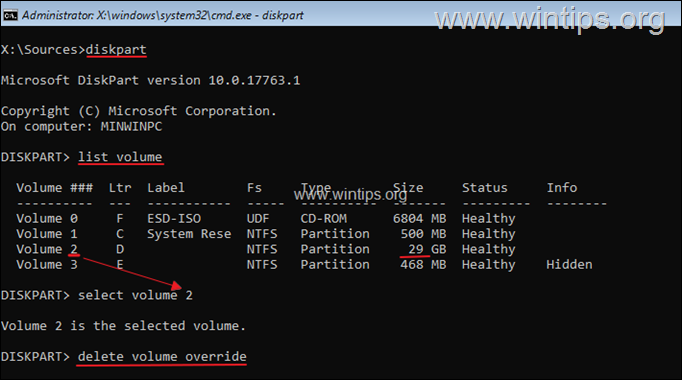
3. In command prompt, give the following command:
4. Then type the following command to list all the volumes on the system.
- list volume
5. Then proceed and select the largest in size volume (which is usually the C: drive), with this command:*
- select volume number
eg As you can see at the screenshot below, the largest in size volume, is the volume “2“. So, at this case the command will be:
- select volume 2
6. Finally proceed to completely erase the selected volume, with this command:*
- delete volume override
Attention: This command will delete all the contents of drive.
7. When the process is completed, type exit to close the DISKPART utility.
8. Restart your computer and boot again from the Windows installation media.
11. Proceed to clean install Windows 10, by following the steps in this article: How to clean install Windows 10 on your Desktop or Laptop PC.
That’s it! Which method worked for you?
Let me know if this guide has helped you by leaving your comment about your experience. Please like and share this guide to help others.
