,
As Windows 11 gains popularity, manufacturers have begun selling laptops and computers with Windows 11 operating system pre-installed to boost sales. However, despite the hype around Windows 11, many users still prefer Windows 10 because it is one of the fastest, feature-rich, and most stable versions of Windows to date.
Sometimes, the software or games you have installed on your computer may not be compatible with Windows 11. In such cases, downgrading your PC to Windows 10 can be the smart move to restore full functionality and make sure everything runs smoothly.
To downgrade Windows 11 to Windows 10, you don’t need to buy any extra licenses or discs, because you can easily perform a clean installation of Windows 10 using the Windows 11 OEM license key that comes with your device.
All you need to do is back up your files to an external storage media and then to create a Windows 10 installation media to install the Windows 10 operating system on your computer. Now let’s show you how.
How to Downgrade Windows 11 to Windows 10 without losing files?
If you’ve previously upgraded your system to Windows 11 from Windows 10, Microsoft offers a 10-day window during which you can easily roll back to Windows 10 while keeping your files and data. (From Settings > System > Recovery and under Recovery options, click Go back).
However, this short 10-day rollback option is not available for PCs pre-installed with Windows 11. So, in this case, the only option to downgrade to Windows 10 without losing files, is to save your files to another storage device, before installing Windows 10.
To downgrade from Windows 11 to Windows 10, use one of the methods below:
- Downgrade to Windows 10 with Media Creation Tool.
- Downgrade from Windows 11 to Windows 10 using Windows 10 ISO file.
- Clean Install Windows 10 from USB.
Method 1: Downgrade to Windows 10 using the Windows 10 Media Creation Tool.
* Attention: Before continuing below, we recommend that you back up your personal files to another storage device (e.g. to a USB disk), otherwise you’ll lose all your files.
1. Visit the Windows 10 download page and click Download Now under the Create Windows 10 installation media section to download the Media Creation tool.


2. After the mediacreationtool.exe file is downloaded, double-click on it to run the Windows 10 setup assistant.


3. Next, click Accept on the license terms.
![clip_image006[6]](https://techprotips.com/wp-content/uploads/2024/01/localimages/clip_image0066.png "clip_image006[6]")
![clip_image006[6]](https://techprotips.com/wp-content/uploads/2024/01/localimages/clip_image0066_thumb.png "clip_image006[6]")
4. Now, select the Upgrade this PC now option and click Next. (Although it says Upgrade this PC, it will actually downgrade the PC to Windows 10).


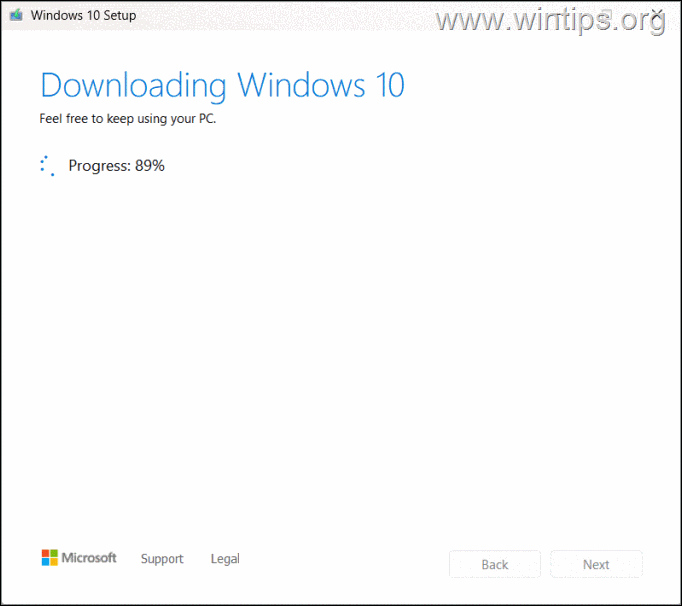
5. Just wait for the setup to finish downloading Windows 10. It might take some time, depending on your Internet speed and system performance.


6. Once the download is complete, click Accept again to agree to the terms.


7a. In the Choose what to keep window, you’ll be told that Nothing will be kept during the downgrade process to Windows 10, and all your files, apps, and settings will be deleted. So, before clicking Next, make sure you have backed up your files to an external storage device (eg. a USB drive.


7b. Then, click Yes to confirm your decision.


8. Now, let the Windows 10 setup assistant to download any required updates, and then click Finish to install Windows 10.


Method 2: Downgrade to Windows 10 using the Windows 10 ISO file.
Another method to downgrade to Windows 10 from Windows 11, is by using the Windows 10 ISO file.
* Attention: Before continuing below, we recommend that you back up your personal files to another storage device (e.g. to a USB disk), otherwise you’ll lose all your files.
Step 1. Download Windows 10 in a ISO file.
1. Visit the Windows 10 download page and click Download Now under the Create Windows 10 installation media section to download the Media Creation tool.


2. After the mediacreationtool.exe file is downloaded, double-click on it to run the Windows 10 setup assistant.
![clip_image004[6]](https://techprotips.com/wp-content/uploads/2024/01/localimages/clip_image0046-1.png "clip_image004[6]")
![clip_image004[6]](https://techprotips.com/wp-content/uploads/2024/01/localimages/clip_image0046_thumb-1.png "clip_image004[6]")
3. Next, click Accept on the license terms.
![clip_image006[6]](https://techprotips.com/wp-content/uploads/2024/01/localimages/clip_image0066-1.png "clip_image006[6]")
![clip_image006[6]](https://techprotips.com/wp-content/uploads/2024/01/localimages/clip_image0066_thumb-1.png "clip_image006[6]")
4. At the next screen, choose the Create installation media (USB flash drive, DVD, or ISO file) for another PC option and click Next.


5. The setup will automatically choose English (United States) as the language and the 64-bit (x64) architecture. If you want to change these settings, simply uncheck the Use the recommended options for this PC box, and then select your desired language and architecture. When done, click Next to continue.


6. After that, choose the ISO file option and click Next.


7. Then, select where you want to save the ISO file and click Save.
![clip_image031[6]](https://techprotips.com/wp-content/uploads/2024/01/localimages/clip_image0316.png "clip_image031[6]")
![clip_image031[6]](https://techprotips.com/wp-content/uploads/2024/01/localimages/clip_image0316_thumb.png "clip_image031[6]")
8. Wait for Windows to download the Windows 10 ISO file, and then click Finish.
![clip_image033[6]](https://techprotips.com/wp-content/uploads/2024/01/localimages/clip_image0336.png "clip_image033[6]")
![clip_image033[6]](https://techprotips.com/wp-content/uploads/2024/01/localimages/clip_image0336_thumb.png "clip_image033[6]")
9. Continue to next step,.
Step 2. Clean Install Windows 10 using the ISO file.
1. Now navigate to the location you saved the Windows 10 ISO file, right-click on it and choose the Mount option.


2. After that, navigate to the mounted drive and double-click on setup.exe application to start the Windows 10 installation. (Click Yes if prompted by User Account Control).


3. On the Install Windows 10 window, click on Change how Windows Setup downloads updates.


4. Now decide whether to download Windows 10 updates before or after the installation process and then click Next.
- Choose Download updates, drivers, and optional features (recommended) if you want to install the latest updates along with Windows 10 setup.
- Select Not right now, to install all the available updates after the Windows 10 installation. (This is my preferred option because sometimes the installation hangs when trying to download or install the latest updates)
![clip_image041[6]](https://techprotips.com/wp-content/uploads/2024/01/localimages/clip_image0416.png "clip_image041[6]")
![clip_image041[6]](https://techprotips.com/wp-content/uploads/2024/01/localimages/clip_image0416_thumb.png "clip_image041[6]")
5. Click Accept to agree to the terms.
6. In the Choose what to keep window, you’ll be told that Nothing will be kept during the downgrade process to Windows 10, and all your files, apps, and settings will be deleted. So, make sure you have backed up your files to an external storage device (eg. a USB drive), and then click Next to continue.
![clip_image043[6]](https://techprotips.com/wp-content/uploads/2024/01/localimages/clip_image0436.png "clip_image043[6]")
![clip_image043[6]](https://techprotips.com/wp-content/uploads/2024/01/localimages/clip_image0436_thumb.png "clip_image043[6]")
7. Now give the Windows 10 installer a few minutes to check your system requirements and get everything ready for installation. When this done, click Install to start the installation process.


8. During the installation process, your PC will restart multiple times, and it will take several minutes to complete. Please let the process run smoothly without any interruptions.
9. Once the Windows 10 installation is done, go to Start > Settings > Windows Update and check and install all available updates. After that you can start using your device.*
* Note: After returning to Windows 10, if you want to give Windows 11 another chance, you can easily upgrade Windows 10 to Windows 11 through Windows Update or by following one of the methods in this tutorial.
Method 3. Downgrade Windows 11 to Windows 10 from USB.
The third method to downgrade your Windows 11 PC to Windows 10, is to perform a clean installation of Windows 10 using a Windows 10 USB installation media.
* Attention: Before continuing below, we recommend that you back up your personal files to another storage device (e.g. to a USB disk), otherwise you’ll lose all your files.
Step 1. Create a Windows 10 USB Installation Media.
1. Plug an empty USB drive* (at least 8GB) on your PC.
* Attention: The USB drive will be formatted (deleted), during the Windows 10 media creation process. So, make sure there are no files you might want on the USB.
2. Visit the Windows 10 download page and click Download Now under the Create Windows 10 installation media section to download the Media Creation tool.


3. After the mediacreationtool.exe file is downloaded, double-click on it to run the Windows 10 setup assistant.


4. Next, click Accept on the license terms.


5. At the next screen, choose the Create installation media (USB flash drive, DVD, or ISO file) for another PC option and click Next.


6. On the next screen, ensure that the suggested language and architecture settings are correct and click Next to continue. (If you want to modify these settings, simply uncheck the Use the recommended options for this PC box, and then select your desired language and architecture).


7. At Choose which media to Use, select the USB flash drive option and click Next.


8. On the next screen you will be informed that all the files on the USB drives will be deleted. If you agree, click Next to continue.


9. The ‘Windows 10 Setup’ tool will start downloading the necessary Windows 10 installation files to create the USB drive.


10. When the USB drive is ready, click Finish.


11. Now explore the contents of the USB drive and run the “setup.exe” application to install Windows 10 from USB, or go to the next step to clean install Windows 10 by starting your system from the USB drive.
Step 2. Clean Install Windows 10 from USB.
1. Connect the created Windows 10 USB drive to the Windows 11 computer you want to downgrade to Windows 10.
2. Turn ON the PC and boot/start the PC from the USB drive, by using one of the ways below:
A. Press the corresponding key to access the Boot order menu (e.g. Esc, F2, F9, F10, or F12)*, highlight the USB drive using the arrow keys and hit Enter.*
B. Press the corresponding key to enter in BIOS/CMOS Setup menu (e.g. DEL or F1 or F2 or F10)*, go to Advanced section and in the Boot order settings set the USB drive as first boot device. Finally, Save and Exit from BIOS Setup.
* Note: The key to open The “Boot Order” menu or the “BIOS setup” menu, varies by manufacturer. To find it, refer to your computer manufacturer’s website or manual.
3. If prompted, press Enter to boot from CD or DVD.


4. When the Windows Setup screen appears, choose your preferred language, time, currency, and keyboard input method, and then click Next.


5. On the next screen, click Install now to continue.


6. Then accept the license terms box and then click Next.


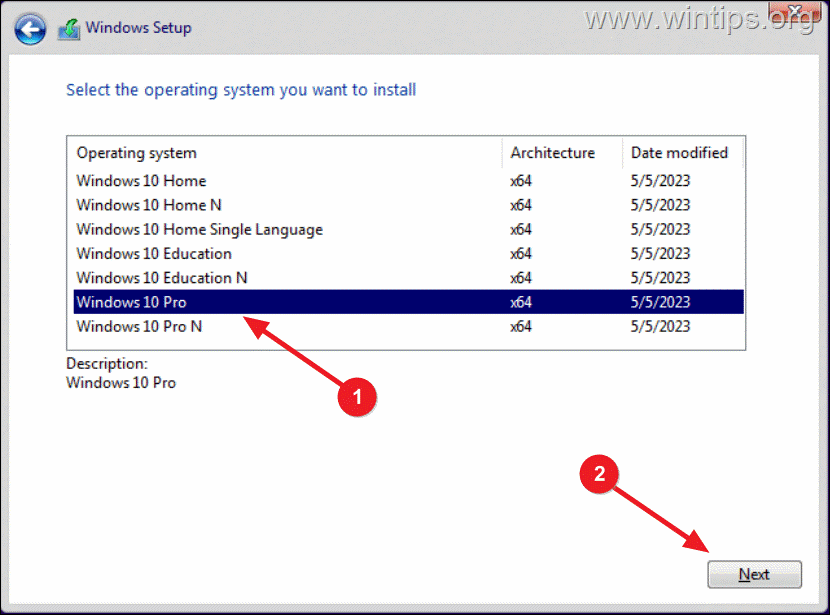
7. Choose Custom: Install Windows only (advanced).


8a. Select and delete (remove) one by one all the partitions on the disk.


8b. Then select the Unallocated Space and click Next.


9. The setup process of Windows 10 is starting. Wait until it is completed.


10. After the setup process is completed, Windows restart, and prompts you to personalize your PC. If you want to make your own customizations, choose Customize settings, otherwise choose Use express settings to continue. *
* Note: In my opinion, I think that you must give some extra time here and make your customizations to critical – for me – decisions, such as which type of data and information can be served to Microsoft.


11. After following the above steps, you should have successfully installed Windows 10 to your PC.
That’s it! Which method worked for you?
Let me know if this guide has helped you by leaving your comment about your experience. Please like and share this guide to help others.
