Last updated on July 15th, 2020
If you want to find out the best way to record screen in Windows 10 for free, then continue reading this article. In Windows 10, you can record your computer’s screen, either by using the embedded screen recorder utility “Xbox Game Bar”, or by using a third party screen recorder tool.
In this tutorial, we demonstrate three different programs to record any action that are you doing on your screen in your Windows 10 PC. More specifically, you will learn how to create a video tutorial with your movements on screen, how to record a YouTube video you play and how to record a video of your Game play, to demonstrate it to your friends.
How to Capture a Video of your Screen in Windows.
Suggestion: To ensure the proper function of the below screen recording programs and to get the best results, update the video card’s driver to its latest version.
1. Xbox Game Bar.
Game Bar is a built-in screen capture tool that Windows 10 offers, and is a part of the Game DVR feature which offered by the Xbox app. In general, the Game bar is a nice screen recording utility, especially to record your gameplay, but it doesn’t work in all situations. For example, you cannot use the Game bar to record your actions in File Explorer or in your Desktop, and also doesn’t work at all if you don’t have the proper hardware requirements.
How to record a video clip with Xbox Game Bar.
1. Navigate to Start menu -> Settings -> Gaming.
2. Toggle to ON the “Record game clips, screenshots and broadcast using Game bar” switch.

3. Open the app you want to record in a video. (e.g. your web browser with a YouTube video, an Office application, or the game you play, etc.). *
* Note: To record a YouTube video, start playing the video, pause it, and then continue below.
4. Press the Windows ![]() + G keys, to open the Game Bar.
+ G keys, to open the Game Bar.
5. When the Game bar settings opens:
a. Press the Windows
+ ALT + R keys to Start the recording, or click the Record button at ‘Broadcast and Capture’ options window.
b To Stop the recording, press the Windows

6. When the screen recording is completed, you will see a message that informs you that the video clip is recorded. Click on that message to navigate to the location where the video clip is stored. Alternately, open File Explorer and navigate to “C:UsersUserNameMy DocumentsMy VideosCaptures” folder, to find the recorded video clip.
Other notes about the Game Bar app.
1. You can start the Game bar recording only if you have already opened the app/video that you want to record. Preferably, open your game/video to windowed mode and then start the recording.
2. The recorded videos are saved in .MP4 format.
3. By default the audio recording is muted. If you want to record the sound/audio, press the microphone iconat ‘Broadcast and Capture’ options window.

4. To view/modify all the Game bar settings click the cogwheel icon.

2. OBS Studio.
The second free screen recorder software we tested is the OBS studio, which offered by the Open Broadcaster Software. The OBS Studio is a powerful and flexible screencast video production and streaming tool, which is available for Windows, MacOS and Linux.
Overall, OBS Studio is a very powerful software for capturing or streaming your computer screen, with many settings to get the desired result.
How to use OSB Studio to record or stream your computer screen.
Step 1. Install and Configure OBS Studio.
1. Download and install OBS Studio.
2. Launch the OBS Studio. When you open OBS Studio for first time, you ‘ll be asked if you want to run the Auto configuration wizard. Click Yes to continue. *
* Note: You can run the configuration wizard at anytime later, from the Tools menu > Auto-configuration Wizard.

3. If you don’t want to streaming, then select Optimize just for recording, I will not be streaming and click Next.

4. At the next screen leave the suggested video settings, or select the size of the video resolution and the FPS (frames per second) you want, and click Next.

5. At the end of the configuration wizard, click Apply Settings.

6. By default, OBS Studio is set to capture your system default desktop audio device and microphone. If you want to set a different audio or microphone device to capture, then click the Settings (cogwheel) icon, next to the Audio or the Mic device.

Step 2. Record Screen to a Video clip with OBS Studio.
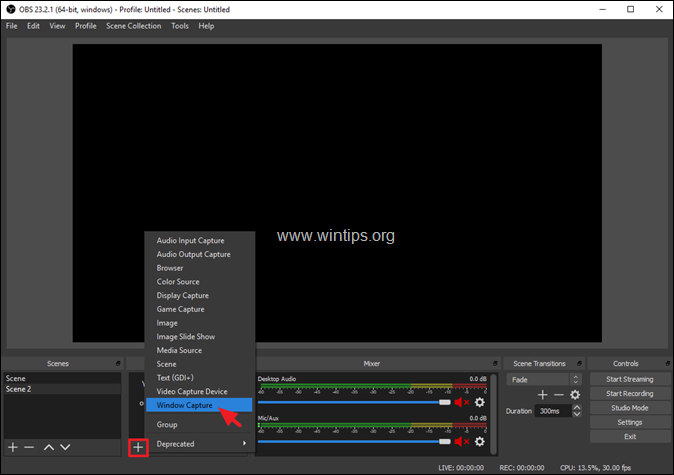
1. To start capturing with OSB Studio, you must specify a Video source. To do that, click the + button and select a source from the listed sources. (e.g. select ‘Game Capture’ if you want to capture your Gameplay, ‘Window’ to capture any program, ‘Display Capture’ to capture your entire monitor, etc.).
* For example: If you want to capture in a video your movements on an already open File Explorer window, select ‘Windows Capture’.

2. By default, the recording audio level is set to its maximum position. To adjust the audio level click and drag the slider to your preferred position.
3. When you ‘re ready, click the Start Recording button to create your video.
4. Whenever you want to end the recording, click the Stop Recording button.

5. To locate the video file that OBS Studio has just recorded, click on File menu and then select Show Recordings, to automatically navigate to the directory where the video is saved. *
* Notes:
1. The default store location, of the OBS Studio videos, is the ‘Videos’ folder (in “C:UsersUserNameMy DocumentsMy Videos”).
2. The recorded videos are saved by default in .flv format. If you want to save your videos to another video format (mp4, mkv, mov, etc.), then:
a. Click the Settings button.

b. Select Output on the left and then modify the Recording format setting.

3. ShareX
The third program we tested for screen recording, is the ShareX. ShareX is a free and open-source screen recording program for Windows. ShareX can capture or record a selected area from the screen with a single keypress and automatically saves the recorded file to your hard disk.
How to use ShareX to capture your computer screen.
1. Download and install ShareX
2. Launch the ShareX.
3. Open the program that you want to capture from (e.g. a YouTube video on your web browser).
4. Press the SHIFT + Print Screen keys.
5. The cursor will change to a cross.
a. Drag the cross to the top left-hand corner of the window that you want to record.
b. Press and keep pressed the left mouse button and select the area that you want to record.
c. When done release the left mouse button.

6. The record should start. Use the two extra buttons that appear on the screen at anytime you want to Stop or to Abort the recording.

7. Open the ShareX program and at the right pane, you will see the recording you have just made.

Note: If you want modify the capture settings in ShareX:
1. Click Task Settings on the left.

2. Select Screen Recorder on the left and then click the Screen Recording options button on the right.

3. At Screen Recording options, make any customization you like and then close the window to apply the changes.

That’s it! Let me know if this guide has helped you by leaving your comment about your experience. Please like and share this guide to help others.

do earn a commision from sales generated from this link, but at no additional cost to you. We have experience with this software and we recommend it because it is helpful and useful):