,
In this guide we’ll show you how to safely restore your Windows 11 PC to its original settings without losing files even if Windows won’t start or work properly
Sometimes, there is a need to reset a Windows computer back to its default settings for various reasons. For example, when we encounter problems that can’t be fixed with common methods, or when the computer has become slower, or because we just want to sell our computer and need to delete everything from it.
In previous versions of Windows (up to Windows 8/8.1), the only way to restore a computer to its default settings was to do a clean installation of Windows. However, now with Windows 10 & Windows 11 every user can easily restore their PC to a “clean state” using the “Reset this PC” feature.
The “Reset this PC” feature in Windows 10/11 is a built-in functionality that allows users to reinstall the operating system while keeping their personal files or removing everything to start with a clean slate, even if Windows won’t boot..
How to Reinstall Windows 11 using the “Reset this PC” feature.
Tο restore the Windows 11 operating system to its default settings using the “Reset this PC” feature, follow the instructions in the methods listed below. However, before you proceed with resetting your PC and if you can log into Windows, apply the precautionary steps listed below to avoid problems.
- Reinstall Windows 11 by Resetting This PC from Windows Settings.
- Reset Windows 11 from Advanced Startup options-menu.
- Reset Windows 11 if Windows Could Not Start.
PRECAUTIONARY STEPS IF YOU CAN BOOT TO WINDOWS.
1. Backup your Data: As mentioned above, the Reset This PC feature on Windows 11, allow you to keep your personal files, settings and apps or to remove everything from your computer.
However, before proceeding with the restore process, it is recommended that you back up your data to another external storage device (e.g. a USB drive) as a precautionary measure. This action will ensure that you will not lose your data even if the restore process does not complete successfully.
2. Uninstall Third-Party Security software: If you using any third-part security application (e.g. e.g. Antivirus, Firewall, etc.), is suggested to uninstall it before resetting your PC and re-install it when the restore process is completed.
3. Disable Device or BitLocker Encryption. The final precaution step, before proceeding to reset Windows 11, is to disable the BitLocker device encryption (if it’s enabled), because it can cause problems during the “Reset” process. To check if the encryption is active on your system:
- On Windows 11 Home: go to Start -> Settings -> Privacy & security -> Device encryption. If device encryption is enabled, set the switch to OFF and then wait until your device is decrypted.
- On Windows 11 Pro: go to Control Panel -> System and Security -> BitLocker Drive Encryption. Then, click Turn Off BitLocker to disable the encryption if its enabled.


Method 1. Reset Windows 11 PC from Settings.
If your PC boots into Windows normally, the easiest way to reinstall Windows 11 without losing your files and settings is by using the “Reset this PC” feature. To do that:
1. Right-click on Start menu and select Settings. (Alternatively, press Windows + I keys to open Settings directly).


2. Then navigate to System > Recovery and click on Reset PC button.


3. In the next window, you will be presented with two reset options: Keep my files and Remove everything. Click on the option that best suits your needs to continue.
- Keep my files: This option will reset Windows 11 while preserving your personal files, but it will remove installed applications and reset settings to default. (This is the preferred and safest way to restore Windows 11 without losing your files).
- Remove everything: This option will perform a more comprehensive reset, removing all your personal files, applications, and settings, providing you with a clean slate. (This option is useful if you plan to sell or donate your PC). *
* Attention: If you select to “Remove everything” option, ensure that you have a recent copy of all your files to another storage device (e.g. to a USB disk), otherwise all your files will be removed.


4. Then choose between Cloud download or Local reinstall.
- Cloud Download: By selecting this option, Windows will download the necessary installations files (~4GB), from the cloud-based Windows servers. This option is the safest and the recommended one if you have a fast Internet connection and if you think that the local Windows installation files are corrupted or damaged.
- Local reinstall: If you choose this option, the process will reinstall Windows 11 using the existing installation files stored on your computer. Although faster, this option does not always guarantee that Windows 11 will be reinstalled correctly and according to the latest updates. So, if you have a fast Internet Connections, choose “Cloud download” for best results.


5. After you pick one of the two options to Reset this PC, the screen will show under which conditions Windows will reinstalled. If you don’t agree with the current settings and want to make any changes, click Change settings*, otherwise click Next to continue.


* Change Settings options:
- If you have chosen Local reinstall, you can pick whether to restore the preloaded programs and settings that came with your PC, and you’ll be given the option of reinstalling Windows by downloading a fresh copy of the installation files.


- If you selected Cloud download, you can choose whether you want to delete data and provisioning packages to completely clean your computer. You can additionally decide whether to download Windows or reinstall from the device.


8. Windows 11 will now start the reset process. This may take some time, depending on the reset option you selected and your computer’s speed. During this process your computer will restart several times.
Method 2: Reset your PC from WinRE Advanced Startup options.
Another method to reset Windows 11 back to its default systems, is by using the “RESET THIS PC” feature in ‘Advanced Startup’ options menu (aka “Advanced Boot options” menu).
The “Advanced Startup/Boot options menu” on Windows 10/11, is a special environment that provides various troubleshooting and recovery options during the boot process and is useful when you cannot fix the PC in other ways.
1. To access the “Advanced Startup Options” menu in Windows 11/10, use one of the following ways:
A. Click on Start menu and press the Power button/menu. Then hold down the SHIFT key on your keyboard and click Restart with your mouse. (Then release the SHIFT key).


B. On the login screen, click the Power menu, hold down the SHIFT key and then click Restart. (Then release the SHIFT key).


2. After restarting, Windows will display the “Choose an option” screen. Click Troubleshoot.


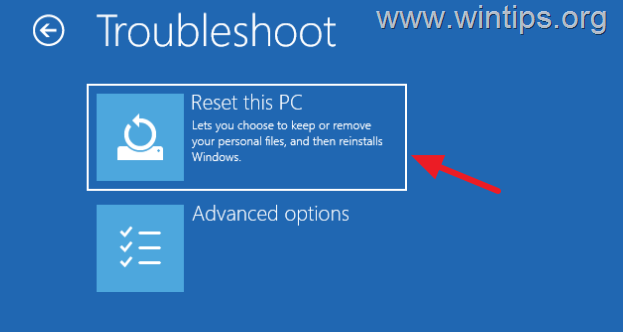
3. In the Troubleshoot menu, click Reset this PC.


4. At the next screen choose how you want to reset Windows 11:
- Keep my files: By selecting this option, the “Reset this PC” process will reinstall Windows 11 while keeping your personal files but removing your apps and settings.
- Remove Everything: By choosing this option, the “Reset this PC” process will reinstall Windows and delete all files from the computer.*
* Important: Select this option only if you have backed up your computer files to an external USB drive.


5. Now choose how you want to install Windows on your computer: Cloud download or Local reinstall.
- If you select Cloud download, the “Restore this process” will download a new copy of the Windows 11 installation files from the Internet and then reinstall Windows from those files.
- If you select Local Reinstall, the “Restore this process” will use the local stored Windows 11 installation files to reinstall Windows.


6. Finally, read carefully what actions will be taken during the reset process and if you agree, click the Reset button to continue the process.


7. Now relax and be patient while Windows reinstalls. During the process your computer will restart several times. When the process is complete you will have successfully reinstalled Windows.
Method 3. Reset your PC If Windows Won’t Boot from Windows RE.
If Windows couldn’t start normally, then you can force Windows to boot in Windows Recovery Environment (WinRE) and then to Reset your Windows 11 PC, using the following steps:
1. Shutdown or Turn off your PC by pressing the power button for 3-5 seconds.
2. Turn on your PC and when your see the spinning dots/cycle, hold down the power button again for 3-5 seconds to turn your PC off.
3. Repeat the above step two (2) more times, and then leave Windows to start the “Automatic Repair” process and to diagnose your PC.
4. When the “Automatic Repair” screen appears, click Advanced Options.


5. Then click Troubleshoot.


6. Finally click Reset this PC and follow the same steps (4-7) as in method-2 above to reinstall Windows 11.


That’s it! Which method worked for you?
Let me know if this guide has helped you by leaving your comment about your experience. Please like and share this guide to help others.
