Virtual desktops, is a Windows 10/11 feature that allows you to create and have multiple virtual desktops on a single computer screen. This feature allows you to have multiple desktops with different applications open on each of them, helping you stay organized and productive.
For example, using virtual desktops you can have some Office apps on one screen and all your social networking and entertainment apps on the other and easily switch between them without having to minimize and maximize windows.
While virtual desktops have been around in Windows for some time, they’ve undergone significant improvements in Windows 11. For example, the addition of a “Task view” button on the taskbar has made it incredibly simple to add and access multiple desktops with ease.
In this article, we’ll show you how to setup, manage and work with virtual desktops on Windows 11. (switch between desktops, personalize desktops, move apps between desktops, etc.)
How to Create and Work with Virtual Desktops on Windows 11.
1. How to Create Virtual Desktops in Windows 11.
There are two ways to add a virtual desktop: through the “Task view” button or by pressing a keyboard shortcut.
1. Click or hover the mouse over the Task View ![]()
![]() button* in the Taskbar and then click the New Desktop (+) button, or alternatively, press Ctrl + Windows + D to quickly create a new desktop.
button* in the Taskbar and then click the New Desktop (+) button, or alternatively, press Ctrl + Windows + D to quickly create a new desktop.
* Note: If the “Task view” button is missing from the taskbar, right-click at the taskbar and select Taskbar settings. Then set the Task view switch to On.
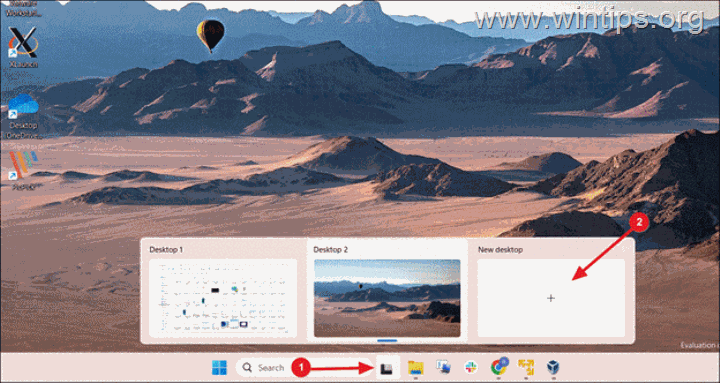
2. A new virtual desktop will be created and you will be switched over to that desktop immediately. Follow the same steps to create as many virtual desktops as you want and proceed to set up and manage them using the instructions below.
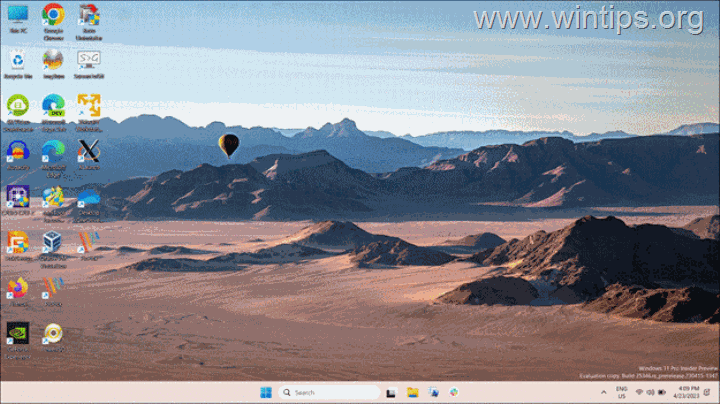
2. How to Switch between Desktops on Windows 11.
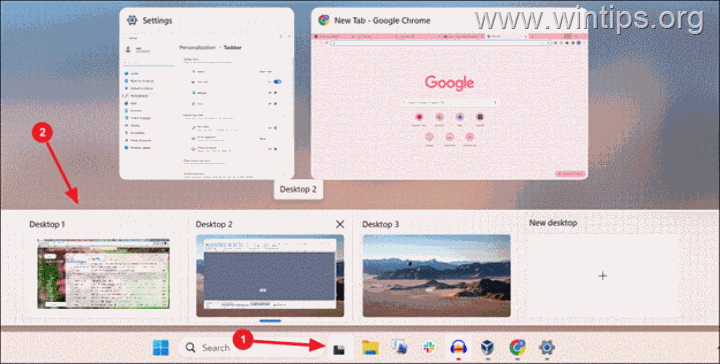
After creating your virtual desktops, you can switch between them using any of the following methods:
- Press Windows + Tab and click on the desktop you want on the top of the screen.
- Press Windows + Ctrl + Left Arrow to go to the previous desktop (left) or Windows + Ctrl + Right Arrow to go to the next desktop (right)
- Click or hover over the Task View button on the taskbar and select the desktop you want to switch to.*
* Notes: Clicking the Task View button opens a full screen, which shows an overview of all virtual desktops along with the open applications when you hover your mouse over any of them.
However, when you hover the mouse over the Task View button, it will only show you a preview of the virtual desktops, and not all the active apps in them.
3. How to Personalize Virtual Desktops in Windows 11.
With Windows 11, users have the ability to personalize their virtual desktops, making it easy to distinguish between them quickly and easily.
This can be achieved in a number of ways, such as renaming each desktop, customizing the backgrounds, and reordering the order of the desktops.
3.1 Rename Desktops in Windows 11
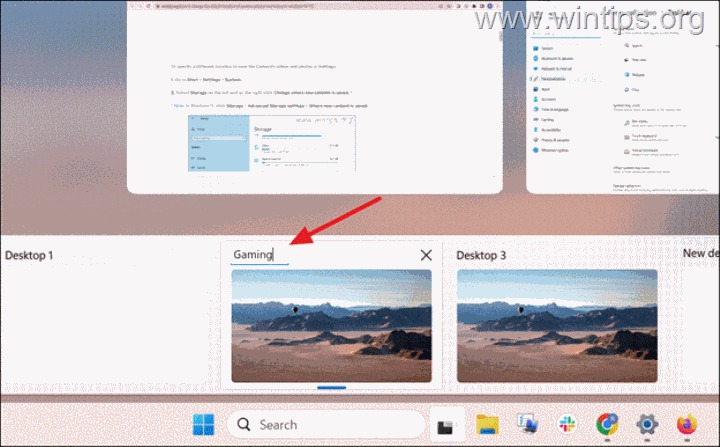
If you have multiple desktops, assigning descriptive names like ‘Work’ or ‘Gaming’ can help you in keeping your workspace organized and quickly identify each one. To rename a virtual desktop:
1. Click or hover over the Task View icon on the taskbar and click on the name of the desktop you want to rename (i.e. Desktop 1, Desktop 2, etc.). *
* Alternatively, right-click the desktop you want to rename and select Rename.
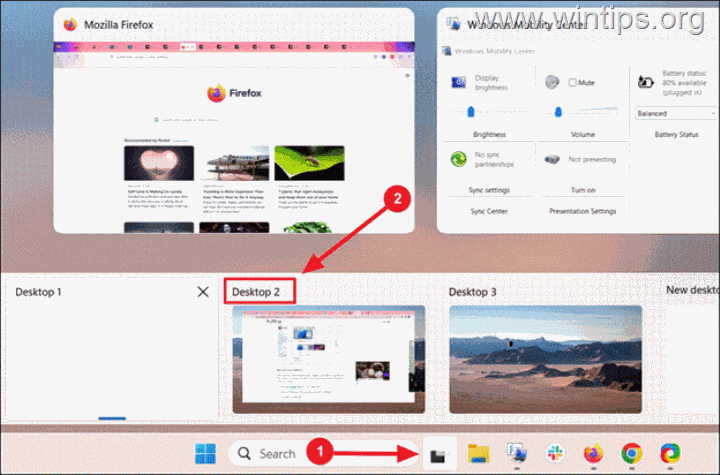
3. Type the new desktop name and press Enter.
3.2 Change Backgrounds on Virtual Desktops
Another way to make the desktops stand out from each other is to change the background of each desktop. To change the desktop background on a virtual desktop:
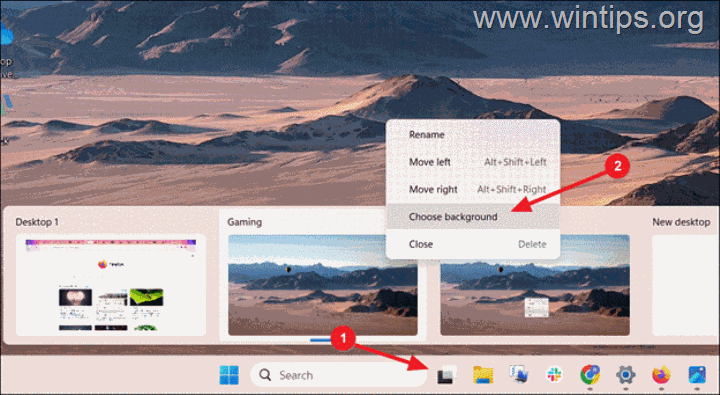
1. Click or hover over the Task View button in the Taskbar.
2. Right-click the desktop for which you want to change the background and select Choose Background.
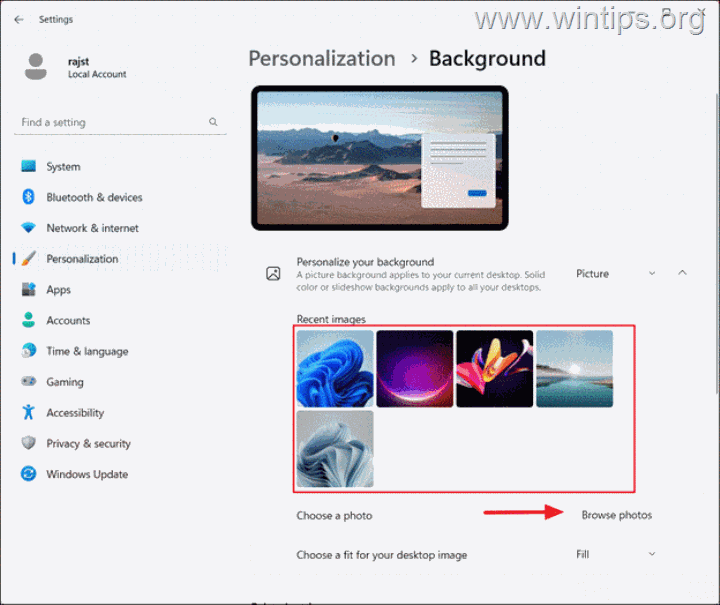
3. On the Background settings page, select one of the images under the Recent images section or click the Browse photos button to choose your own image.
4. The background image will be applied to the selected desktop while others remain unchanged. *
* Note: The disadvantage here is that you can have different backgrounds only with “Pictures” and not with solid colors or slideshows. For example, if you try to set a single color as the background on a virtual desktop, it will be applied to all your virtual desktops.
3.3. Rearrange Virtual Desktops
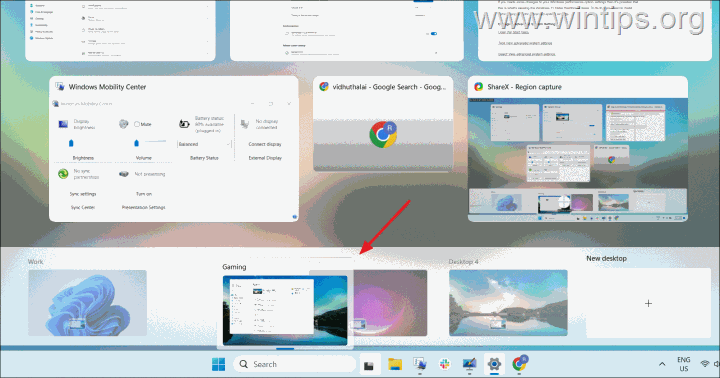
You can move the desktop icons in your preferred order for easy navigation by dragging and dropping them into place or using keyboard shortcuts. To re-order a virtual desktop:
1. Click the Task View button or press Windows + TAB to open Task View.
2. Click and hold the desktop you wish to move and drag it to your desired position.*
* Alternatively, press the TAB key and then use the arrow keys to select the desktop. Then, use Alt + Shift + Left Arrow or Alt + Shift + Right Arrow to move the selected desktop to another position.
4. Show the Same App on All Desktops in Windows 11.
When you open the same app on different virtual desktops, they are kept separate. For example, if you already have Chrome open multiple tabs on one desktop and then switch to another desktop and open Chrome again, it will open as a new instance with its own set of tabs.
However, if you want to display the same window across all virtual desktops with the same content, you can do so through Task View.
1. Click the Task View icon or press Windows + TAB to open the full Task View. It will show all the open windows on the current desktop.
![clip_image022[6] clip_image022[6]](https://techprotips.com/wp-content/uploads/2023/08/localimages/clip_image0226_thumb.png)
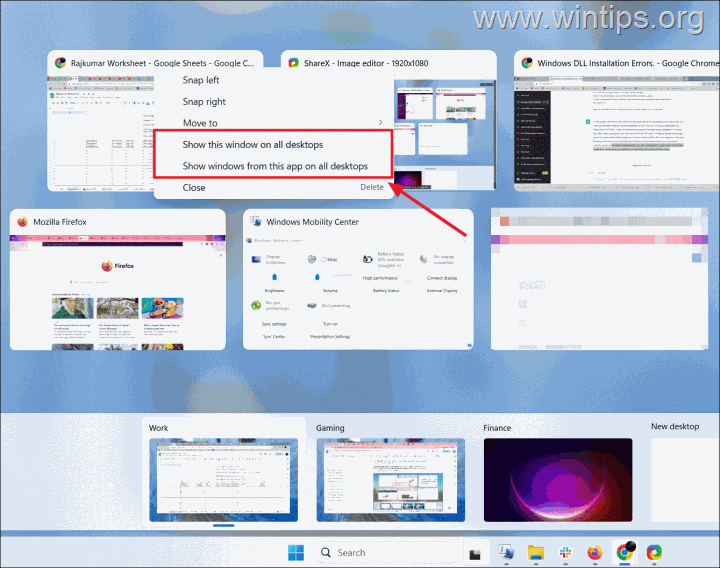
2. Now, right-click the app window you want to show on all desktops and…
a. Select Show this window on all desktops to show the selected window on all other desktops
or…
b. Show windows from this app on all desktops to display all open windows from a specific app on all other desktops.
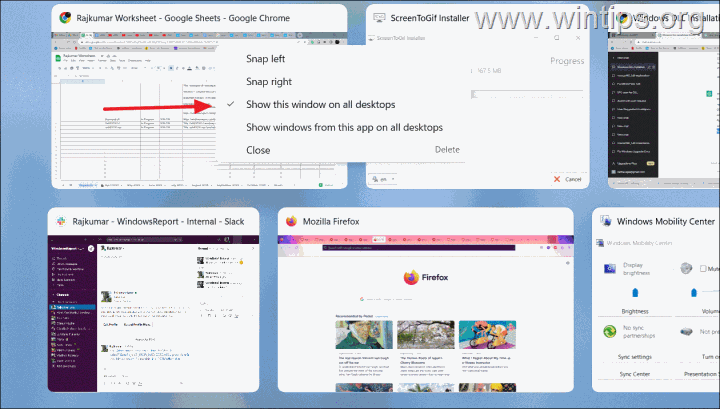
4. To stop a window from showing on all desktops:
a. Navigate to the desktop where you want only to show the open window (app).
b. Open Task View, right-click on the window, and uncheck the Show this window on all desktops or Show windows from this app on all desktops option.
5. Move Apps Between Desktops.
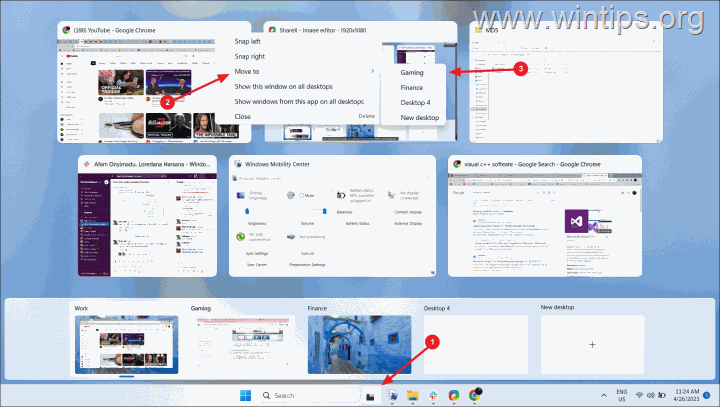
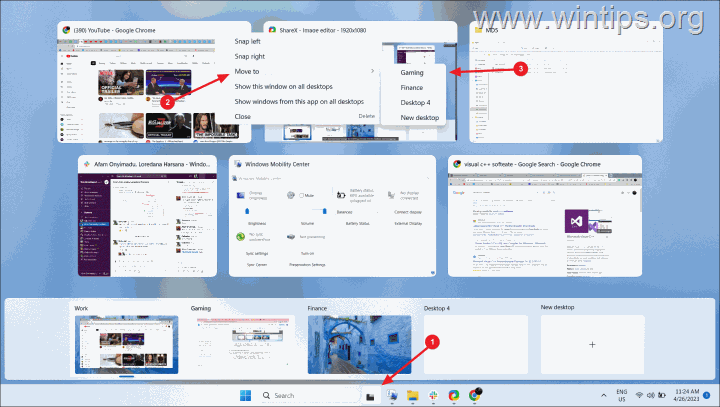
If you think an application would be better suited for a different virtual desktop, you can easily move it to another one without the need to close and reopen it, and without losing any of its data. To move an app in another virtual desktop:
1. Click the Task View button in the Taskbar or press Windows + TAB.
2. Right-click and select Move to, and then choose the desktop to which you want to move the app. *
* Alternatively, you can click and drag the app’s window to your desired desktop.
7. Show all open apps from all desktops in one.
By default, the taskbar on a virtual desktop displays only the windows and applications that are currently open on that desktop.
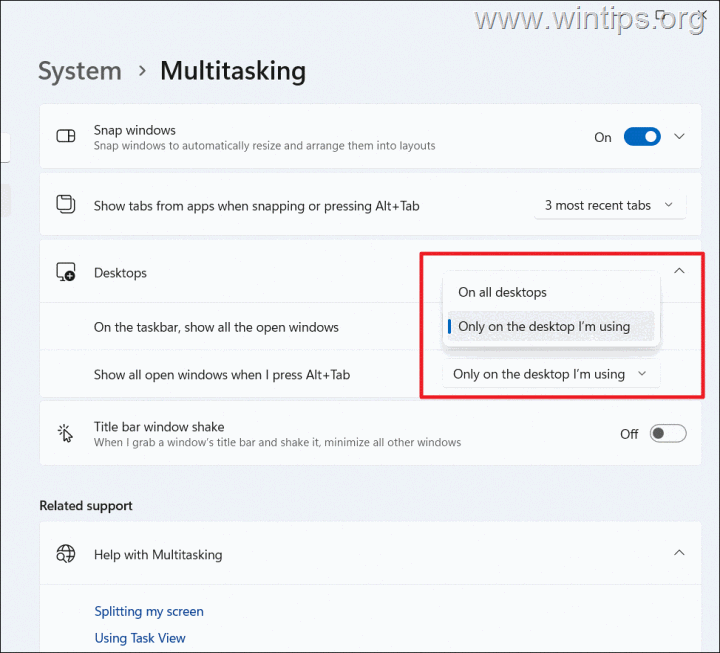
However, if you want to view all open applications on your taskbar or when you press the Alt + Tab keys, regardless of the desktop you’re currently using, you can enable this feature in the Windows Multitasking settings.
1. Go to Start menu > Settings > System > Multitasking > Desktops.
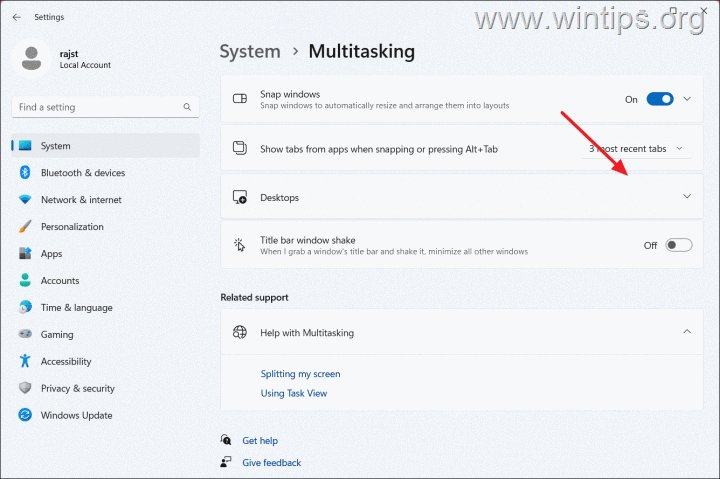
2. Use the drop-down menus next to the two options and choose On all desktops to show all the open windows across desktops.
6. Close a Virtual Desktop
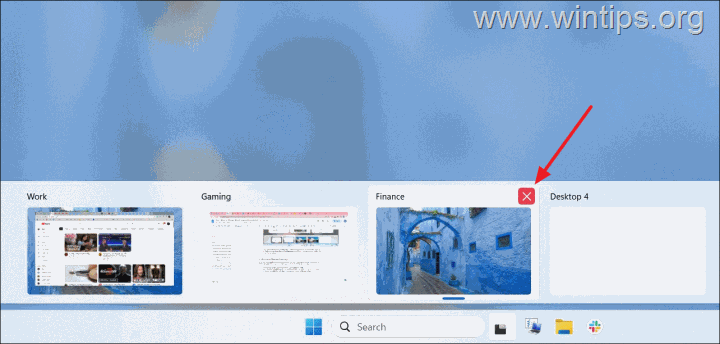
If you’re finished using a specific virtual desktop, you can close it with a single click.
1. Click or hover over the Task View button, and click the Close (X) button of the desktop you want to close.
* Note: If you close a virtual desktop, all the currently open windows and applications on that desktop will shift to the virtual desktop immediately preceding it in the row.
That’s it! Let me know if this guide has helped you by leaving your comment about your experience. Please like and share this guide to help others.


![clip_image022[6] clip_image022[6]](https://techprotips.com/wp-content/uploads/2023/08/localimages/clip_image0226_thumb.png.webp)


