,
As you work with VM’s, you may need to increase the size of a virtual disk to provide more space to your virtualized operating system. If you’re in a such case, follow this step-by-step guide on how to increase a virtual disk’s size in VirtualBox.
Increasing the disk size of a virtual machine (VM) in VirtualBox involves a few steps, including resizing the virtual hard disk and then expanding the partition within the VM’s operating system to utilize the additional space.
How to Expand the Size of a Virtual Disk in VirtualBox.
Before starting to expand the size of a virtual disk in VirtualBox, you should know the following:
- In order to be able to increase the size of a virtual disk in VirtualBox its Storage type must be DYNAMIC (Dynamically allocated storage).
- To increase the size of a FIXED disk on VirtualBox, you should first convert it to a DYNAMIC disk and then to increase its storage space.
Having that in mind, proceed first and find out the Storage type of the virtual disk you want to increase the storage space for. To do that:
1. Select (in VirtualBox Manager) the Virtual Machine that you want to increase it’s disk’s size and notice on the right, under the “Storage” section, the name of the VDI file. (e.g. “Windows7X86EN.vdi” in this example)


2. Then open the File menu and go to Tools > Virtual Media Manager.


3. Select the VDI file you noticed before and then click the Information tab below. Now look at the Storage details and depending on the type of storage (“Fixed size” or “Dynamically allocated”), follow the instructions in the corresponding part below.


Part 1. Increase Dynamically allocated storage size in VirtualBox.
Part 2. Increase Fixed storage Size in VirtualBox.
Part 3. Expand Virtual Machine’s Disk storage size in Windows.
Part 1. How to increase the size of a Dynamic disk in VirtualBox.
Method 1. Enlarge Virtual Machine’s Disk in Virtual Media Manager.
The first method to increase the storage space of a Dynamic virtual disk, is by using the Virtual Media Manager interface of VirtualBox.
1. From File menu go to Tools and open the Virtual Media Manager.


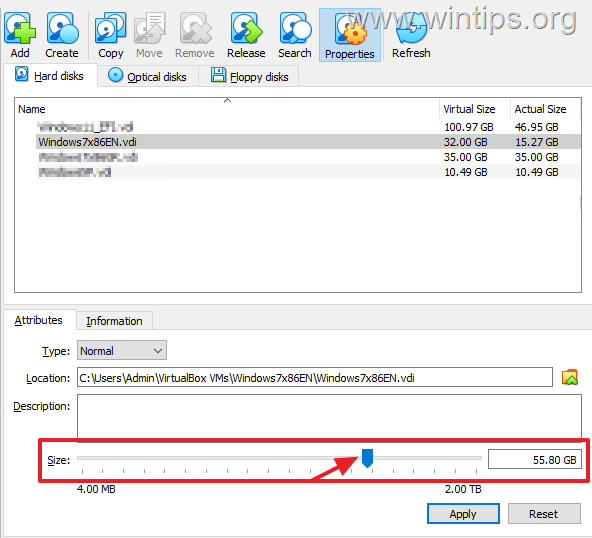
2. Now locate and select the dynamic virtual disk file (VDI file), that you want to increase it’s storage size.
3. Use the “Size” slider to adjust the storage size and then click Apply, to save the change.*
4. After increasing the virtual disk’s size, follow the instructions on part-3 below to allocate the extra space in Virtual Machine’s disk.


* Note: If you receive the error message “Resizing to new size is not yet supported”, read the instructions on Part-2, because this error appears when you try to increase the size on a Fixed disk, and VirtualBox does not allow to resize a Fixed Virtual Disk, using its GUI interface or via command prompt.


Method 2. Resize Dynamic Virtual Disk from Command Prompt.
The second method to increase the size of a Dynamic virtual disk, in VirtualBox is by using command prompt.
1. Shutdown the Virtual Machine whose virtual disk size you want to increase.
2. Open Command Prompt and give the following command, to navigate to the folder where VirtualBox is installed:*
- cd “C:Program FilesOracleVirtualBox”
* Note: This this the default install location of the VirtualBox application.
3. Then issue the following command to see a list of all virtual disks (VDI files):
- VBoxManage.exe list hdds


4. Now notice in the list the full file path of the virtual disk (.VDI file) that you want to increase its size. Then mark it and press CTRL + C to copy the path* and paste it in notepad.
* e.g. “C:UsersAdminVirtualBox VMsWindows7x86ENWindows7x86EN.vdi” in this example.


5. Now issue the following command, to increase the size of the virtual disk:*
-
VBoxManage modifyhd “File.vdi” –resize size-in-megabytes
* Notes: In the above command:
1. Replace “File.vdi“, with the full path of the virtual disk VDI file you want to increase its space.
2. Replace the size in megabytes with the new file size you want for the VDI file in Megabytes. (1GB=1024MB, 30GB=30720MB, 50GB=51200MB, 70GB=71680MB, 100GB=102400MB, etc.)
3. Use two dashes (–) before resize in the command above.
For example: If you want to increase the storage space of the VDI file “C:UsersAdminVirtualBox VMsWindows7x86ENWindows7x86EN.vdi” to 50GB, issue this command:
-
VBoxManage modifyhd “C:UsersAdminVirtualBox VMsWindows7x86ENWindows7x86EN.vdi” –resize 51200


6. Now, wait for the process to complete and when this done, follow the instructions on part-3 below to allocate the extra space in Virtual Machine’s disk.
Part 2. How to increase the size of a FIXED disk in VirtualBox.
If you have setup a virtual machine with a FIXED disk, the only way to increase the disk’s size is to first clone and convert – at the same time – the FIXED disk to DYNAMIC and after to increase the storage space on the new created DYNAMIC disk (VDI file), as instructed in Part-1 above.
Step 1. Detach the Virtual Disk from the Virtual Machine.
1. Shutdown the Virtual Machine whose virtual disk’s size you want to increase.
2. Go to machine’s Storage settings and click the Remove button to detach the virtual disk (VDI file) from the machine.


3. When done, click OK.


4. Then from File menu go to Tools and open the Virtual Media Manager.


5. Here, select the virtual machine’s disk (VDI file) and click Remove.


6. Important: When prompted to delete the storage unit of the virtual disk C:, select Keep. (otherwise you’ll delete the virtual disk!).


Step 2. Clone and Convert FIXED disk to DYNAMIC.
Now proceed to clone the FIXED virtual disk’s VDI file, to a new VDI file in DYNAMIC format:
1. Open Command Prompt and give the following command, to navigate to the folder where VirtualBox is installed:*
- cd “C:Program FilesOracleVirtualBox”
* Note: This is the default install location of the VirtualBox application.
2. Then issue the following command to see a list of all virtual disks (VDI files):
- VBoxManage.exe list hdds


3. Now notice in the list the full path of the .VDI file of the FIXED virtual disk you want to increase the size for. Then mark it and press CTRL + C to copy the path* and paste it in notepad.
* e.g. “C:UsersAdminVirtualBox VMsWindows7x86ENWindows7x86EN.vdi” in this example.


4. Now issue the following command, to clone and convert the FIXED virtual disk to DYNAMIC in a new VDI file:*
-
VBoxManage clonehd “source.vdi” “source-clone.vdi“
* Notes: In the above command:
1. Replace “source.vdi“, with the full file path of the VDI file you want to increase its space. (e.g. “C:UsersAdminVirtualBox VMsWindows7x86ENWindows7x86EN.vdi” in this example.
2. Replace “source-clone.vdi“, with the new filename of the cloned ‘source’ VDI file. (e.g. “C:UsersAdminVirtualBox VMsWindows7x86ENWindows7x86EN-clone.vdi” in this example.
e.g. To clone the FIXED virtual disk “Windows7x86EN.vdi” to a new DYNAMIC virtual disk file named “Windows7x86EN-clone.vdi”, the command will be:
-
VBoxManage clonehd “C:UsersAdminVirtualBox VMsWindows7x86ENWindows7x86EN.vdi” “C:UsersAdminVirtualBox VMsWindows7x86ENWindows7x86EN-clone.vdi”


5. Now wait until the cloning is complete, and when the new VDI file is created close the Command Prompt window and proceed to the next step.


Step 3. Rename VDI files (Optional Step).
After the cloning, you should have a new DYNAMIC virtual disk (VDI file) which is the exact copy/clone of the FIXED virtual disk. At this point, you can either go straight to step-4 below to attach the DYNAMIC virtual disk VDI file to your VM, or rename the 2 VDI files to make your life easier.
1. Open Windows Explorer and navigate to the folder on disk where the “source” and the “clone” VDI files are stored.*
* e.g. at “C:UsersAdminVirtualBox VMsWindows7x86EN” in this example.
2. Rename the original (FIXED) virtual disk’s VDI file (source.vdi) with a different name.*
* e.g. from “Windows7x86EN.vdi” to “Windows7x86EN.OLD.vdi” in this example.


3. Then rename the new cloned VDI file (DYNAMIC virtual disk), with the original name of the source VDI file.*
* e.g. from “Windows7x86EN-clone.vdi” to “Windows7x86EN.vdi” in this example


4. When done, proceed to next step and attach the DYNAMIC VDI file, on your Virtual Machine.
Step 4. Attach the (New) DYNAMIC VDI file to Virtual Machine.
1. Open the VirtualBox Manager.
2a. Go to File > Tools > Virtual Media Manager.
2b. Here, select and remove (one-by-one) any inaccessible virtual disk (.vdi file) that marked with an exclamation mark.


3. When done, select the virtual machine of which you wanted to increase the virtual disk size, and click on Settings.


4a. Select Storage on the left and then at right, click the 2nd plus (+) symbol next to “Controller:IDE” (or ‘SATA’), to Add Hard Disk. *


4b. In Media Selector window, click the Add button.


4c. Select the new DYNAMIC .VDI file you created and click Open.


4e. Then select again the VDI file from the “Not Attached” list and click Choose.


5. When done, click OK.


6. Now, start the Virtual Machine to ensure that is working smoothly.
7. If everything is OK, shut down the Virtual Machine and continue to next step.
Step 5. Increase Virtual Disk Size.
Now, follow the instructions of one of the methods of Part-1 above, to increase the size of the virtual disk. When done, proceed to part-3 below.
Part 3. Extend Virtual Machine’s Disk in Windows.
After increasing the size of the Virtual Disk, start the Virtual Machine and allocate the extra space on the Windows disk.
1. Start the virtual Machine and navigate to Disk Management. To do that:
1. Press the Win
+ R keys to open the run command box.
2. Type diskmgmt.msc and press Enter.


2. In disk management, you’ll see the extra space you given on the virtual disk as an Unallocated space.


3. To add the unallocated space on your main disk, right-click on the hard disk C: and select Extend Volume.


4. In Extend Volume Wizard click Next and Next again to add the available space on the disk C:, and you’re done!


That’s it! Let me know if this guide has helped you by leaving your comment about your experience. Please like and share this guide to help others.
