,
A static IP address is a dedicated, permanent IP address that is manually assigned to a device by a user. Unlike dynamic IP addresses, which are assigned by a DHCP Server and can change over time, static IP addresses remain fixed and do not change over time.
A static IP address can be useful in many situations, such as when hosting a website or server, setting up a virtual private network (VPN) server, forwarding ports to a specific device, accessing a networked printer, and more.
Whatever your reason may be, assigning a static IP address is a simple and straightforward task that can be done directly on the device. In this article, we will cover various methods for setting up a static IP address on Windows 11/10.
How to Assign a Static IP Address on a Windows 11 PC.
- Set Static IP on Windows 11 Settings.
- Set Up Static IP Address in Network Connections.
- Assign a Static IP Address through Command Prompt.
- Specify a Static IP Address with PowerShell.
Method 1: Manually Set a Static IP Address using Windows Settings
The most straightforward method for setting a static IP address is through Windows Settings.
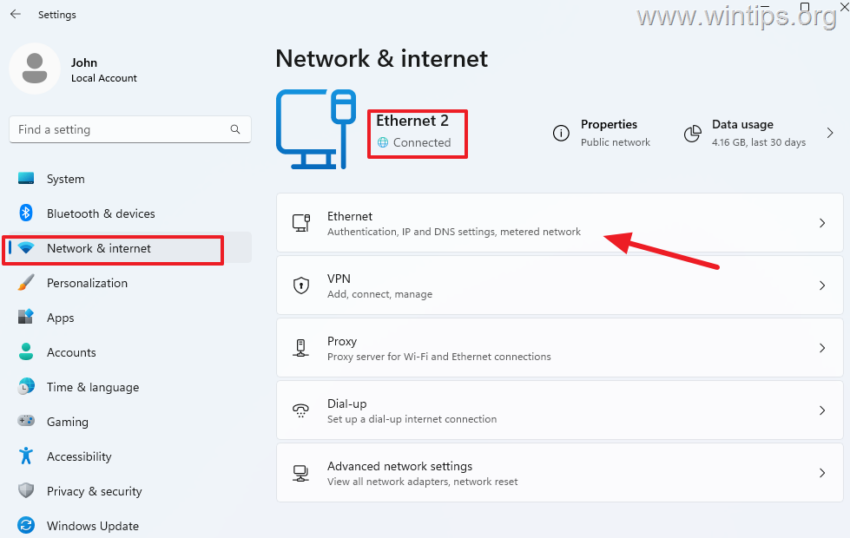
1. Press Windows + I keys to open the Windows Settings app
2. Select the Network & internet tab in the left pane and then click on the active/connected network connection (Ethernet or WiFi) on the right pane.
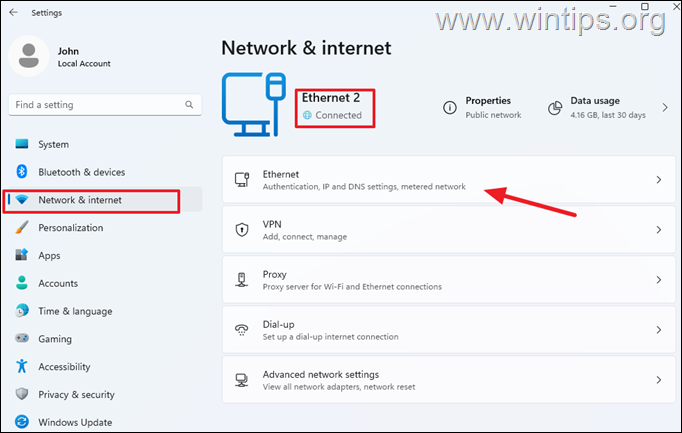
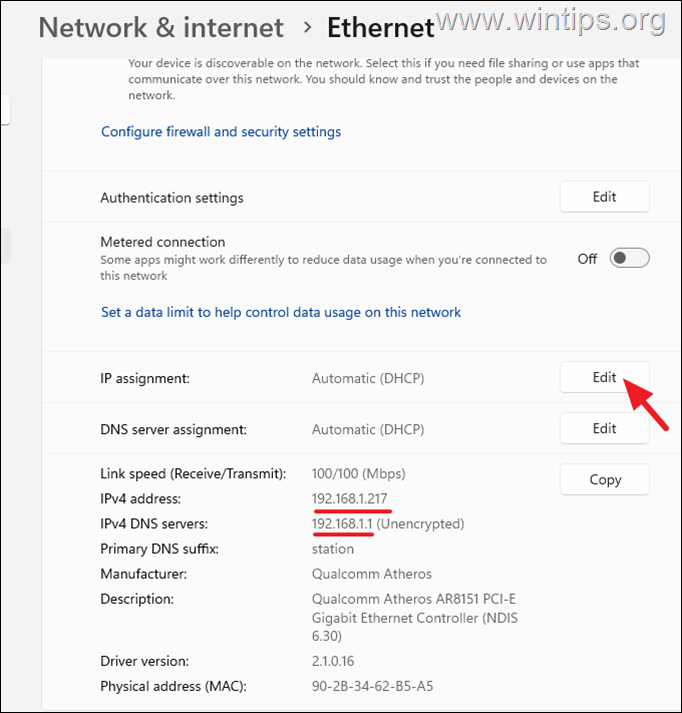
3. On the network configuration page:
a. Note the current IPv4 address and the IPv4 DNS server address which automatically assigned by DHCP (usually your router).
b. Click the the Edit button next to the IP assignment section to set a Static IP Address.
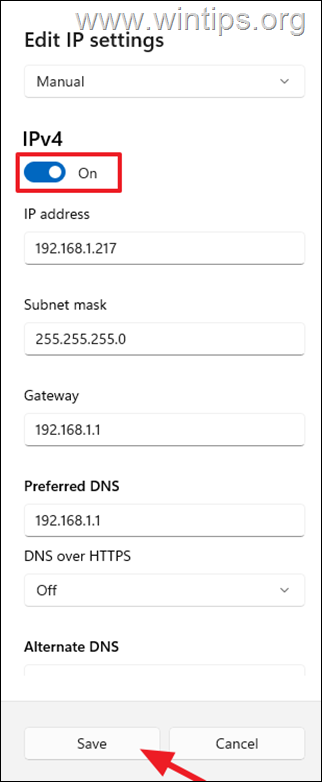
4. In Edit IP settings, change the setting from Automatic (DHCP) to Manual using the drop-down menu.

5. Then, Turn On the IPv4 toggle and fill out the fields below as follows:
- IP address: Enter the static IP Address that you want to use. *
* Note: if you want to set the assigned DHCP IPv4 address you noted before as static, type this address here. (e.g. “192.168.1.217” in this example)
- Subnet mask: Type 255.255.255.0
- Gateway: Enter the IP address of your router. [Usually, this is the same as the IPv4 DNS server address you noted before. (e.g. “192.168.1.1” in this example)]
- Preferred DNS: Type the IPv4 DNS server address you noted before. (e.g. “192.168.1.1” in this example).
6. When finish, click Save and you done. You have successfully changed the IP address from dynamic to static. *
* Note: If, after following the instructions above, you lose your network connectivity, make sure you have set the correct IP address, Subnet Mask, Gateway and DNS, or change to Automatic (DHCP) again.
Method 2: Assign a Static IP Address in Network Connections settings.
The classic and my favorite method to change the IP Address in Windows, is through the Network Connections applet.
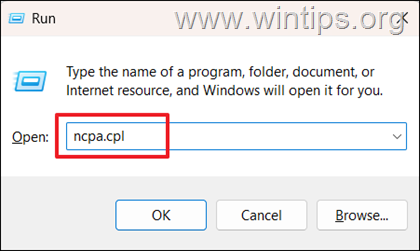
![]() + R keys to load the Run dialog box.
+ R keys to load the Run dialog box.
2. Type ncpa.cpl and press Enter, to view the Network Connections.
3a. In Network Connections window, double-click on the active Network Connection/Adapter and click Details.

3b. In Network Connection Details window, notice and write down the following information:
- IPv4 Address (e.g. “192.168.1.101”)
- IPv4 Subnet Mask (e.g. “255.255.255.0”)
- IPv4 Default Gateway (e.g. “192.168.1.1”)
- IPv4 DNS Server (e.g. “192.168.1.1”)
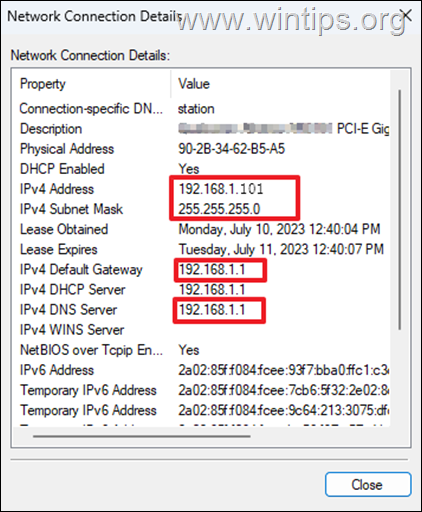
3c. When done, click the Close button.
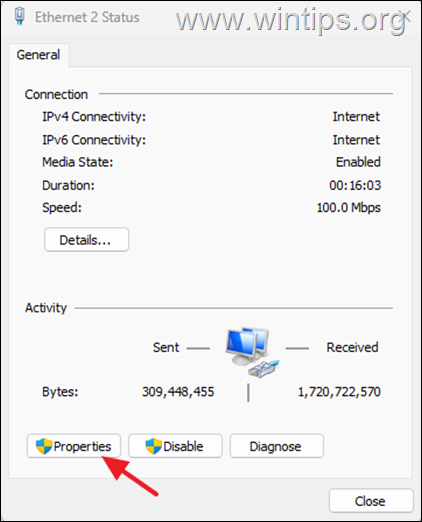
4. Now, in Network Status window, click Properties.
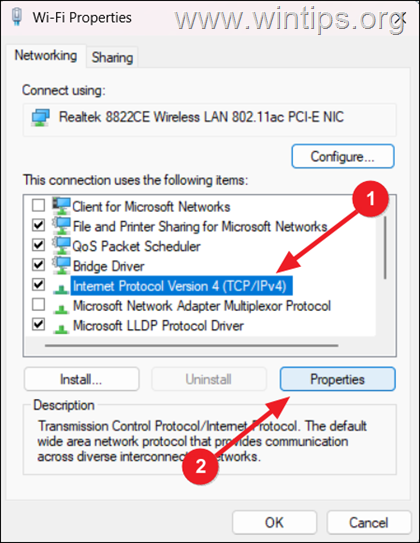
5. Select Internet Protocol Version 4 (TCP/IPv4) and click Properties again.
6. In ‘Internet Protocol Version 4 (TCP/IPv4) Properties’ window, do the following:
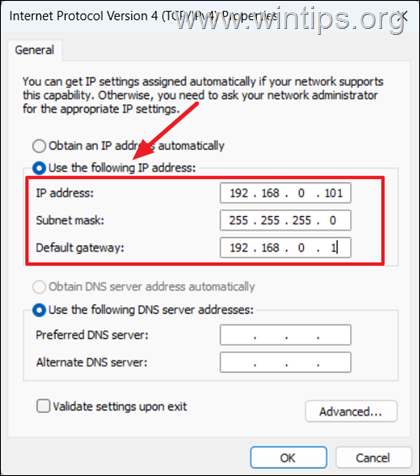
a. Check the Use the following IP address option and fill the below fields as follows:
b. At IPv4 Address field, type the static IP Address that you want to use, or if you want to set the assigned DHCP IPv4 address you noted before as static, type this address. (e.g. “192.168.1.101” in this example)
c. Then press the Tab button once to fill automatically the Subnet mask field, or type manually the Subnet mask “numbers” you noted in the step-3b above (e.g. 255.255.255.0″).
d. At Default gateway field, type the IP Address of the “IPv4 Default Gateway” you noted before (This is the IP Address of your router. e.g. “192.168.1.1” in this example)
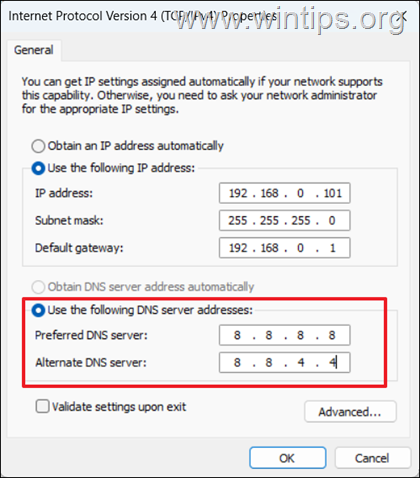
e. Next, check the Use the following DNS addresses option and type below the IPv4 DNS Server address you noted before (e.g. “192.168.1.1” in this example), or type your preferred DNS server’s address, such as the Google’s public DNS Server’s addresses “8.8.8.8” for Preferred DNS and “8.8.4.4” for Alternate DNS, as in this example.
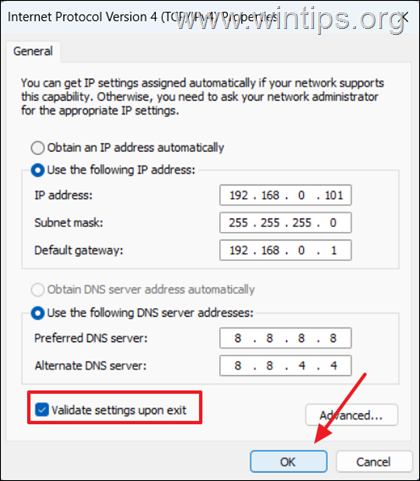
7. Now, check the Validate settings upon exit option and click OK to save the changes.
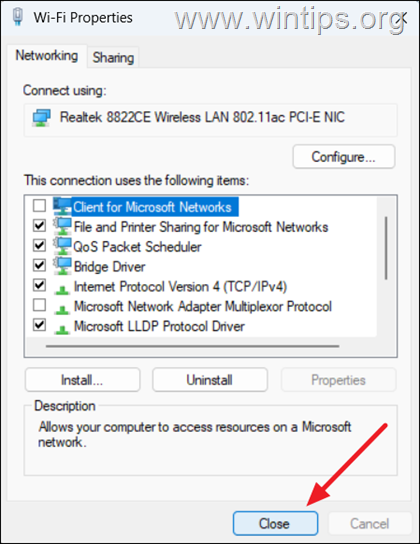
8. Finally, click Close to close the adapter’s properties window and you done! *
* Note: If, after following the instructions above, you lose your network connectivity, make sure you have set the correct IP address, Subnet Mask, Gateway and DNS, or change back to the Dynamic IP assignment, by checking both the “Obtain an IP address automatically” & “Obtain DNS Server addresses automatically” options in the above screen.
Method 3: Set Up a Static IP Address using Command Prompt
If you like commands, then here are the instructions to change your Dynamic IP address to Static, via command line.
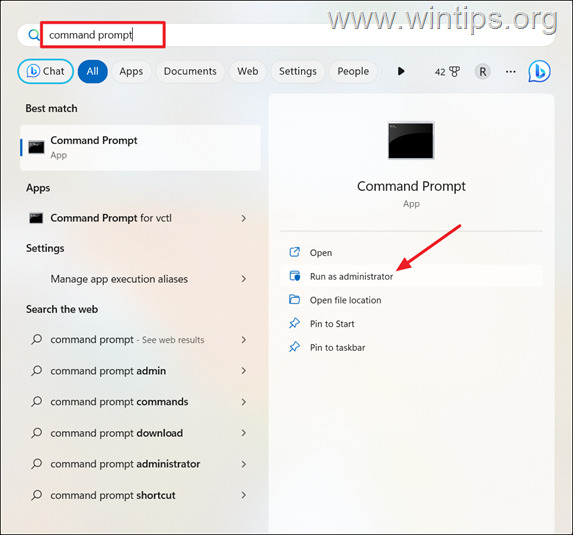
1. Open Windows Search, type command prompt, and select Run as administrator. Then, click Yes on the UAC prompt to proceed.
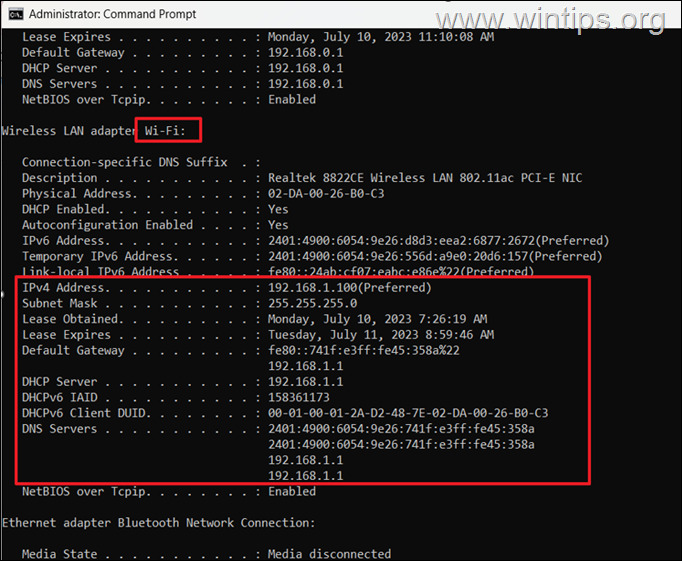
2. Proceed and view your current IP Address configuration by giving the below command and pressing Enter:
- ipconfig/all

3. After command execution, scroll up and and note the name of the network adapter that you are currently using (e.g. “Wi-Fi” in this example), and then note the following details below it:
- IPv4 Address (e.g. “192.168.1.100”)
- Subnet Mask (e.g. “255.255.255.0”)
- Default Gateway (e.g. “192.168.1.1”)
- DNS Server (e.g. “192.168.1.1”)
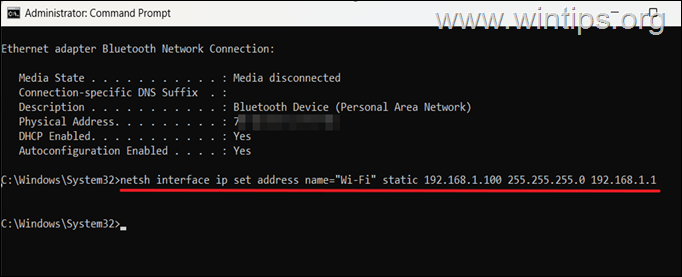
2a. To change the Dynamic IP address configuration you already have to a static IP address configuration, enter the following command:*
- netsh interface ip set address name=”Adapter’s_Name” static IPAddress SubnetMask DefaultGateway
* Note: In the above command:*
-
Replace Adapter’s_Name with the name of the active network adapter, (e.g. “Wi-Fi” in this example)
-
Replace the IPAddress with the IPv4 Address you noted above (e.g. “192.168.1.100” in this example), or type the Static IP Address that you want to use.
-
Replace the SubnetMask with the “Subnet mask” address you noted above (e.g. “192.168.1.1” in this example).
* In this example, the command will be:
- netsh interface ip set address name=”Wi-Fi” static 192.168.1.100 255.255.255.0 192.168.1.1
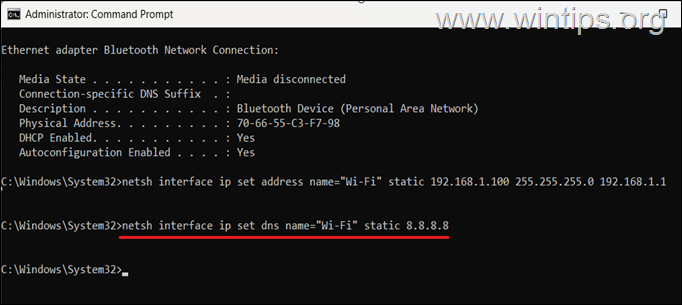
2b. To assign a DNS server address, type or paste the following command and press Enter:*
- netsh interface ip set dns name=”Adapter’s_Name” static DnsServer
* Note: In the above command:*
-
Replace Adapter’s_Name with the name of the active network adapter, (e.g. “Wi-Fi” in this example)
-
Replace the DnsServer with the DNS Server’s IP Address of the DNS you noted above (e.g. “192.168.1.1” in this example), or the type the IP address of the DNS Server that you want to use. **
** e.g. In this example will want to use Google’s Public DNS server (8.8.8.8). So , the command will be:
- netsh interface ip set dns name=”Wi-Fi” static 8.8.8.8
2c. If you want to assign an alternate DNS server address, (e.g. “8.8.4.4”), give the following command and press Enter: *
- netsh interface ip add dns name=”Wi-Fi” 8.8.4.4 index=2
* Note: Replace Wi-Fi with your adapter’s name and change 8.8.4.4 with your desired alternative DNS server address.
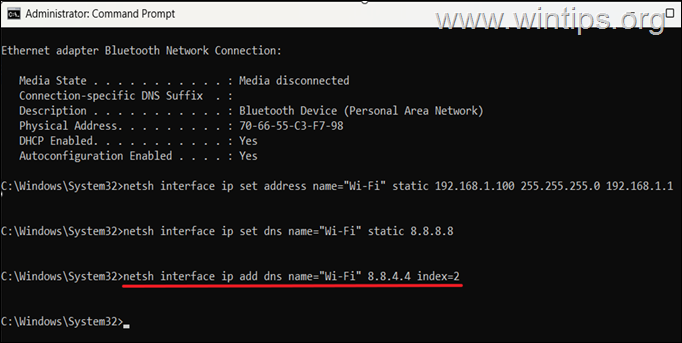
3. When finish, close the command prompt window and you’re done!
Method 4: Set a Static IP Address using PowerShell.
Another way to change to a Static IP address on your device, is via PowerShell.
1. Press the Windows key, type powershell in the search bar, and click Run as Administrator to open Windows PowerShell as administrator.
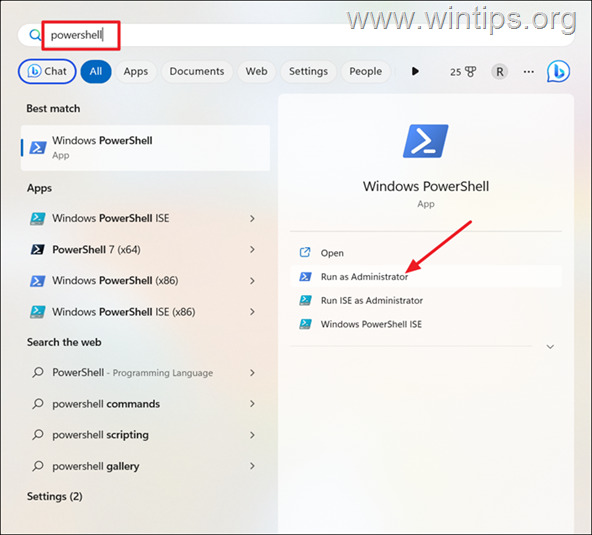
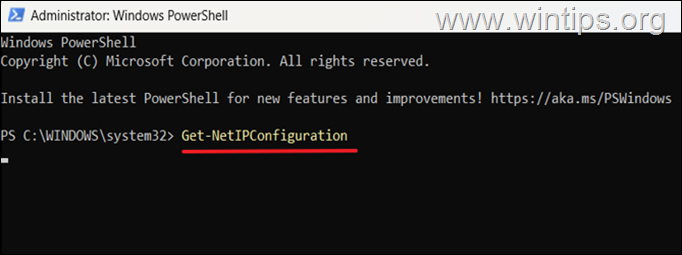
2. Now give the following PowerShell command and hit Enter to view the current Network IP configuration:
- Get-NetIPConfiguration
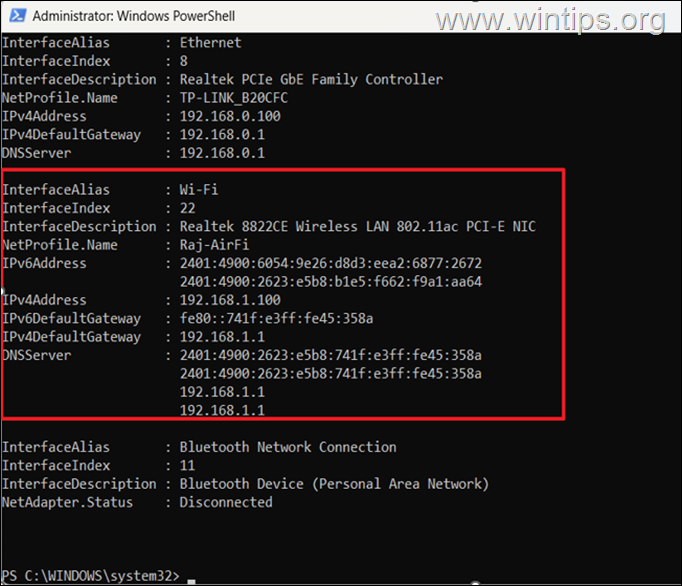
3. Now note the InterfaceIndex of the active network adapter (e.g. “22” in this example), and the following details below it:
- IPv4Address (e.g. “192.168.1.100”)
- IPv4Default Gateway (e.g. “192.168.1.1”)
- DNS Server (e.g. “192.168.1.1”)
4. Run the following command to set up a static IP address: *
- New-NetIPAddress -InterfaceIndex Number -IPAddress New-IPv4Address -PrefixLength 24 -DefaultGateway IPv4DefaultGateway
* Notes
1. In the above command:
-
Replace Number with the Interface’s Index number you noted above (e.g. “22” in this example)
-
Replace New-IPv4Address with the static IP Address you want to use. (e.g. “192.168.1.150” in this example), or type the IPv4Address you noted before.
-
Replace IPv4DefaultGateway with the IP Address you noted above (e.g. “192.168.1.1” in this example.
e.g. To set the IPv4 Address to “192.168.1.150”, type:
New-NetIPAddress -InterfaceIndex 22 -IPAddress 192.168.1.150 -PrefixLength 24 -DefaultGateway 192.168.1.1
2. The number “24” is usually the default prefix (Subnet Mask) for home networks.

5. To add a primary DNS server to your network adapter, run the below command:*
- Set-DnsClientServerAddress -InterfaceIndex Number -ServerAddresses DnsServer
Note: In the above command:
-
Replace Number with the Interface’s Index number you noted above (e.g. “22” in this example)
-
Replace DnsServer with the IP of the DNS Server you noted above (e.g. “192.168.1.1” in this example), or type the IP Address of your referred DNS Server.
Example No1: To use the current DNS server’s IP address in this example:
- Set-DnsClientServerAddress -InterfaceIndex 22 -ServerAddresses 192.168.1.1
Example No2: To set another DNS Server with IP address “208.67.222.222” type:
- Set-DnsClientServerAddress -InterfaceIndex 22 -ServerAddresses 208.67.222.222
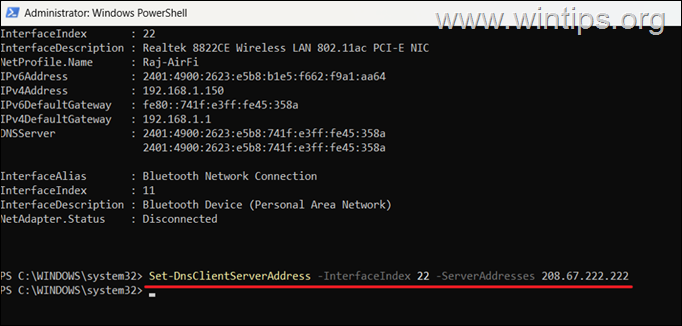
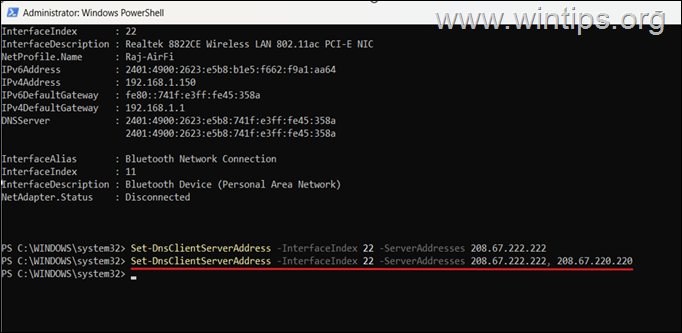
Example No3: To specify both a Preferred and an Alternate DNS Server with IP’s 208.67.222.222 & 208.67.220.220 respectively, give the following command:
- Set-DnsClientServerAddress -InterfaceIndex 22 -ServerAddresses 208.67.222.222, 208.67.220.220
That’s it! Which method worked for you?
Let me know if this guide has helped you by leaving your comment about your experience. Please like and share this guide to help others.
